Introduction
Azure Bastion as poor engineers’ VPN 🙂
Azure Bastion service helps to reach our private Virtual Machines. It was designed to act as a jump point into our fully private Azure environment where we don’t expose our services to the internet but with its preview feature we can tweak it connect to private Azure services directly from our PC.
I can use Bastion to open tunnels via a jumpserver so I can use my own computer to:
- Use Visual Code’s Remote explorer to connect private VMs
- Run kubectl, helm commands on my local PC and manage private AKS clusters
- Reach private databases
- Open closed WebApps and Webpages in my own browser
…without any VPN or breaking the company’s firewall policies.
Note that, this is not a VPN replacement alternative but rather an alternative usage of Bastion.
TL/DR
This is a bit complex but I prepared an easy to use powershell script. Just download the script and the config. Add your parameters and run it.
https://github.com/szasza576/azure-bastion-advanced
If you are interested in the details then keep reading and a have a deep dive together in the networking.
Azure Bastion
Enterprise companies loves to use private networks and endpoints with a good security reason. This raises the question how the developer and the operator engineers can reach these resources. Azure Bastion can open an RDP or SSH session even in our browser which makes it very easy to connect to these resources. This is its basic functionality which is well documented but it has nice preview feature which is the tunneling or how Azure calls it: “native client connections“. And here starts the story be interesting.
With this tunneling functionality, we can open new TCP tunnels from our machine into the Azure environment and the best is that this is over HTTPS so it will bypass the usual corporate firewalls as outgoing traffic. With some tweaks we get a VPN-like environment with this feature so we can use our own PC to connect Azure internal services.
Concept
The design is very similar to the official Azure documentation as depicted on the following picture.
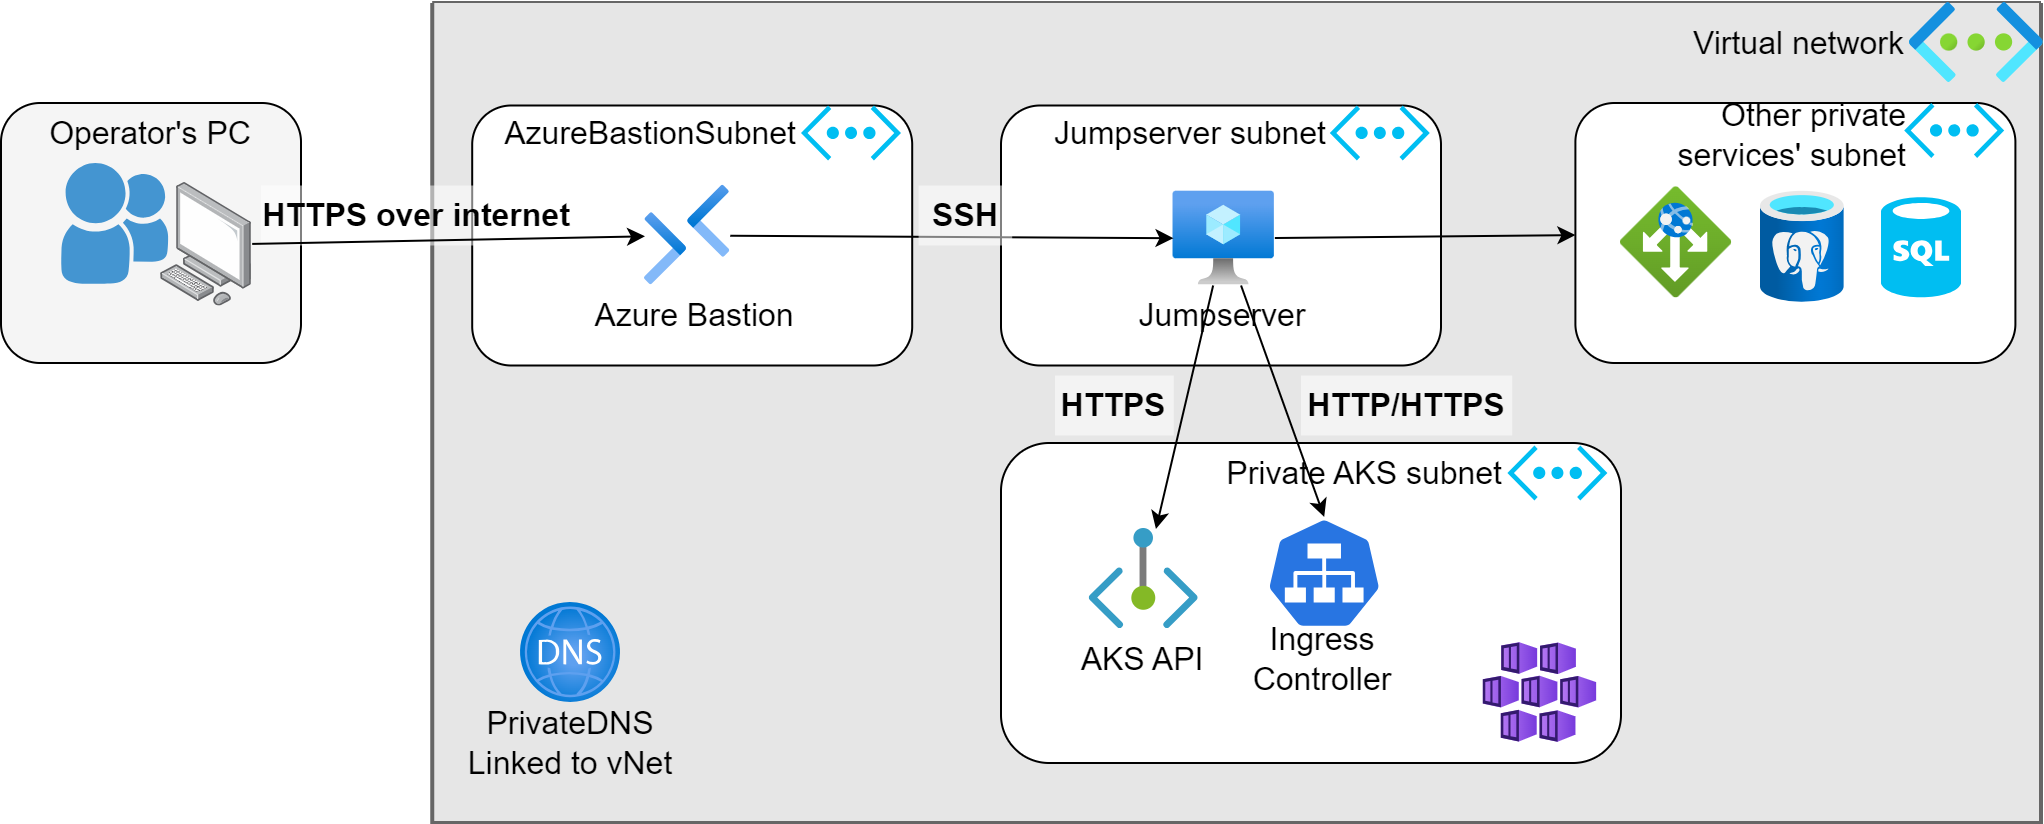
Azure Bastion is exposed to the internet and it acts as a gateway to the Jumpserver. Jumpserver is simple Linux based VM with the smallest and cheapest possible size (e.g.: Standard_B1s). The other services are all private and the Jumpserver can reach them internally.
For the further examples there is a Private AKS with an internally exposed Ingress Controller. The following examples will show how to reach these.
Building up the setup is not detailed here but be sure to:
- Install the VM with an SSH key and save the private key to your PC
- The Jumpserver shall reach the internal services so ensure that no NSG blocks the traffic
- Bastion shall have “Standard” tier and the “Native client support” feature shall be activated as the documentation says.
Bastion’s internal life
There is a catch. Bastion can build up a tunnel to our Jumpserver but this tunnel can handle on 1 single TCP session. So if we would like to reach a backend which would build up multiple sessions (like VS Code’s remote explorer) then it won’t work. We need to create a local aggregator tunnel. So it will be a tunnel in tunnel. Let’s see on the next picture.
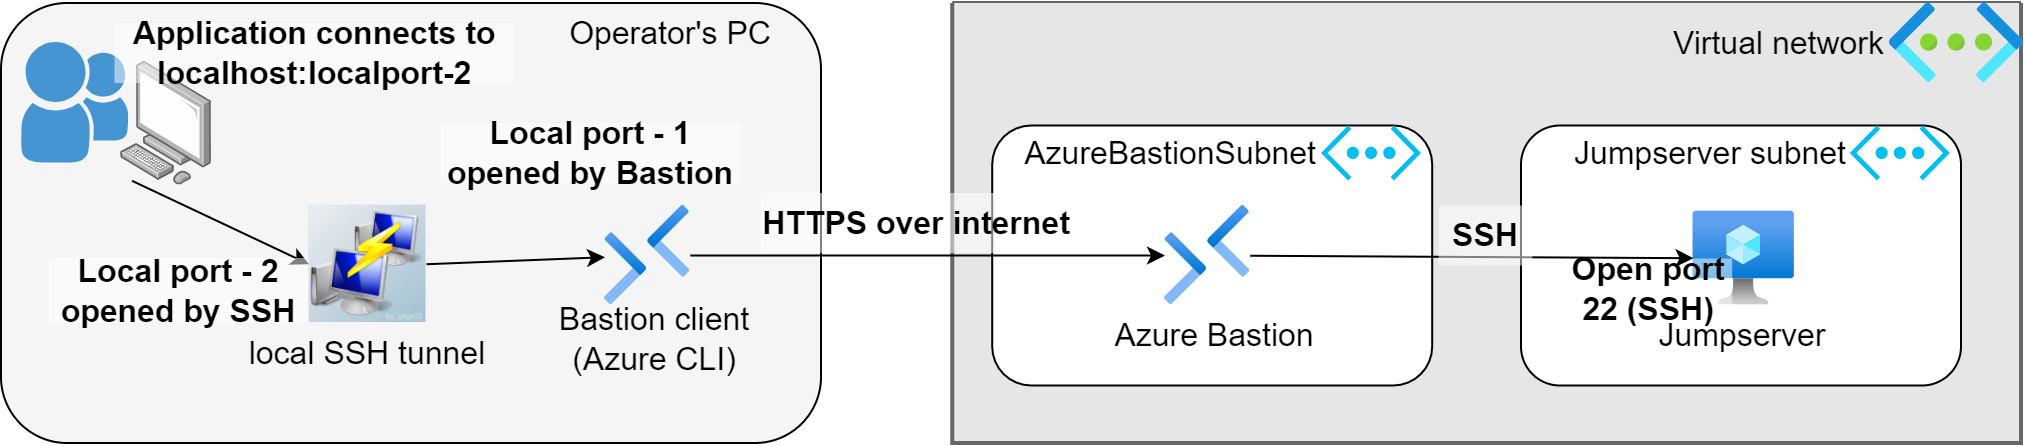
First the Bastion client (Azure CLI) opens a tunnel on the local machine to the remote VM. This means all traffic what we send to the LocalPort-1 will arrive transparently to the VM’s port (which is the SSH port in this case). We can achieve this by this Azure CLI command:
az network bastion tunnel `
  --target-resource-id <JumpServer-VMs-ResourceID> `
  --ids <Bastions-ResourceID> `
  --port <LocalPort-1> `
  --resource-port <RemotePort>
Once we established this tunnel then we can open an SSH session to the localhost on the LocalPort-1 port and with the private SSH key we can authenticate to the VM. BTW, the az network bastion ssh command can open an SSH tunnel without the other hassle if we just want an SSH session.
ssh -L `
  <LocalPort-2>:<RemoteAddress>:<RemotePort> `
  -p <LocalPort-1>`
  -N `
  -o TCPKeepAlive=false `
  -o ServerAliveInterval=10 `
  -o ServerAliveCountMax=525600 `
  <Your-Username>@127.0.0.1 `
  -i '<Path-to-your-Private-SSH-key>'
This is a bit more complex but it opens an SSH tunnel on LocalPort-2 and forwards everything to the RemoteAddress:RemotePort via our JumpServer. The LocalPort-1 is the same as we used with the Bastion tunnel (which shall be up now). This means if we send traffic to the localhost:<LocalPort-2> then it will be forwarded to RemoteAddress:RemotePort but let’s take 2 examples.
Let’s see two examples with exact values.
SSH tunnel to the Jumpserver
The LocalPort-1 can be 10022 for example and the RemotePort shall be 22 as we have a Linux server on the other side which listens on that port.
az network bastion tunnel `
  --target-resource-id /subscriptions/xxxxxxxx-xxxx-xxxx-xxxx-xxxxxxxxxxxx/resourceGroups/BastionTest/providers/Microsoft.Compute/virtualMachines/myjumpserver `
  --ids /subscriptions/xxxxxxxx-xxxx-xxxx-xxxx-xxxxxxxxxxxx/resourceGroups/BastionTest/providers/Microsoft.Network/bastionHosts/mybastion `
  --port 10022 `
  --resource-port 22
The next step is to create a local tunnel which can aggregate sessions. Luckily the simple ssh.exe (or the ssh binary) can do this for us with the following parameters:
ssh -L `
  20022:127.0.0.1:22 `
  -p 10022 `
  -N `
  -o TCPKeepAlive=false `
  -o ServerAliveInterval=10 `
  -o ServerAliveCountMax=525600 `
  [email protected] `
  -i 'c:\keys\myrsakey'
Now we can open as many sessions to the localhost:20022 as many as we wish and all will be aggregated and sent to our Jumpserver. Now the Visual Studio Code’s Remote explorer can be configured to connect to the localhost:20022 and it will setup the environment to our Jumpserver.
Note 1, the <RemoteAddress> is resolved on the Jumpserver hence the “127.0.0.1” in the second line refer to the Jumpserver. While the other “127.0.0.1” in the bottom line refers to our local machine. I know it is complicated but this is how the SSH tunnel works, sorry 🙂
Note 2, as the <RemoteAddress> is resolved on the Jumpserver we can add here Azure Private IP address or FQDNs as well. Even we can use Private FQDN because the Jumpserver will resolve this. So we can add another VM’s IP or the AKS’ API IP and this is what we will use for AKS in the next example.
VS Code remote explorer
Visual Code’s Remote Development feature makes it very easy to use our own computer to edit files but all is executed on the remote host and we don’t need a remote desktop for that.
Follow the documentation to configure the feature and you can use this example to add the Jumpserver to the hosts.
Host JumpServer
  HostName 127.0.0.1
  Port 20022
  User gabor
  IdentityFile c:\keys\myrsakey
  ServerAliveInterval 3
Tunnel to AKS
In the other example we can tunnel to AKS but 1 Bastion tunnel can be used with 1 SSH aggregator. If you wish to build up multiple tunnels (1 for SSH to your JumpServer and 1 for your AKS) then you need to setup multiple Bastion + SSH aggregator pairs.
First we setup a new Bastion tunnel to the 10443 localport (this is just a random number, it doesn’t matter).
az network bastion tunnel `
  --target-resource-id /subscriptions/xxxxxxxx-xxxx-xxxx-xxxx-xxxxxxxxxxxx/resourceGroups/BastionTest/providers/Microsoft.Compute/virtualMachines/myjumpserver `
  --ids /subscriptions/xxxxxxxx-xxxx-xxxx-xxxx-xxxxxxxxxxxx/resourceGroups/BastionTest/providers/Microsoft.Network/bastionHosts/mybastion `
  --port 10443 `
  --resource-port 22
Simple add the AKS’s URL as <RemoteAddress> and set the <RemotePort> to 443 where the API server listens.
ssh -L `
  20443:myaks.privatelink.westeurope.azmk8s.io:443 `
  -p 10443 `
  -N `
  -o TCPKeepAlive=false `
  -o ServerAliveInterval=10 `
  -o ServerAliveCountMax=525600 `
  [email protected] `
  -i 'c:\keys\myrsakey'
Now get the AKS credentials with the az aks get-credentials command. And open the kubeconfig file with an editor what you find in <home_director>/.kube/config
You shall see something similar (of course with your AKS FQDN, not mine):
apiVersion: v1
clusters:
- cluster:
    certificate-authority-data: <A_VERY_LONG_STRING_HERE>
    server: https://myaks.privatelink.westeurope.azmk8s.io:443
If you would execute a kubectl command then it would try to connect to that server address which is of course not resolvable locally so it won’t work hence you need to change it like this:
apiVersion: v1
clusters:
- cluster:
    certificate-authority-data: <A_VERY_LONG_STRING_HERE>
    server: https://127.0.0.1:20443
    tls-server-name: myaks.privatelink.westeurope.azmk8s.io
Create a new line and add the “tls-server-name” field and move your AKS’ FQDN there as value. Change the “server” field to your localhost and localhost-2 port. Save the file.
And now you can run kubectl commands locally on your machine. Also fancy tools like k8slens work as well. You can also use the kubectl port-forward command seamlessly to open additional tunnels on your local machine to the Kubernetes services.
Tunnels to internal websites
As our jumpserver can reach the internal network so we can use it to proxy us to the internal websites. We can also open a tunnel by adding the URL as the Remote address and port 80 or 443 as Remote port.
ssh -L `
  443:website.internal.com:443 `
  -p 1443 `
  -N `
  -o TCPKeepAlive=false `
  -o ServerAliveInterval=10 `
  -o ServerAliveCountMax=525600 `
  gabor@127.0.0.1 `
  -i 'c:\keys\myrsakey'
Then open the https://127.0.0.1 in your browser and there it is.
If you reach and endpoint which checks the HTTP host header (like an ingress controller) or checks the certificate then you need to edit your own hosts file in “C:\Windows\System32\drivers\etc\hosts” and add a new line to the end:
127.0.0.1 website.internal.com…and then open it in your browser like: https://website.internal.com
Unfortunately, editing the hosts file requires admin rights so this might not work for you if the company restricts your privileges.
Easy setup powershell script
This is complex and requires several terminal running parallel (as each tunnel requires 2 console) and the parametrization is also hard. Also in case of network break you need to reconnect.
I prepared a simple Powershell script and a config file which offloads you. You can download them from here: https://github.com/szasza576/azure-bastion-advanced
First you need to install the ThreadJob Powershell module:
Install-Module -Name ThreadJobAlso you need to install the Azure CLI. Follow the official installation guide.
Then save the Bastion_config.json and Bastion_tunnels.ps1 files to your computer.
Open the Bastion_config.json file and add your parameters. This file is just an example and you need to specify with your environment.
The parameters documentation as follows:
{
    "Subscription": "<Your subscription's ID>",

    "BastionResourceID": "<The Bastion server's ResourceID>",
    "JumpServerResourceID": "<The JumpServer's ResourceID>",
    "JumpServerUser": "<The username on the Jumpserver>",
    "JumpServerKeyPath": "<Path to the SSH private key. Use \\ to in the path like c:\\folder\\key >",
    "Tunnels": [
        {
            "Description": "<Short description>",
            "Enabled": <true or false>,
            "RemoteHost": "<IP or FQDN of the remote server>",
            "RemotePort": <Port number on the remote server>,
            "LocalAggregatorPort": <A random number on your local machine>,
            "LocalPort": <A random number on your local machine. You will use this port number to connect to your service.>
        }
    ]
}
Note that all the LocalAggregatorPorts and LocalPorts shall be unique and even cannot overlap other services running on your machine.
Once the configuration is ready then login to azure with Azure CLI and start the script.
az login

powershell -executionpolicy bypass .\Bastion_tunnels.ps1
You can also create a shorcut icon to your desktop or start menu.
The script creates dedicated threads for each tunnel and all information will be written into the same console (it will be crowded). If there is a network break then it will automatically retry to recover the tunnels. All the logs and outputs will be in the console.
At the start there will be several Warnings with red letters which is fine. You will see something like this:
>  powershell -executionpolicy bypass .\Bastion_tunnels.ps1
Switching subscription to:  xxxxxxxx-xxxx-xxxx-xxxx-xxxxxxxxxxxx
Successfully changed subscription
Checking JumpServer's state...
VM is running
Opening Bastion tunnel via jumpserver to:  Example Jumpserver
az : WARNING: Command group 'az network' is in preview and under development. Reference and support levels: https://aka.ms/CLI_refstatus
At line:6 char:19
+                 &{az network bastion tunnel `
+                   ~~~~~~~~~~~~~~~~~~~~~~~~~~~
    + CategoryInfo          : NotSpecified: (WARNING: Comman...s/CLI_refstatus:String) [], RemoteException
    + FullyQualifiedErrorId : NativeCommandError

WARNING: Opening tunnel on port: 10022
WARNING: Tunnel is ready, connect on port 10022
WARNING: Ctrl + C to close
Opening SSH aggregator tunnel for:  Example Jumpserver


Tunnels are configured...
To stop the tunnels just close the console or press CTRL+c
Security considerations
This technic is not against of any security rules. Also it doesn’t misuse the services but gives an alternative way to leverage the maximum. Nevertheless it points out some important security points.
- Azure Bastion (via the Azure CLI) does a proper authentication (with MFA if configured).
- Even if we have a private network setup, there is a way to connect to that network. We cannot just trust that an Private network protects us from all the threats
- The internal accesses shall be also restricted with NSGs and jumpservers (or any kind of VM) shall have access only to those resources where it is really needed.