Introduction
There is shift to use more and more PaaS and SaaS services from the cloud providers because it is easy, fast and (relatively) cheap to use them. Azure Kubernetes Service (AKS) is one of the most complex managed service which can be configured thousands ways. It supports tens of different plugins and external service integrations. Also there is multiple ways to configure these services according to the customer’s compliance needs.
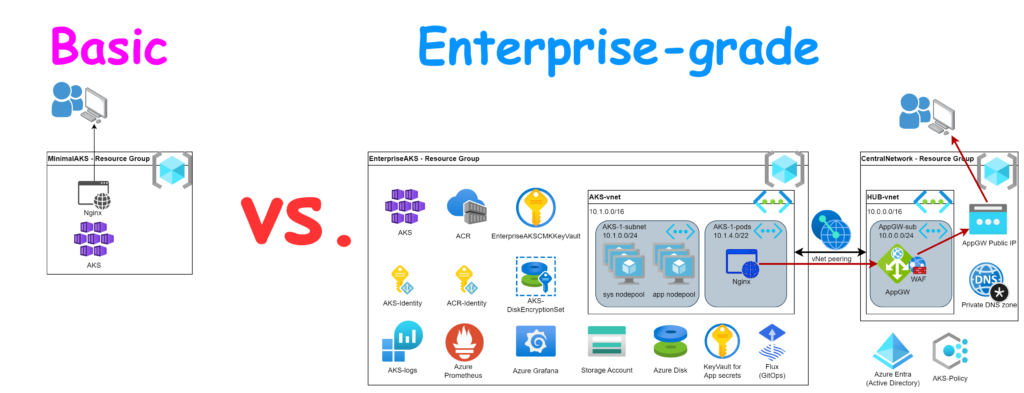
This post guides you through of different configuration aspects of the Azure Kubernetes Service to make it Enterprise-grade. It starts with a minimalist deployment and add the extra configurations step by step. At the end of the guide we shall have a secure and reliable managed Kubernetes cluster. Please note that every company has its own compliance rule-sets so the configuration shall be always adapted to the company’s needs.
I will use the Azure CLI with bash in the following chapters because it is more repeatable than clicking on the Portal. If you use Windows then it is easy to translate the lines to Powershell.
Pre-requisites
You will need only:
- an Azure subscription with few bucks.
- pre-installed Azure CLI (see the official guide).
Minimalist AKS
Concept
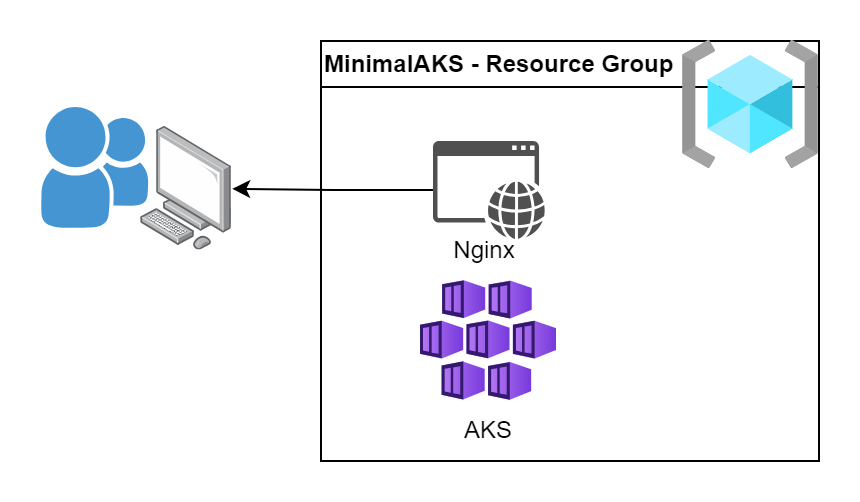
The most minimal AKS deployment comes with its basic and default configuration. We just need a Resource Group where we place our AKS cluster. Nevertheless the AKS has several sub-components like VM Scale Sets, Public IP addresses, Load Balancers, Managed Identities, etc. These will be automatically created by Azure and placed into a new managed Resource Group which name start with “MC_”. These are managed resourced and we don’t need to take care about them.
As a test Application we will deploy an Nginx container which will be exposed to the internet imitating a classic cloud usage.
The solution includes a resource group, an AKS cluster and the Nginx exposed to the internet.
Deployment
Login with Azure CLI and select your subscription if you have multiple.
az login
az account set --subscription <YOUR_SUBSCRIPTION_ID>
Create a Resource Group
ResourceGroup="MinimalAKS"
Location="uksouth"
az group create --name $ResourceGroup --location $Location
Create an AKS cluster
AKSName="MinimalAKS"
az aks create --name $AKSName --resource-group $ResourceGroup --no-ssh-key
The deployment takes few minutes and it creates an AKS cluster which is manageable from the internet which means its Kubernetes API endpoint is exposed to the internet and accessible from our computer.
Install kubectl, kubelogin and then get the cluster credentials.
sudo az aks install-cli
az aks get-credentials --name $AKSName --resource-group $ResourceGroup --overwrite-existing
Test the connection with the kubectl get nodes command. You shall see 3 nodes like this:
~$ kubectl get nodes
NAME                                STATUS   ROLES   AGE     VERSION
aks-nodepool1-26547779-vmss000000   Ready    agent   3m16s   v1.27.7
aks-nodepool1-26547779-vmss000001   Ready    agent   3m6s    v1.27.7
aks-nodepool1-26547779-vmss000002   Ready    agent   3m11s   v1.27.7
Deploy an Nginx as a deployment and expose to the internet.
kubectl create deployment webapp --image nginx --replicas=3 --port=80
kubectl expose deployment webapp --type=LoadBalancer
Typically this deployment takes 1 minute. It pull the Nginx image and starts 3 pods. It also creates an Azure LoadBalancer with a public IP address where our pods will be accessible.
Check the progress with kubectl get pods and kubectl get svc webapp commands. Wait until all pods are running. You might also see that the service has “pending” state at the EXTERNAL-IP. Wait a minute and check again. You shall see something similar:
~$ kubectl get pods
NAME                     READY   STATUS    RESTARTS   AGE
webapp-89958654c-g4wpr   1/1     Running   0          4m53s
webapp-89958654c-rb6fb   1/1     Running   0          4m52s
webapp-89958654c-tg56p   1/1     Running   0          4m52s

~$ kubectl get svc webapp
NAME     TYPE           CLUSTER-IP    EXTERNAL-IP    PORT(S)        AGE
webapp   LoadBalancer   10.0.234.38   4.250.57.117   80:32552/TCP   3m47s
Hurray we have a working cluster and application in ~5 minutes 🙂
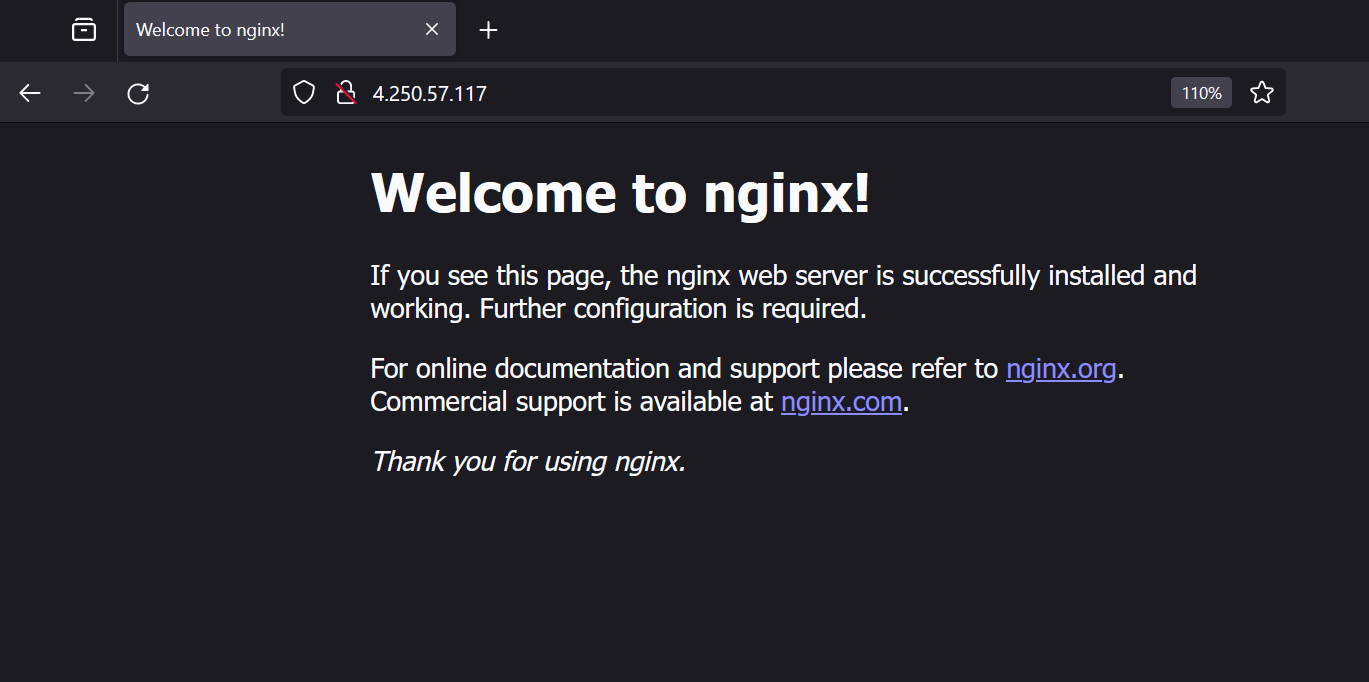
Put the external IP into your browser to test your application like http://4.250.57.117
Note that this is http and not https. You shall see the default Nginx page like this:
Summary and conclusion
Here are all steps together:
# Initialization
# Login
az login
# Set the subscription if you have multiple one.
#az account set --subscription <YOUR_SUBSCRIPTION_ID>
# Install kubectl and kubelogin
sudo az aks install-cli


# Create a resource group
ResourceGroup="MinimalAKS"
Location="uksouth"
az group create --name $ResourceGroup --location $Location

# Create a cluster
AKSName="MinimalAKS"
az aks create --name $AKSName --resource-group $ResourceGroup --no-ssh-key

# Get the cluster credentials
az aks get-credentials --name $AKSName --resource-group $ResourceGroup --overwrite-existing

# Create a test application
kubectl create deployment webapp --image nginx --replicas=3 --port=80
kubectl expose deployment webapp --type=LoadBalancer
# Get the public IP address in watch mode. The console will refresh automatically when the external IP is ready.
# Press CTRL+c to quit once you have the IP.
kubectl get svc webapp -w
As you can see, we could deploy an AKS cluster and deploy and reach an application in few minutes. The cluster arrived with its default configuration which means:
- A public AKS cluster (the Kubernetes API is accessible on the internet)
- It deployed with 3x Standard_D2s nodes (2 vCPU, 8GB RAM)
- It uses Kubenet network module with its own isolated vNet
- It exposed the application directly to the internet
- No logging and no extra security
Clean-up
Don’t forget to delete your resources and clean-up. However there is an “MC_…” managed resource group it is enough if we delete the AKS cluster and then it will automatically clean up that resource group as well. Also if we delete the original resource group then it will clean up our entire deployment.
az group delete --name $ResourceGroupEnterprise deployment
As you could see the minimalist deployment comes with lot of default settings which makes it easy and fast to deploy. Most customers have their own compliance guidelines and requirements where the infrastructure deployment shall fit. We need to integrate the AKS cluster into such an environment.
In this chapter, I will guide you through on the typical requirements what we can see and show how to configure AKS to fulfill them. Of course every customer is different so this deployment is just an example. It intends to point to the different areas to consider during the solution design and deployment.
We will build up the concept step by step hence you will see the complete picture only at the end of the article.
Baseline
As a baseline we will use the Minimalist AKS and add the extra components to the deployment
The Resource Group creation is the same. Run these commands.
# Create a resource group
ResourceGroup="EnterpriseAKS"
Location="uksouth"
az group create --name $ResourceGroup --location $Location
However the AKS creation is very different. We will add extra parameters in each steps to the baseline hence DON NOT RUN THIS YET!!!
# Create a cluster
AKSName="EnterpriseAKS"
az aks create \
  --name $AKSName \
  --resource-group $ResourceGroup
As the final create command will be a long one hence I just mention the additional parameters in each step in the following format:
az aks create \
[...]
  --no-ssh-key \
Management plane
Kubernetes version
Foremost we would like to configure the Kubernetes version. Azure supports 3 minor versions parallel and it picks the middle one by default. In most cases this might be acceptable but sometimes we would like to go with the latest version to get the most recent features.
Note that the below mentioned version might be outdated when you read this article. You can get the currently available versions by this command: az aks get-versions --location $Location
KubernetesVersion="1.28.3"

az aks create \
[...]
  --kubernetes-version $KubernetesVersion \
Support tier
Azure provides different support levels from the Free to Premium to the AKS cluster. Of course if we are an Enterprise company then we would like to get immediate support in case of failure to ASAP restore our service.
AKSTier="Standard"
az aks create \
[...]
  --tier $AKSTier \
Security
However typically the security is a last thing what people start to thing about, here there are several dependencies hence let’s pick this first.
Managed Identity
AKS is a complex solution and our AKS resource act as an umbrella solution to cover several other resources (VMs, network, loadbalancers, IPs, etc.). To manage these resources the AKS (control plane) requires an identity which can be used to reach other resources. So first create a User-assigned Managed Identity and add it to our AKS.
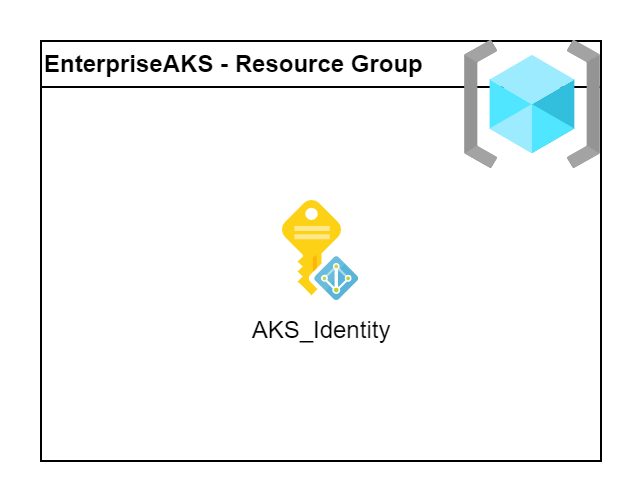
AKSIdentityName="AKS-identity"
az identity create --resource-group $ResourceGroup --name $AKSIdentityName
AKSMIResourceID=$(az identity show --resource-group $ResourceGroup --name $AKSIdentityName --query 'id' --output tsv)
AKSMIPrincipalID=$(az identity show --resource-group $ResourceGroup --name $AKSIdentityName --query 'principalId' --output tsv)

az aks create \
[...]
  --assign-identity $AKSMIResourceID \
Disk encryption
Azure provides wide range of security regarding the encryption and it also allow the customers to use their own keys to encrypt data. We can use Customer Managed Keys (CMK) to encrypt the worker VMs’ own disk and the mounted Azure Disks as Persistent Volumes.
To activate the feature we need a KeyVault which stores the key and a Disk Encryption Set (DES) which uses the key for the encryption. We also need to grant read permission to the DES’ identity to read. Note that this is an automatically created identity and assigned for the DES and it is completely independent from the one what we created in the previous step.
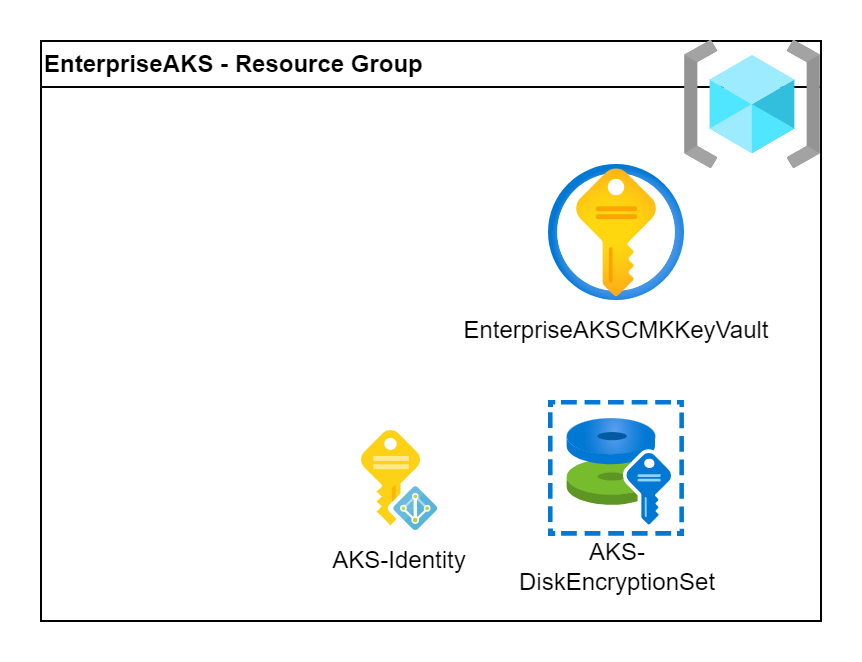
Note that the KeyVault requires a globally unique name hence please change the variable to a random one.
# Create a KeyVault for the Customer Managed Keys
# KeyVault name MUST be globally unique!
CMKKeyVaultName="EnterpriseAKSCMKKeyVault"
az keyvault create --resource-group $ResourceGroup --name $CMKKeyVaultName \
  --enable-purge-protection --retention-days 7
CMKKeyVaultID=$(az keyvault show --resource-group $ResourceGroup --name $CMKKeyVaultName --query 'id' --output tsv)

# Create a key for encryption
AKSCMKName="EnterpriseAKSCMK"
az keyvault key create --vault-name $CMKKeyVaultName --name $AKSCMKName --kty RSA
AKSKeyURI=$(az keyvault key show --vault-name $CMKKeyVaultName --name $AKSCMKName --query key.kid -o tsv)

# Create a DiskEncryptionSet
DiskEncName="EnterpriseAKS-DES"
az disk-encryption-set create --name $DiskEncName  \
  --location $Location  --resource-group $ResourceGroup \
  --source-vault $CMKKeyVaultID --key-url $AKSKeyURI

DiskEncPrincipalID=$(az disk-encryption-set show --name $DiskEncName --resource-group $ResourceGroup --query [identity.principalId] -o tsv)
DiskEncID=$(az disk-encryption-set show --name $DiskEncName --resource-group $ResourceGroup --query [id] -o tsv)

# Grant access for the DiskEncryptionSet to read the KeyVault
az keyvault set-policy --resource-group $ResourceGroup \
  --name $CMKKeyVaultName --object-id $DiskEncPrincipalID \
  --key-permissions get unwrapKey wrapKey

az aks create \
[...]
  --enable-encryption-at-host \
  --node-osdisk-diskencryptionset-id $DiskEncID \
etcd encryption
Etcd is Kubernetes’ internal database where all the configuration and secrets are stored. Etcd is fully managed by Azure and it is hidden from our eyes. Even it doesn’t appear as a resource on the portal. Although it is very hard to access it, Azure provides an option to use CMK to encrypt it at the rest. It gives extra security to us similar to the previous disk encryption.
To activate the feature we need to grant access to the AKS’ identity to the CMK KeyVault to read the keys and then just activate the feature by pointing to the key.
Note that we can use the same encryption key as we used with the disks but we can use another dedicated one. It always depends on the customer and both have pros and cons. Here I reuse the key because of simplicity.
# Grant access for AKS to read the KeyVault
az keyvault set-policy --resource-group $ResourceGroup \
  --name $CMKKeyVaultName --object-id $AKSMIPrincipalID \
  --key-permissions decrypt encrypt

az aks create \
[...]
  --enable-azure-keyvault-kms \
  --azure-keyvault-kms-key-vault-network-access "Public" \
  --azure-keyvault-kms-key-id $AKSKeyURI \
Policies
With the Azure policies we can define good set of rules how the developers/admins can use the cluster. Those are the essential components to ensure the company’s compliance rules.
Azure offers a big set of built-in policies (almost 100) but we can define our own custom policies as well. The Open Policy Agent is used inside AKS as engine so we can write the custom policies in the Rego language if needed.
These policy sets and their parameters are the most diverse at the customers. Here I just show some examples. The policy sets shall be deeply discussed and aligned with the customers.
Azure offers almost 100 built-in policies just for AKS. Besides the policies Azure provides some initiatives where they already collected the most reasonable policies. We will assign these pre-defined initiatives to the subscription. Nevertheless, we need to build our own initiatives in most cases to cover the customers’ security needs.
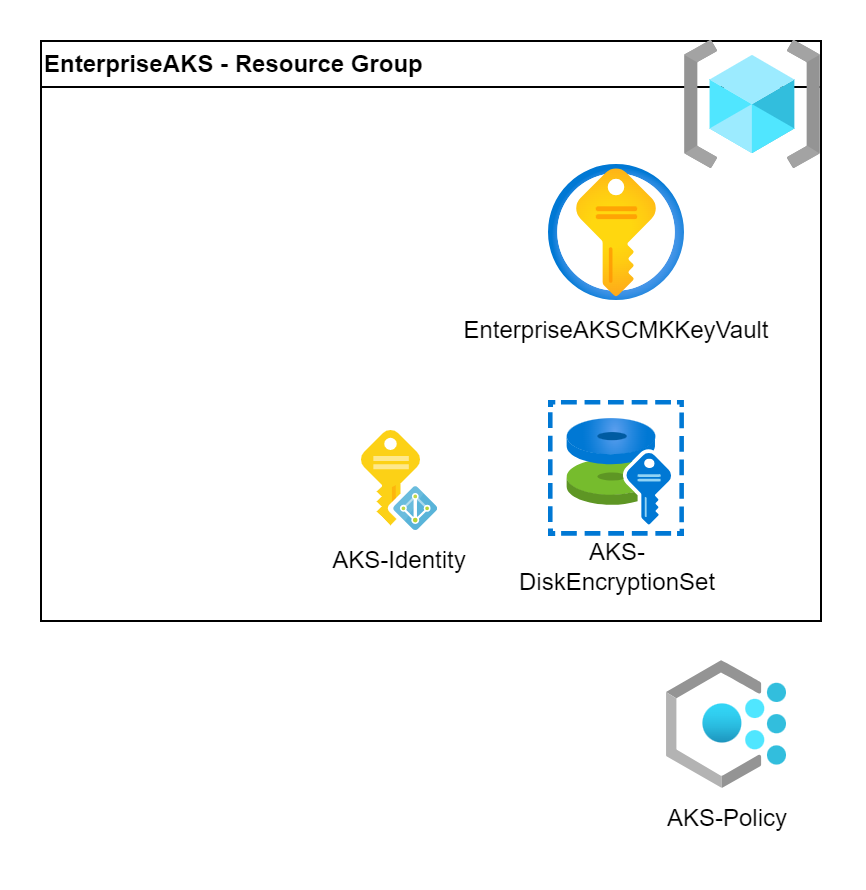
The 2 mentioned initiatives are:
- Kubernetes cluster pod security baseline standards for Linux-based workloads
- Kubernetes cluster pod security restricted standards for Linux-based workloads
# Assign policy initiatives to the subscription
az policy assignment create --name AKS-Baseline \
  --policy-set-definition "a8640138-9b0a-4a28-b8cb-1666c838647d" \
  --params "{ \"effect\": {\"value\": \"Deny\"} }"

az policy assignment create --name AKS-Restricted \
  --policy-set-definition "42b8ef37-b724-4e24-bbc8-7a7708edfe00" \
  --params "{ \"effect\": {\"value\": \"Deny\"} }"

az aks create \
[...]
  --enable-addons azure-policy \
RBAC
Role-Based Access Control (RBAC) helps to control who can access the cluster. Azure provides a good integration to the Azure Entra (Active Directory) to make it easy to grant access to the user groups to reach the cluster and the admins to manage the cluster.
There are 2 level of integration. We can use Azure Entra only for authentication (just identify the users) and use Kubernetes for the authorization with the standard Roles, ClusterRoles and their bindings.
Or we can use Azure Entra for both the authentication and authorization. In this case we can assign Azure roles to the users who will get access at Kubernetes level. It is a nice and unified way of authorization hence we will use it in this example.
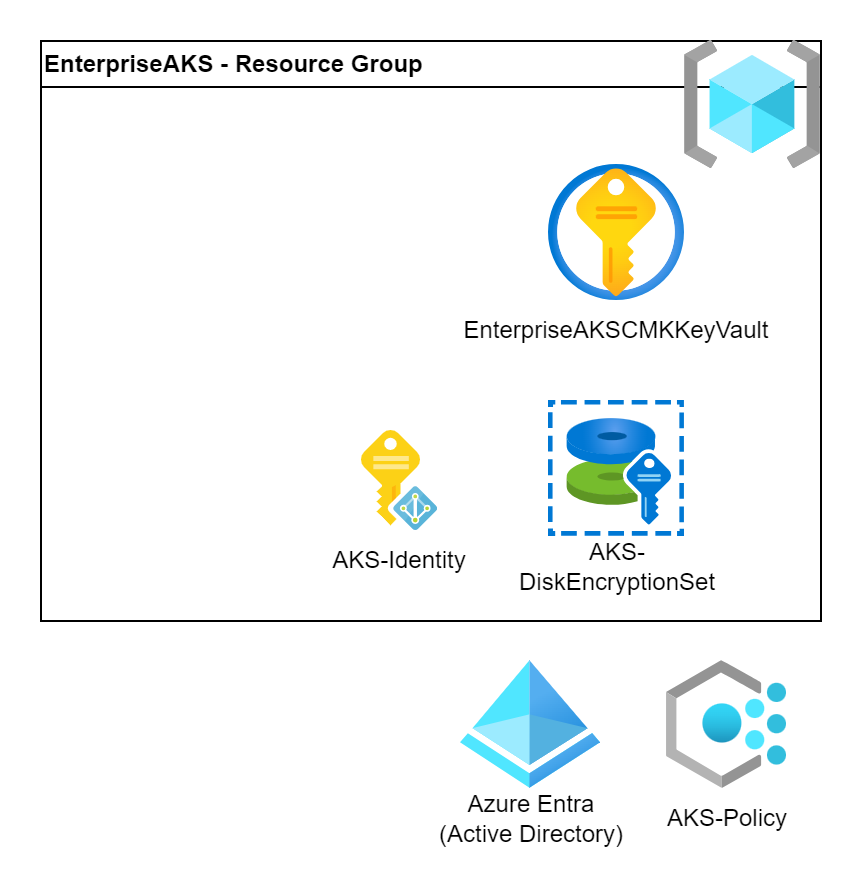
We just need to activate the feature. Very simple. Nevertheless don’t forget to grant a Cluster Admin role to yourself after the cluster is deployed.
az aks create \
[...]
  --enable-aad \
  --enable-azure-rbac \

AKSID=$(az aks show --name $AKSName --resource-group $ResourceGroup --query id -o tsv)
MyID=$(az account show --query user.name -o tsv)

az role assignment create \
  --assignee $MyID \
  --scope $AKSID \
  --role "Azure Kubernetes Service RBAC Cluster Admin"
Vulnerability scans and Defender
New security threats are identified daily and tracking them requires automation. If you operate an infrastructure which has several tens or hundreds of AKS clusters then there will be thousands of application images. Vulnerability scans help to continuously monitor the container images in the Azure Container Registry (ACR) if they contain any vulnerable libraries.
Defender for Kubernetes scans the cluster for malicious or vulnerable running code. It is actively running on the cluster and alters the operators in case of a security threat.
The two services can be activated on the Defender for Cloud‘s page. This will activate the service for the subscription. And we also need to activate it on the cluster be adding a small configuration.
az aks create \
[...]
  --enable-defender \
Container registry
There are several ways how to source container images. We can deploy directly from DockerHub or external registries as well. From business continuity point of view it is better to use a local registry where we don’t rely on a 3rd party. Also we can build our own images what we would like to push to a registry.
We will create an Azure Container Registry and attach it to the AKS cluster. In this way we will have a dedicated registry where we can push our own images and where we can import the 3rd party images. The ACR will do the vulnerability scans as well so we can be sure that our images are up to date.
We can deploy the ACR with CMK encryption as well. It will also require a Managed Identity to access the KeyVault.
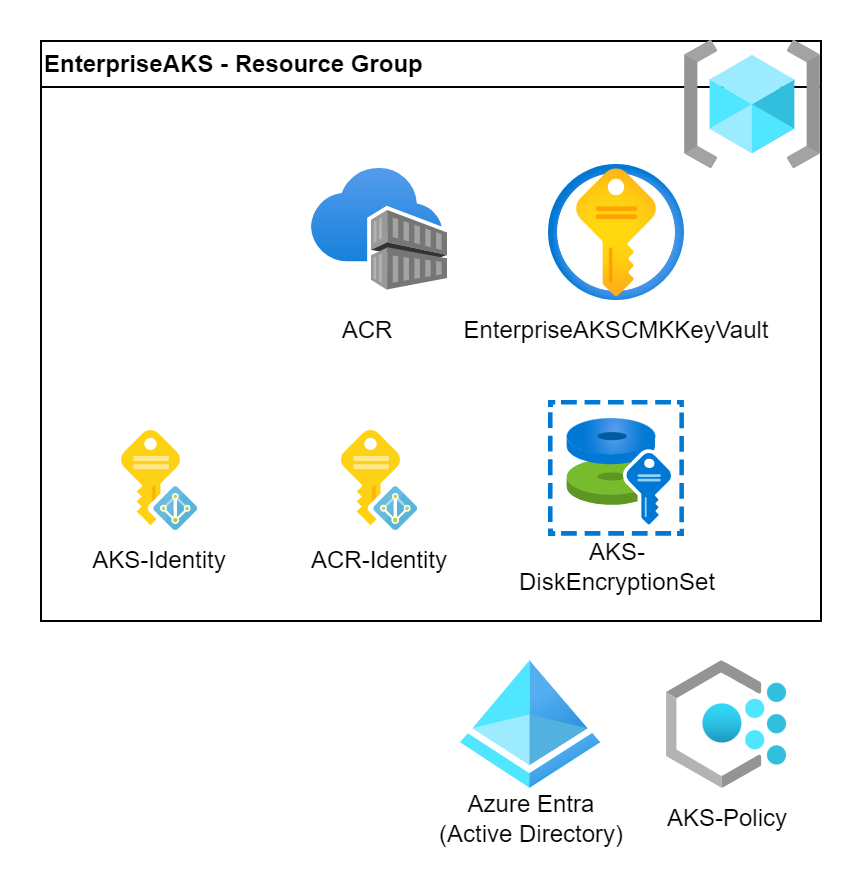
Note that the ACRName shall be globally unique hence please update the variable before deployment.
# Create an encryption key, a managed identity and grant access
ACRCMKName="EnterpriseACRCMK"
az keyvault key create --vault-name $CMKKeyVaultName --name $ACRCMKName --kty RSA
ACRKeyURI=$(az keyvault key show --vault-name $CMKKeyVaultName --name $ACRCMKName --query key.kid -o tsv)

ACRManagedID="ACR-identity"
az identity create --resource-group $ResourceGroup --name $ACRManagedID
ACRMIPrincipalID=$(az identity show --resource-group $ResourceGroup --name $ACRManagedID --query 'principalId' --output tsv)
az keyvault set-policy --resource-group $ResourceGroup \
  --name $CMKKeyVaultName --object-id $ACRMIPrincipalID \
  --key-permissions get unwrapKey wrapKey

# Create an ACR to store images
ACRName="enterpriseaksregistry"
az acr create --resource-group $ResourceGroup --name $ACRName \
  --sku Premium \
  --key-encryption-key $ACRKeyURI \
  --identity $ACRManagedID
ACRID=$(az acr show --name $ACRName --query 'id' --output tsv)


az aks create \
[...]
  --attach-acr $ACRName \
Networking
There are several networking strategies to organize our infrastructure. We can use separated islands where our services are independent and connects via the internet. Or we can organize our services into groups with virtual networks (vNet) and share an internal network. We can expose services to the internet or keep it completely internal.
The network design is driven by the customer needs and how he treats the applications. Nevertheless the most typical design patter is to create an internal network and expose the services to the internet (if needed) via firewalls.
In this section, we will walk you through the different network integration options.
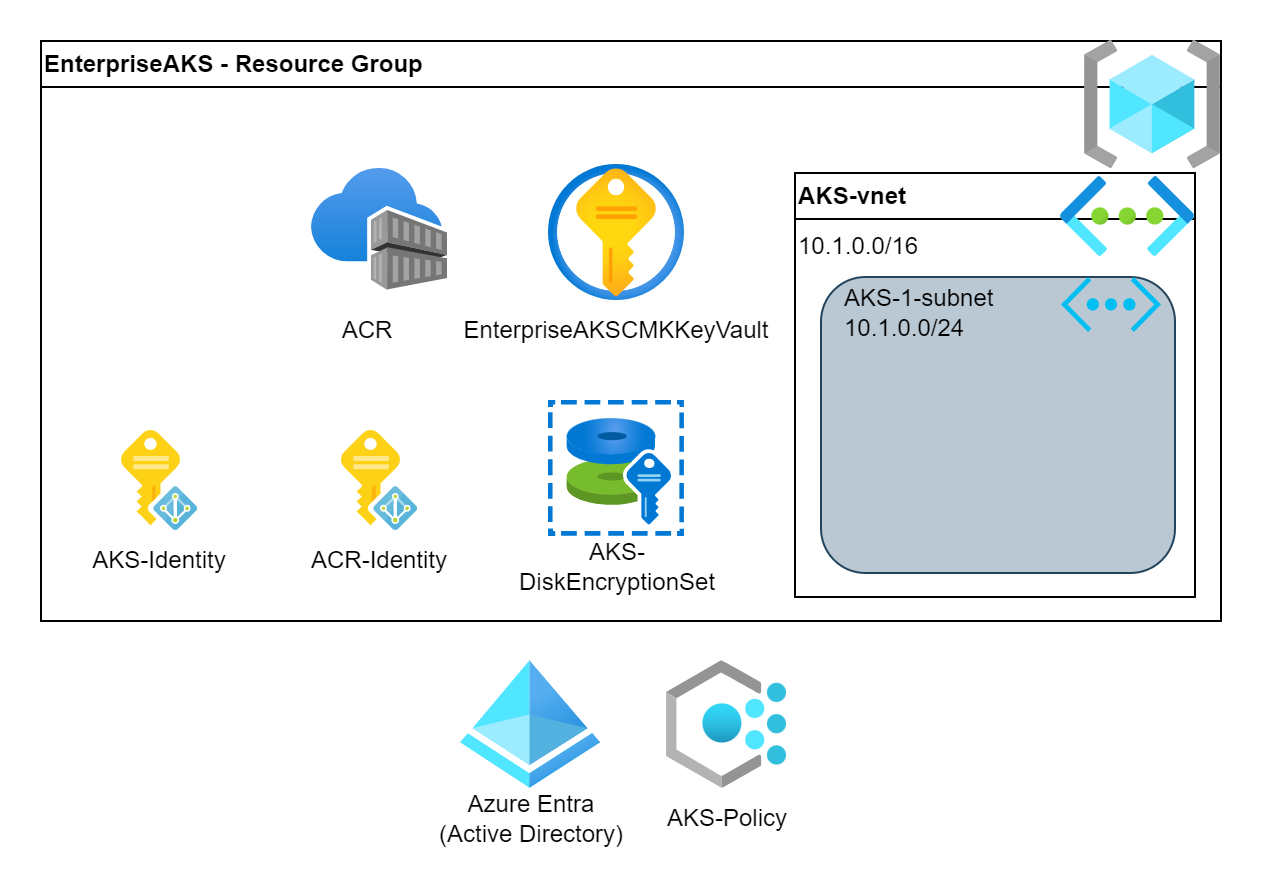
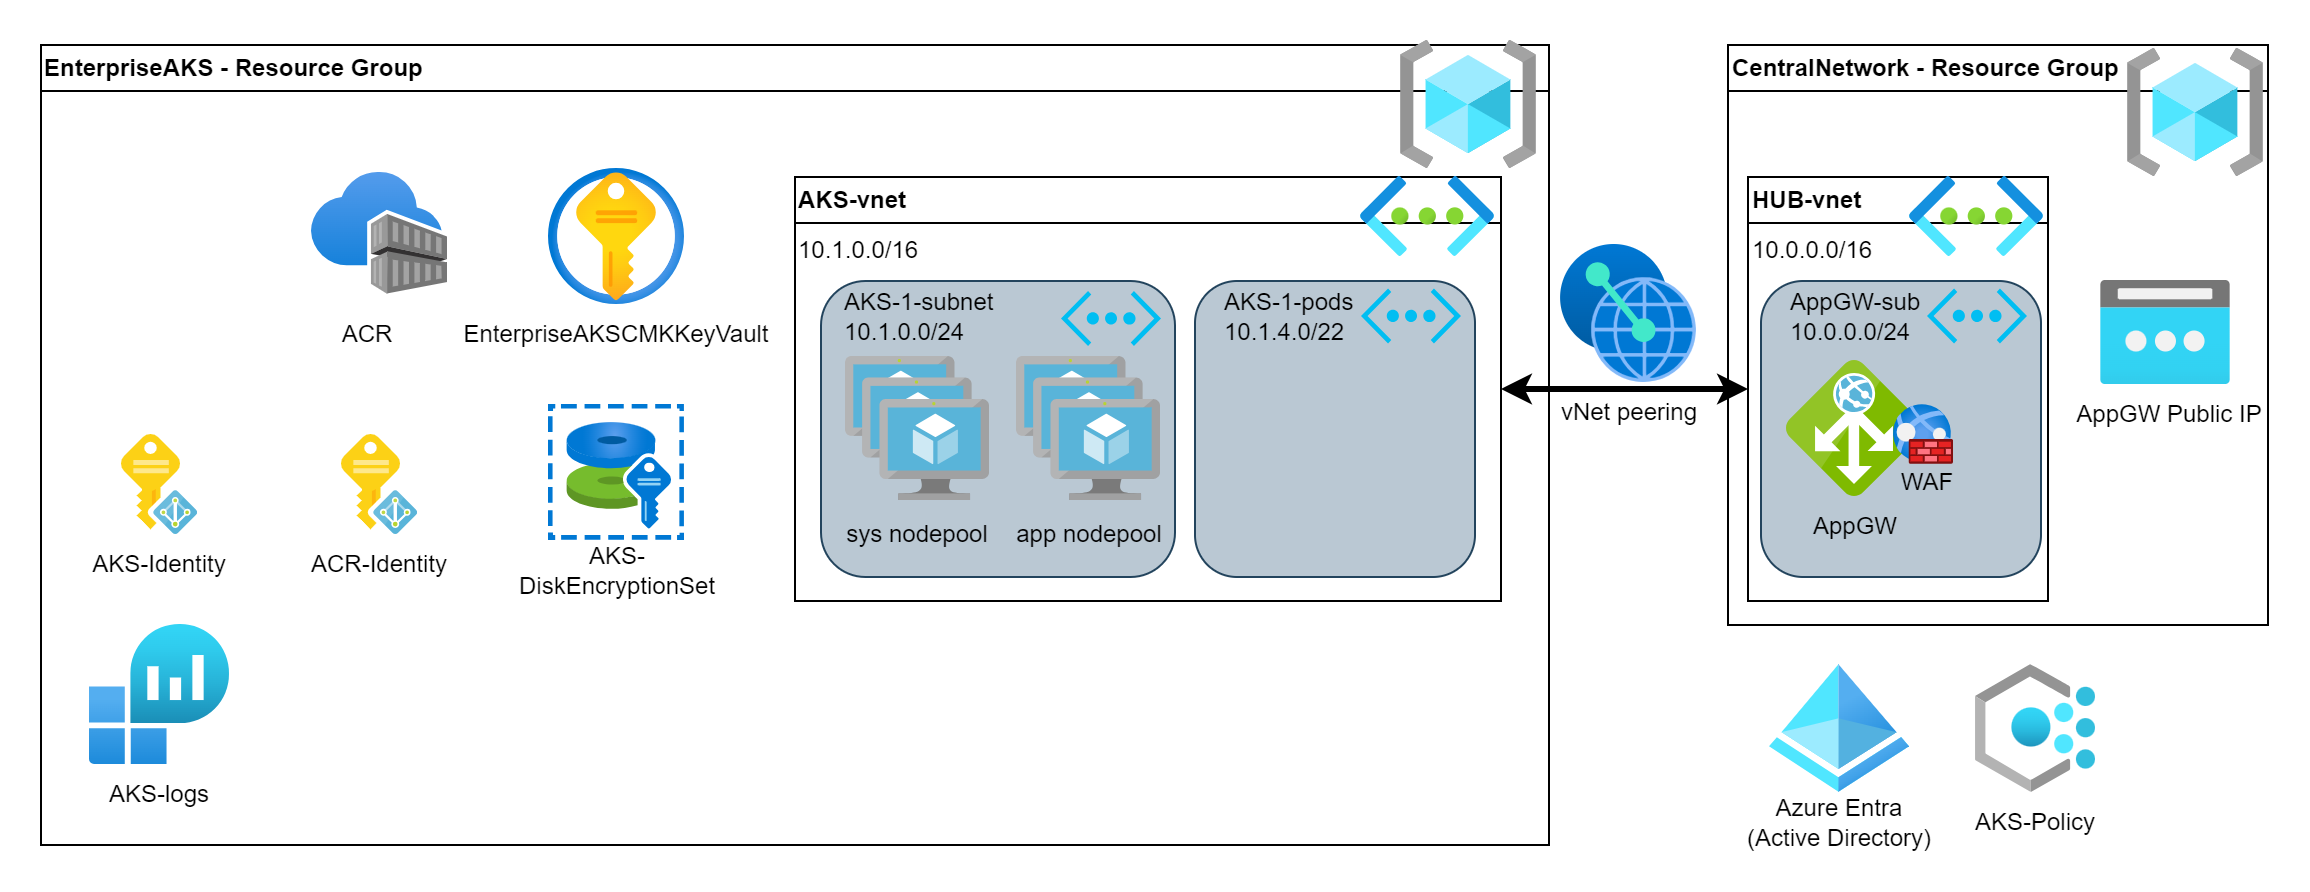
vNet integration
To integrate the AKS into the customer’s network, we need a subnet. This subnet can be part of an already existing vNet or can be part of a newly created vNet. The AKS components (private API, VM nodes, loadbalancers) will get IP address from this subnet.
The cleanest solution is to have a dedicated vNet for the cluster(s) and peer it to the HUB vNet to form a Hub-Spoke topology. We also need to grant Network Contributor role to the subnet for the AKS’ managed identity. Note that, we will create the central components in an upcoming step.
# Create a vNet for AKS
AKSvNetname="aks-subnet"
AKSvNetprefix="10.1.0.0/16"
AKSSubnetName="aks-1-subnet"
AKSSubnet="10.1.0.0/24"
az network vnet create --name $AKSvNetname --resource-group $ResourceGroup \
  --address-prefixes $AKSvNetprefix --subnet-name $AKSSubnetName --subnet-prefixes $AKSSubnet

AKSvNetResourceID=$(az network vnet show --resource-group $ResourceGroup --name $AKSvNetname --query id -o tsv)
AKSSubnetResourceID=$(az network vnet subnet show -g $ResourceGroup --vnet-name $AKSvNetname -n $AKSSubnetName --query id -o tsv)
az role assignment create --assignee $AKSMIPrincipalID --role "Network Contributor" --scope $AKSSubnetResourceID


az aks create \
[...]
  --vnet-subnet-id $AKSSubnetResourceID \
Network plugin
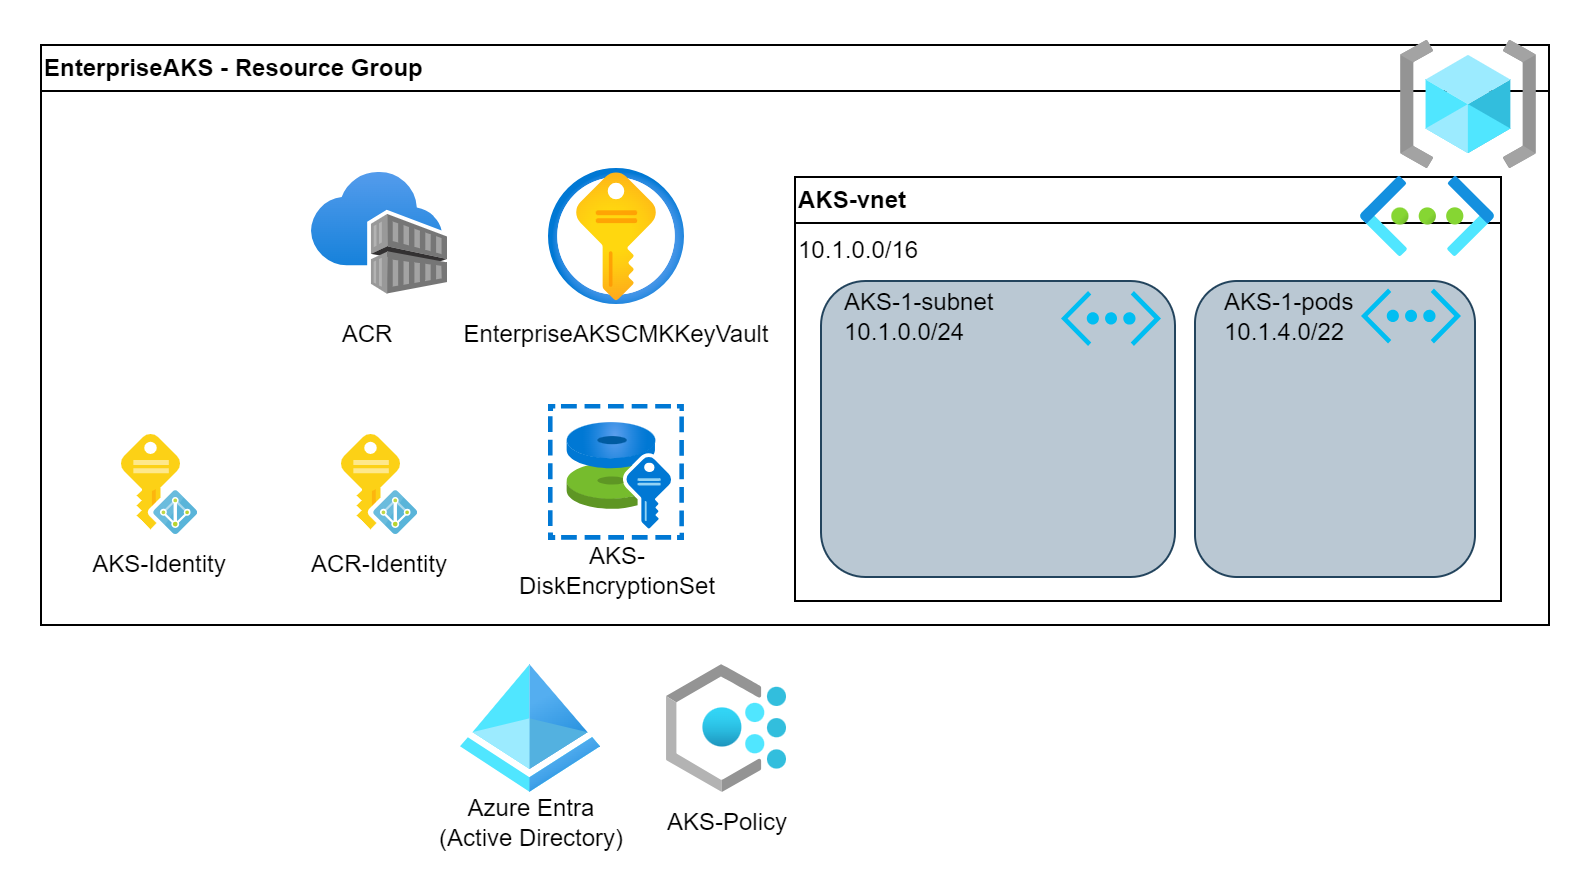
AKS supports 3 different network plugins (Kubenet, Azure CNI, Azure CNI overlay). The network plugin will determin how the application pods will get an IP address. All the 3 have its own pros and cons and by default Kubenet is used. In this example, we will use the Azure CNI which is an advanced solution. Again, similar to the other parameters, the networking plugin depends on the customer’s need. There is no golden solution.
Azure CNI provides allocates IPs to the pods from the vNet. This means that the pods can be reached directly on the vNet as well. We can configure a dedicated subnet for this purpose. Also besides the pods’ subnet we can configure an internal subnet for the Kubernetes Services. This is cluster internal and can be reused at multiple clusters.
If we plan with bigger clusters then these internal IP subnets must grow as well with the cluster.
# Create subnet for the pods
PodSubnetName="aks-1-pods"
PodSubnet="10.1.4.0/22"
az network vnet subnet create --vnet-name $AKSvNetname --resource-group $ResourceGroup \
  --address-prefixes $PodSubnet --name $PodSubnetName
PodSubnetResourceID=$(az network vnet subnet show -g $ResourceGroup --vnet-name $AKSvNetname -n $PodSubnetName--query id -o tsv)

az aks create \
[...]
  --network-plugin azure \
  --network-plugin-mode overlay \
  --pod-subnet-id $PodSubnetResourceID \
  --service-cidr 172.16.0.0/16 \
  --dns-service-ip 172.16.0.10 \
API restriction and Private cluster
Our cluster’s Kubernetes API can be accessible on the internet or privately. However Azure has several protection mechanism on these APIs it is still accessible on the internet. As the Kubernetes API is a very sensitive part of the system hence we need to add extra protection here. There are 2 ways to secure it even further:
- Private Cluster doesn’t have internet facing API but it gets an internal IP from the subnet what we just created. The AKS cluster will be accessible only from the resources which are connected to the internal vNet(s). This brings the most security but it requires a Jumpserver and PrivateDNS configuration hence it increases the complexity.
- Restrict access to authorized IP addresses. This solution is similar to a firewall rule as we can whitelist our own IP address and the AKS will accept requests only from that IP address. This isn’t as secure as the Private Cluster and hardly usable if the users don’t have fix IP address (like connecting from a notebook via the internet). Nevertheless still an extra defence layer.
az aks create \
[...]
  --api-server-authorized-ip-ranges <YOUR_OWN_IP_ADDRESS>
Web Application Firewall and Ingress Controller
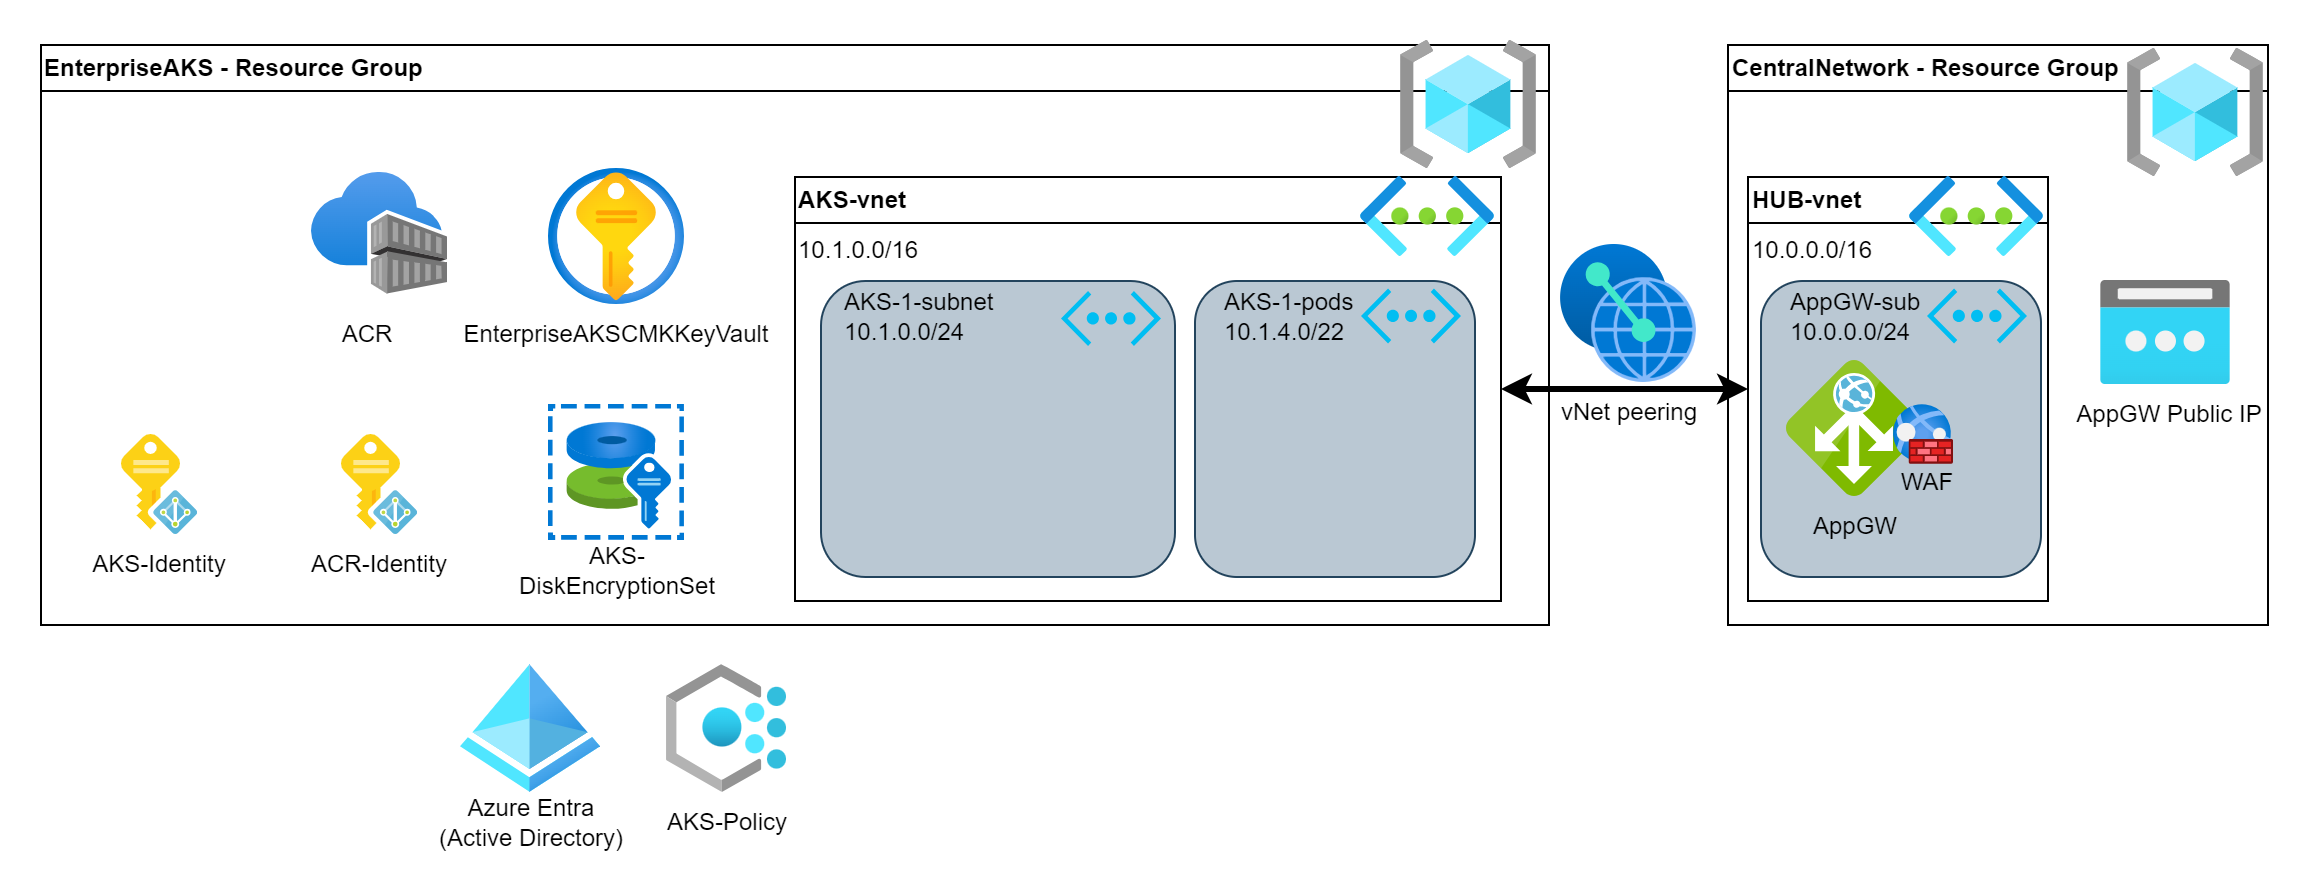
The other component what we can expose to the internet is the Application. By default, AKS will create loadbalancers with public IP address for the services and expose the application directly to the internet (no firewall, no extra security). This contains lot of security threats as our Application will be continuously scanned for vulnerabilities and exploits as soon as we publish it on the internet.
The best solution is to put a Web Application Firewall (WAF) in front of the our Application which will protect us from the attacks from the internet. The WAF has multi layer threat detection algorithm and even it can check the HTTP requests to find malicious requests (like SQL injections, remote procedure calls, etc.). Azure implements WAF in the Azure Application Gateway and the Azure Frontdoor products.
In a typical Kubernetes deployment we also have an Ingress Controller which directs the incoming traffic to the right Application Service. Like the myapp.com will be forwarded to the main webpage and the monitoring.myapp.com will be forwarded the Grafana containers. There are different Ingress Controller solutions what we can use like Nginx, HAproxy, Traefik, etc. Azure provides a seamless integration to the AppGW and it can be used as an Ingress Controller. It works only with the Azure CNI plug but “luckily” we selected that one 🙂
As the AppGW is typically a central entity used by multiple resources … multiple AKS clusters in our case hence we will deploy it into the Hub vNet which is peered with the AKS vNet. Note that the below mentioned integration method works only with single AKS. If you have multiple AKS then you need to install this (AGIC) plugin with Helm.
# Create a resource group for the Hub
HubResourceGroup="CentralNetwork"
Location="uksouth"
az group create --name $HubResourceGroup --location $Location


# Create the Hub vNet
HubvNetname="hub-vnet"
HubvNetprefix="10.0.0.0/16"
AppGWSubnetName="appgw-subnet"
AppGWSubnet="10.0.0.0/24"
az network vnet create --name $HubvNetname --resource-group $HubResourceGroup \
  --address-prefixes $HubvNetprefix --subnet-name $AppGWSubnetName --subnet-prefixes $AppGWSubnet

HubvNetResourceID=$(az network vnet show --resource-group $HubResourceGroup --name $HubvNetname --query id -o tsv)
AppGWSubnetResourceID=$(az network vnet subnet show -g $HubResourceGroup --vnet-name $HubvNetname -n $AppGWSubnetName --query id -o tsv)

# Peer the Hub and the AKS vNets
az network vnet peering create \
  --name AppGWtoAKSVnetPeering \
  --resource-group $HubResourceGroup \
  --vnet-name $HubvNetname \
  --remote-vnet $AKSvNetResourceID \
  --allow-vnet-access
az network vnet peering create \
  --name AKStoAppGWVnetPeering \
  --resource-group $ResourceGroup \
  --vnet-name $AKSvNetname \
  --remote-vnet $HubvNetResourceID \
  --allow-vnet-access

# Create Public IP address for the AppGW
AppGWPublicIPName="appgw-pip"
az network public-ip create \
  --name $AppGWPublicIPName \
  --resource-group $HubResourceGroup \
  --allocation-method Static \
  --sku Standard

# Create the Application Gateway
AppGWName="aks-appgw"
az network application-gateway create \
  --name $AppGWName \
  --resource-group $HubResourceGroup \
  --sku WAF_v2 \
  --public-ip-address $AppGWPublicIPName \
  --vnet-name $HubvNetname \
  --subnet $AppGWSubnetName \
  --priority 100

AppGWResourceId=$(az network application-gateway show -n $AppGWName -g $HubResourceGroup -o tsv --query "id")


az aks create \
[...]
  --enable-addons ingress-appgw \
  --appgw-id $AppGWResourceId \

# Set the rights to the AGIC Identity
AGICAddonIdentity=$(az aks show --name $AKSName --resource-group $ResourceGroup -o tsv --query "addonProfiles.ingressApplicationGateway.identity.clientId")
az role assignment create \
  --assignee $AGICAddonIdentity \
  --scope $AppGWSubnetResourceID \
  --role "Network Contributor"
Nodes
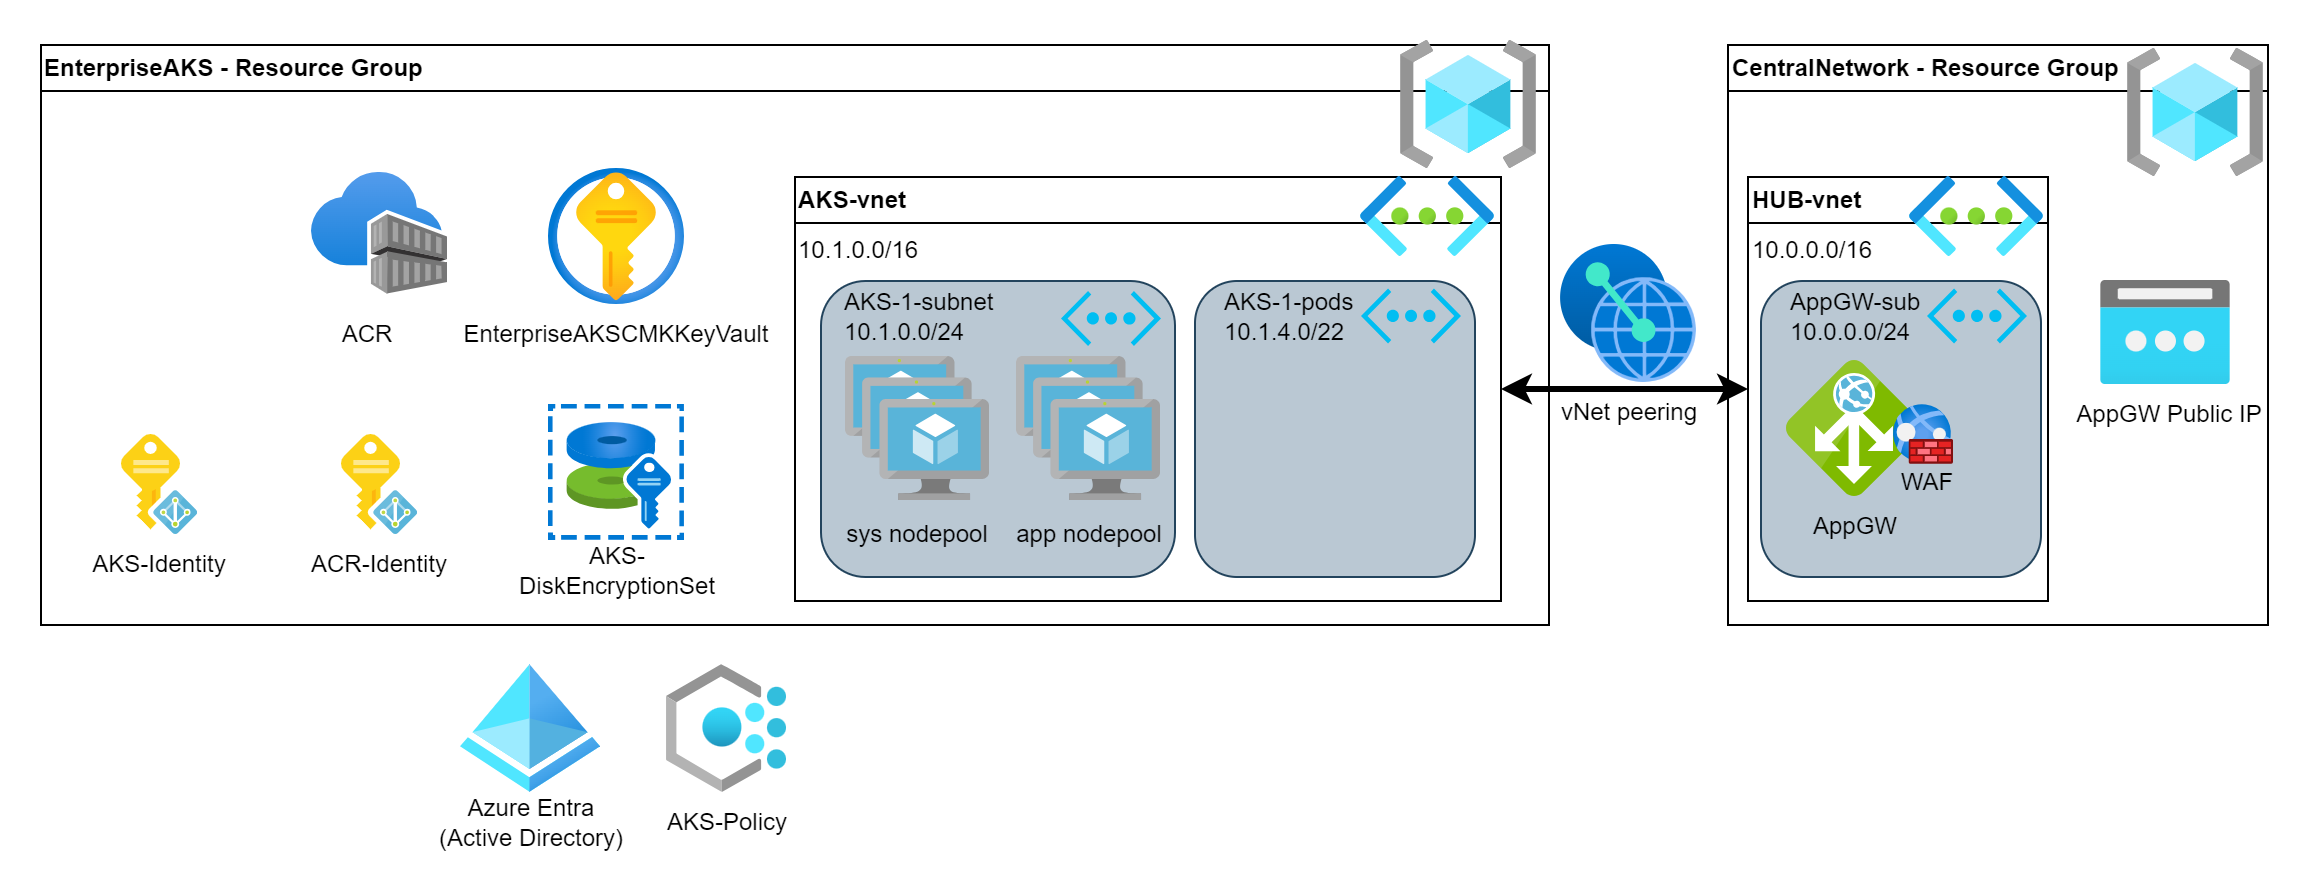
We need Virtual Machines (VMs) to deploy our containers. These VMs are organized into pools, nodepools. We need to properly size the VMs to match to our containers’ resource needs.
Shared/Dedicated nodepools
The core Kubernetes components (aka. management plane) of the AKS cluster is managed in the background by Azure and those don’t consume any compute resources from our cluster.
Nevertheless there a system containers which are also needed to run our cluster with higher functionalities. For example: CoreDNS (internal DNS management), Gatekeeper (the Policy engine), Monitoring, Networking, Storage pods. Some of them run on all VM nodes but some of them run as deployment. These pods are essential to run our cluster hence we need to provide compute resource to them.
There are 2 strategies to organize our pods:
- Shared nodepool can host both the system and the application container. In this case create only 1 nodepool where we run both the system and application container. This is cost effective but comes with a small risk if there is any peak load then some of the container might suffer starvation and leads to instability.
- Dedicated nodepool strategy creates separated nodepools for the system and the application containers. In this case we can separate the workloads to different nodes which ensures that they don’t impact each other. This is a bit more expensive but provides better resiliency.
Also we have the option to distribute the nodes across multiple zones to increase the resiliency (and the node-node communication latency). This is beneficial to most of the application hence we can configure it.
In this example, we create 2 nodepools. The system nodepool will use 2 small nodes and the app nodepool will automatically scale the nodepool based on the deployed containers. The app nodepool can be created after the AKS cluster is deployed.
AKSPoolVMSize="Standard_D2as_v4"
az aks create \
[...]
  --node-count 2 \
  --node-vm-size $AKSPoolVMSize \
  --nodepool-taints CriticalAddonsOnly=true:NoSchedule \
  --nodepool-name sys \
  --zones 1 2 3 \

# Add a second nodepool for the app
AppNodepoolName="app"
AppNodepoolVMSize="Standard_D2as_v4"
az aks nodepool add \
  --cluster-name $AKSName \
  --name $AppNodepoolName \
  --resource-group $ResourceGroup \
  --enable-cluster-autoscaler \
  --enable-encryption-at-host \
  --max-count 3 \
  --min-count 0 \
  --mode User \
  --node-count 0 \
  --node-osdisk-type Ephemeral \
  --node-vm-size $AppNodepoolVMSize \
  --node-osdisk-size 50 \
  --pod-subnet-id $PodSubnetResourceID \
  --vnet-subnet-id $AKSSubnetResourceID \
  --zones 1 2 3
Monitoring
Monitoring our cluster is essential from operation and security point of view. Azure gives several options to collect the logs and the metrics from the cluster. The most basic logging solution is to forward the logs to the Log Analytics Workspace (LAW). Besides the LAW, Azure supports managed Prometheus and Grafana instances to collect and visualize metrics and alerts.
Audit logs and Container logs
From compliance point of view the audit logs are cruisual for companies because this helps to track the employees’ activity. These logs are under the AKS cluster’s Diagnostic Settings.
Besides the Audit logs, the containers’ log are the second big source. This is collected by the Container Analytics service. However it sounds complex, it is very simple because both kind of logs will be stored in the Log Analytics Workspace (if we wish we can separate into different workspaces).
# Create Log Analytics Workspace
LogAnalyticsName="aks-logs"
az monitor log-analytics workspace create \
  --resource-group $ResourceGroup \
  --workspace-name $LogAnalyticsName \
  --location $Location

LogAnalyticsWorkspaceResourceId=$(az monitor log-analytics workspace show \
    --resource-group $ResourceGroup \
    --workspace-name $LogAnalyticsName \
    --query id \
    --output tsv)

az aks create \
[...]
  --enable-addons monitoring \
  --workspace-resource-id $LogAnalyticsWorkspaceResourceId \
AKS deployment
Finally, it is time to deploy our cluster. Putting together all the configuration parameters what we prepared above, we shall get this long command what we can execute now.
# Create a cluster
KubernetesVersion="1.28.3"
AKSTier="Standard"
AKSName="EnterpriseAKS"
AKSPoolVMSize="Standard_D2as_v4"
az aks create \
  --name $AKSName \
  --resource-group $ResourceGroup \
  --kubernetes-version $KubernetesVersion \
  --tier $AKSTier \
  --assign-identity $AKSMIResourceID \
  --enable-encryption-at-host \
  --node-osdisk-diskencryptionset-id $DiskEncID \
  --enable-azure-keyvault-kms \
  --azure-keyvault-kms-key-vault-network-access "Public" \
  --azure-keyvault-kms-key-id $AKSKeyURI \
  --enable-addons azure-policy,monitoring,ingress-appgw \
  --enable-aad \
  --enable-azure-rbac \
  --enable-defender \
  --attach-acr $ACRName \
  --network-plugin azure \
  --pod-subnet-id $PodSubnetResourceID \
  --service-cidr 172.16.0.0/16 \
  --dns-service-ip 172.16.0.10 \
  --vnet-subnet-id $AKSSubnetResourceID \
  --api-server-authorized-ip-ranges 84.3.131.95 \
  --appgw-id $AppGWResourceId \
  --node-count 2 \
  --node-vm-size $AKSPoolVMSize \
  --nodepool-taints CriticalAddonsOnly=true:NoSchedule \
  --nodepool-name sys \
  --zones 1 2 3 \
  --workspace-resource-id $LogAnalyticsWorkspaceResourceId \
  --no-ssh-key

AKSID=$(az aks show --name $AKSName --resource-group $ResourceGroup --query id -o tsv)
Note that you might get errors to register some capabilities to the subscription. Like the EncryptionAtHost. You can do it by executing these commands:
az feature register --namespace Microsoft.Compute --name EncryptionAtHost
# It takes ~3-5 minutes and you can monitor the sate with this command:
az feature show --namespace Microsoft.Compute --name EncryptionAtHost
Once the cluster is deployed then don’t forget to run those commands which requested the AKS. Like the extra nodepool creation or assigning the cluster-admin role to yourself.
# Set the rights to the AGIC Identity
AGICAddonIdentity=$(az aks show --name $AKSName --resource-group $ResourceGroup -o tsv --query "addonProfiles.ingressApplicationGateway.identity.clientId")
az role assignment create \
  --assignee $AGICAddonIdentity \
  --scope $AppGWSubnetResourceID \
  --role "Network Contributor"

# Add a second nodepool for the app
AppNodepoolName="app"
AppNodepoolVMSize="Standard_D2as_v4"
az aks nodepool add \
  --cluster-name $AKSName \
  --name $AppNodepoolName \
  --resource-group $ResourceGroup \
  --enable-cluster-autoscaler \
  --enable-encryption-at-host \
  --max-count 3 \
  --min-count 0 \
  --mode User \
  --node-count 0 \
  --node-osdisk-type Ephemeral \
  --node-vm-size $AppNodepoolVMSize \
  --node-osdisk-size 50 \
  --pod-subnet-id $PodSubnetResourceID \
  --vnet-subnet-id $AKSSubnetResourceID \
  --zones 1 2 3

# Grant cluster-admin role to myself
MyID=$(az account show --query user.name -o tsv)

az role assignment create \
  --assignee $MyID \
  --scope $AKSID \
  --role "Azure Kubernetes Service RBAC Cluster Admin"

# Get the cluster credentials
az aks get-credentials --name $AKSName --resource-group $ResourceGroup --overwrite-existing
kubelogin convert-kubeconfig
Other extras
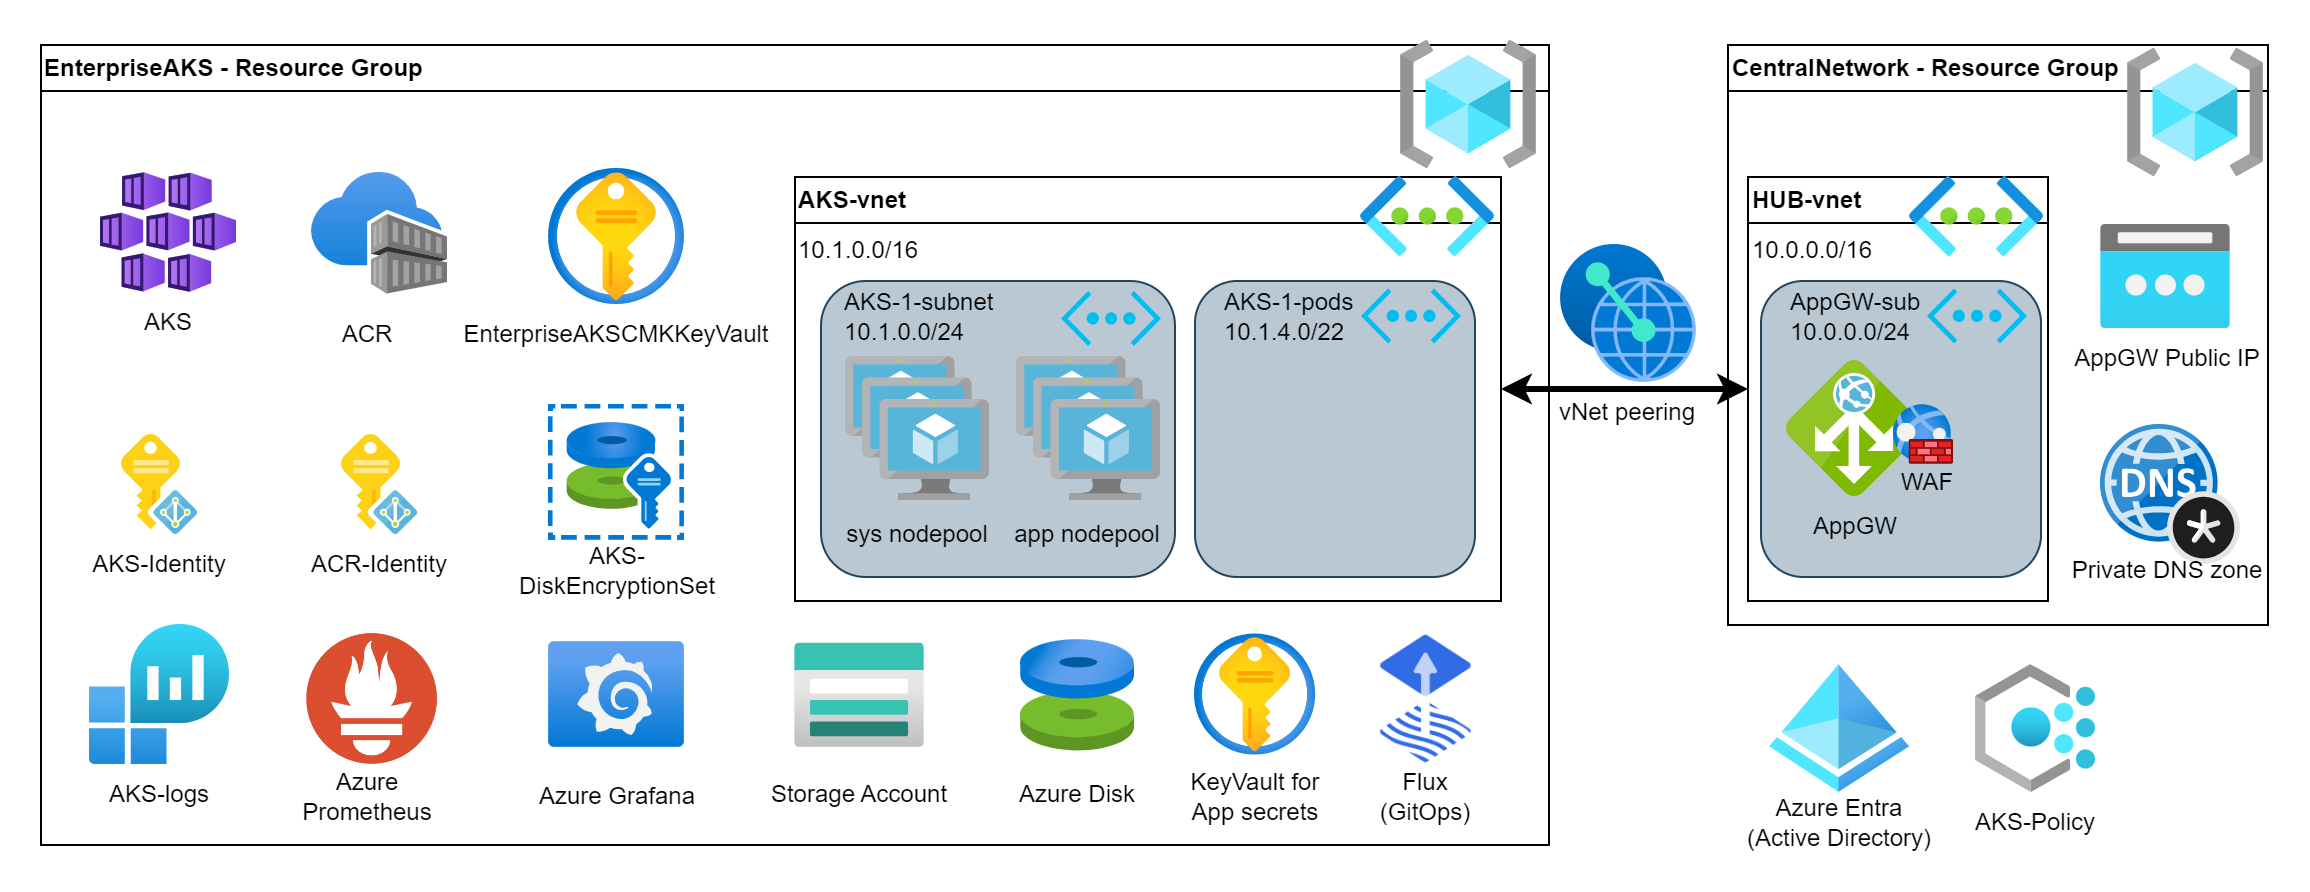
These configuration were the most basic ones what we need to consider for an Enterprise-grade AKS but there are tons of other services which can be attached or utilized by our new cluster. Just a short list of mostly used:
- Workload identity assigns an identity to our pods (or App) which makes the authentication easy against of other Azure services.
- Storage solutions are used to realize Persistent Volumes. Azure supports Disk, Fileshare and Blob which can be attached to the pods.
- KeyVault CSI driver allows us to mount secrets from the Azure KeyVault directly to our pods. This makes the secret handling much easier
- Certificates are needed for HTTPS. Generating and managing certificates are essential for secure communication. The example doesn’t cover this part.
- Autoupgrade ensures that our cluster is always updated and the security patches are applied on the worker nodes. Nevertheless, it requires that the application is also follows the cloud-native principles and it is fault tolerant.
- Autoprovisioning helps in the VM sizing to find the most suitable VM for our pods automatically. If we have memory heavy pods then the autoprovisioner will create a nodepool with memory optimized VMs. It helps a lot in the cost optimization automatically.
- Backup and Restore is supported by integrated Velero solution.
- Managed Prometheus and Grafana helps in the monitoring and operation.
- Private AKS with Private DNS increases the security how the cluster users reach the Kubernetes API
- Flux (GitOps) boosts the CI/CD pipeline automation
- …and so on.
Considering the extra components, they can also add extra complexity but also lot of extra functionality, flexibility and resiliency.
Test application
Finally we can deploy our application. First we will import the image into our ACR to deploy it from there. It is also a best practice in Kubernetes to don’t deploy into the default namespace so we will create a namespace for our App.
Once the application is deployed then AKS will scale out the App nodepool because currently it is scaled-in to 0 hence the first pod deployment will take ~3 minutes. Then once the Services and Ingress rules are created then we will be able to reach our App via the AppGW. The IP address will be visible in Kubernetes however it will be the same as what we created for the AppGW.
# Create a Kubernetes namespace for the application
kubectl create namespace testapp

# Create a test application
kubectl create deployment webapp --image=${ACRName}.azurecr.io/library/nginx:latest --replicas=3 --port=80 -n testapp
# Check the application deployment. It might take ~3-4 minutes because AKS will create a new node in the nodepool.
# Wait until the pods turn from "Pending" to "Running"
kubectl get pods -n testapp
# Create a Kubernetes Service for the app
kubectl expose deployment webapp --type=ClusterIP -n testapp
# Create an ingress rule
kubectl create ingress webapp-ingress --class=azure-application-gateway --rule="/=webapp:80" -n testapp

# Get the public IP address. This is the same as the AppGW's Public IP address
kubectl get ingress -n testapp
Here are my printouts
~$ kubectl get pods -n testapp
NAME READY STATUS RESTARTS AGE
webapp-7465675dc4-8xvpv 0/1 Pending 0 52s
webapp-7465675dc4-kmvlw 0/1 Pending 0 52s
webapp-7465675dc4-trj4x 0/1 Pending 0 52s
~$ kubectl get pods -n testapp
NAME READY STATUS RESTARTS AGE
webapp-7465675dc4-8xvpv 1/1 Running 0 4m24s
webapp-7465675dc4-kmvlw 1/1 Running 0 4m24s
webapp-7465675dc4-trj4x 1/1 Running 0 4m24s
~$ kubectl get ingress -n testapp
NAME CLASS HOSTS ADDRESS PORTS AGE
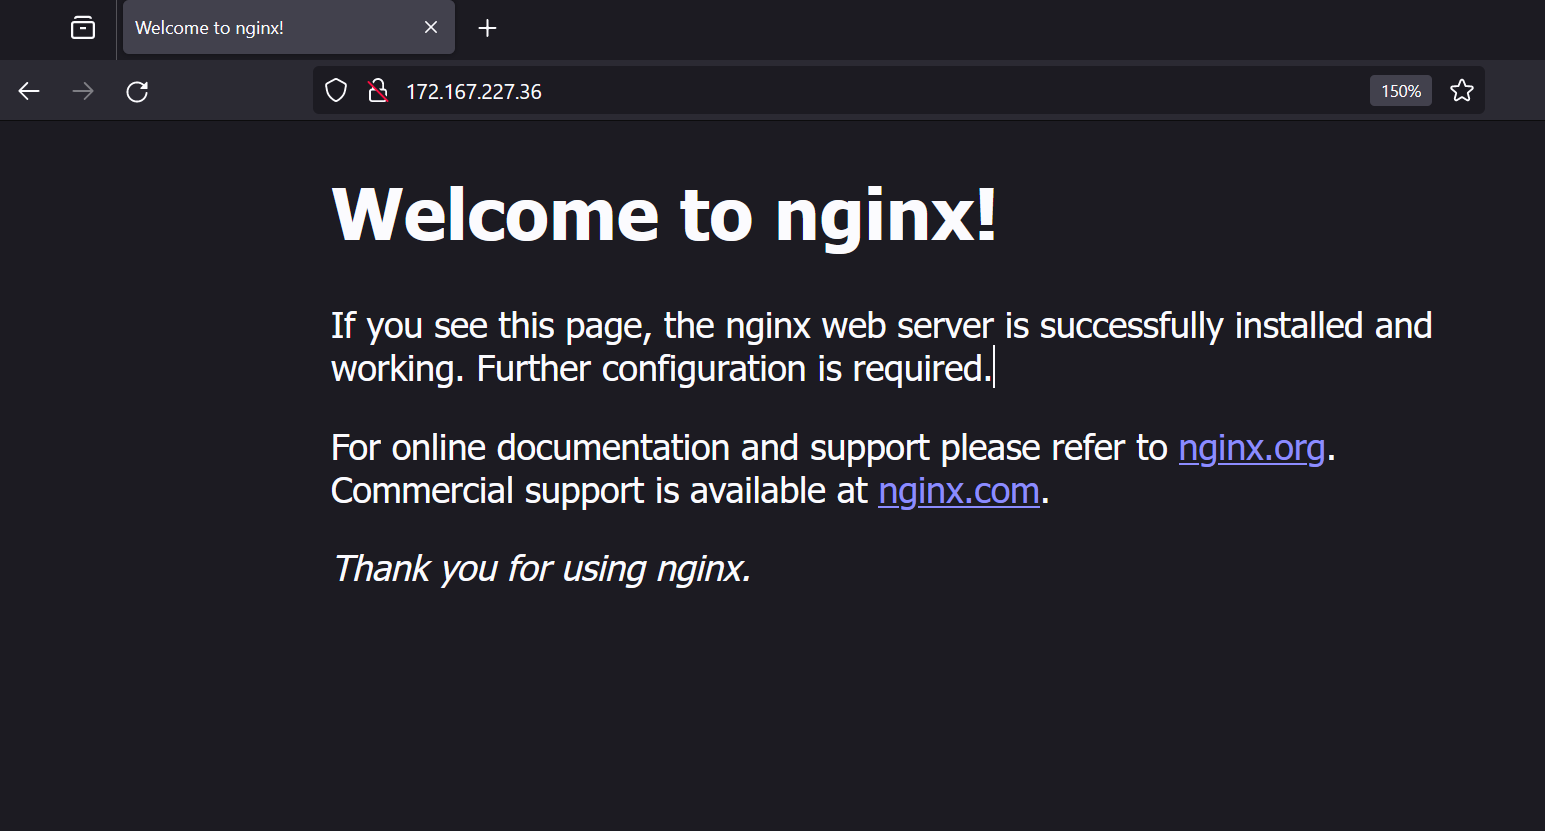
webapp-ingress azure-application-gateway * 172.167.227.36 80 13sMy public IP is 172.167.227.36. (Note, in my unfortunate situation that it is very similar to the 172.16.xxx.xxx IP addresses which are internal but this one is a public on the internet.)
Put this IP into your browser and test it like http://172.167.227.36. You shall see the Nginx’s default page like this one.
Clean-up
Again, don’t forget the clean-up once you finished with the testing.
az group delete --name $ResourceGroup
az group delete --name $HubResourceGroup
All commands together
All the small pieces brought together (without the extra components mentioned in the last chapter).
# Initialization
# Login
az login
az extension add --name aks-preview
# Set the subscription if you have multiple one.
#az account set --subscription <YOUR_SUBSCRIPTION_ID>
# Register EncyrptionAtHost capability to the subscription
#az feature register --namespace Microsoft.Compute --name EncryptionAtHost
# It takes ~3-5 minutes and you can monitor the sate with this command:
#az feature show --namespace Microsoft.Compute --name EncryptionAtHost
# Install kubectl and kubelogin
sudo az aks install-cli

# Create a resource group
ResourceGroup="EnterpriseAKS"
Location="uksouth"
az group create --name $ResourceGroup --location $Location

# Create a managed identity for AKS
AKSIdentityName="AKS-identity"
az identity create --resource-group $ResourceGroup --name $AKSIdentityName
AKSMIResourceID=$(az identity show --resource-group $ResourceGroup --name $AKSIdentityName --query 'id' --output tsv)
AKSMIPrincipalID=$(az identity show --resource-group $ResourceGroup --name $AKSIdentityName --query 'principalId' --output tsv)

# Create a KeyVault for the Customer Managed Keys
# KeyVault name MUST be globally unique!
CMKKeyVaultName="EnterpriseAKSCMKKeyVault"
az keyvault create --resource-group $ResourceGroup --name $CMKKeyVaultName \
  --enable-purge-protection --retention-days 7
CMKKeyVaultID=$(az keyvault show --resource-group $ResourceGroup --name $CMKKeyVaultName --query 'id' --output tsv)

# Create a key for encryption
AKSCMKName="EnterpriseAKSCMK"
az keyvault key create --vault-name $CMKKeyVaultName --name $AKSCMKName --kty RSA
AKSKeyURI=$(az keyvault key show --vault-name $CMKKeyVaultName --name $AKSCMKName --query key.kid -o tsv)

# Create a DiskEncryptionSet
DiskEncName="EnterpriseAKS-DES"
az disk-encryption-set create --name $DiskEncName  \
  --location $Location  --resource-group $ResourceGroup \
  --source-vault $CMKKeyVaultID --key-url $AKSKeyURI

DiskEncPrincipalID=$(az disk-encryption-set show --name $DiskEncName --resource-group $ResourceGroup --query [identity.principalId] -o tsv)
DiskEncID=$(az disk-encryption-set show --name $DiskEncName --resource-group $ResourceGroup --query [id] -o tsv)

# Grant access for the DiskEncryptionSet to read the KeyVault
az keyvault set-policy --resource-group $ResourceGroup \
  --name $CMKKeyVaultName --object-id $DiskEncPrincipalID \
  --key-permissions get unwrapKey wrapKey

# Grant access for AKS to read the KeyVault
az keyvault set-policy --resource-group $ResourceGroup \
  --name $CMKKeyVaultName --object-id $AKSMIPrincipalID \
  --key-permissions decrypt encrypt

# Assign policy initiatives to the subscription
az policy assignment create --name AKS-Baseline \
  --policy-set-definition "a8640138-9b0a-4a28-b8cb-1666c838647d" \
  --params "{ \"effect\": {\"value\": \"Deny\"} }"

az policy assignment create --name AKS-Restricted \
  --policy-set-definition "42b8ef37-b724-4e24-bbc8-7a7708edfe00" \
  --params "{ \"effect\": {\"value\": \"Deny\"} }"

# Create an encryption key, a managed identity and grant access
ACRCMKName="EnterpriseACRCMK"
az keyvault key create --vault-name $CMKKeyVaultName --name $ACRCMKName --kty RSA
ACRKeyURI=$(az keyvault key show --vault-name $CMKKeyVaultName --name $ACRCMKName --query key.kid -o tsv)

ACRManagedID="ACR-identity"
az identity create --resource-group $ResourceGroup --name $ACRManagedID
ACRMIPrincipalID=$(az identity show --resource-group $ResourceGroup --name $ACRManagedID --query 'principalId' --output tsv)
az keyvault set-policy --resource-group $ResourceGroup \
  --name $CMKKeyVaultName --object-id $ACRMIPrincipalID \
  --key-permissions get unwrapKey wrapKey

# Create an ACR to store images
ACRName="enterpriseaksregistry"
az acr create --resource-group $ResourceGroup --name $ACRName \
  --sku Premium \
  --key-encryption-key $ACRKeyURI \
  --identity $ACRManagedID
ACRID=$(az acr show --name $ACRName --query 'id' --output tsv)

# Create a vNet for AKS
AKSvNetname="aks-vnet"
AKSvNetprefix="10.1.0.0/16"
AKSSubnetName="aks-1-subnet"
AKSSubnet="10.1.0.0/24"
az network vnet create --name $AKSvNetname --resource-group $ResourceGroup \
  --address-prefixes $AKSvNetprefix --subnet-name $AKSSubnetName --subnet-prefixes $AKSSubnet

AKSvNetResourceID=$(az network vnet show --resource-group $ResourceGroup --name $AKSvNetname --query id -o tsv)
AKSSubnetResourceID=$(az network vnet subnet show -g $ResourceGroup --vnet-name $AKSvNetname -n $AKSSubnetName --query id -o tsv)
az role assignment create --assignee $AKSMIPrincipalID --role "Network Contributor" --scope $AKSSubnetResourceID

# Create subnet for the pods
PodSubnetName="aks-1-pods"
PodSubnet="10.1.4.0/22"
az network vnet subnet create --vnet-name $AKSvNetname --resource-group $ResourceGroup \
  --address-prefixes $PodSubnet --name $PodSubnetName
PodSubnetResourceID=$(az network vnet subnet show -g $ResourceGroup --vnet-name $AKSvNetname -n $PodSubnetName --query id -o tsv)

# Create a resource group for the Hub
HubResourceGroup="CentralNetwork"
Location="uksouth"
az group create --name $HubResourceGroup --location $Location


# Create the Hub vNet
HubvNetname="hub-vnet"
HubvNetprefix="10.0.0.0/16"
AppGWSubnetName="appgw-subnet"
AppGWSubnet="10.0.0.0/24"
az network vnet create --name $HubvNetname --resource-group $HubResourceGroup \
  --address-prefixes $HubvNetprefix --subnet-name $AppGWSubnetName --subnet-prefixes $AppGWSubnet

HubvNetResourceID=$(az network vnet show --resource-group $HubResourceGroup --name $HubvNetname --query id -o tsv)
AppGWSubnetResourceID=$(az network vnet subnet show -g $HubResourceGroup --vnet-name $HubvNetname -n $AppGWSubnetName --query id -o tsv)

# Peer the Hub and the AKS vNets
az network vnet peering create \
  --name AppGWtoAKSVnetPeering \
  --resource-group $HubResourceGroup \
  --vnet-name $HubvNetname \
  --remote-vnet $AKSvNetResourceID \
  --allow-vnet-access
az network vnet peering create \
  --name AKStoAppGWVnetPeering \
  --resource-group $ResourceGroup \
  --vnet-name $AKSvNetname \
  --remote-vnet $HubvNetResourceID \
  --allow-vnet-access

# Create Public IP address for the AppGW
AppGWPublicIPName="appgw-pip"
az network public-ip create \
  --name $AppGWPublicIPName \
  --resource-group $HubResourceGroup \
  --allocation-method Static \
  --sku Standard

# Create a WAF policy set
WAFName="appgw-default-waf"
az network application-gateway waf-policy create \
  --name $WAFName \
  --resource-group $HubResourceGroup \
  --type OWASP \
  --version 3.2

# Create the Application Gateway
AppGWName="aks-appgw"
az network application-gateway create \
  --name $AppGWName \
  --resource-group $HubResourceGroup \
  --sku WAF_v2 \
  --public-ip-address $AppGWPublicIPName \
  --vnet-name $HubvNetname \
  --subnet $AppGWSubnetName \
  --waf-policy $WAFName \
  --priority 100

AppGWResourceId=$(az network application-gateway show -n $AppGWName -g $HubResourceGroup -o tsv --query "id")

# Create Log Analytics Workspace
LogAnalyticsName="aks-logs"
az monitor log-analytics workspace create \
  --resource-group $ResourceGroup \
  --workspace-name $LogAnalyticsName \
  --location $Location

LogAnalyticsWorkspaceResourceId=$(az monitor log-analytics workspace show \
    --resource-group $ResourceGroup \
    --workspace-name $LogAnalyticsName \
    --query id \
    --output tsv)


# Create a cluster
KubernetesVersion="1.28.3"
AKSTier="Standard"
AKSName="EnterpriseAKS"
AKSPoolVMSize="Standard_D2as_v4"
az aks create \
  --name $AKSName \
  --resource-group $ResourceGroup \
  --kubernetes-version $KubernetesVersion \
  --tier $AKSTier \
  --assign-identity $AKSMIResourceID \
  --enable-encryption-at-host \
  --node-osdisk-diskencryptionset-id $DiskEncID \
  --enable-azure-keyvault-kms \
  --azure-keyvault-kms-key-vault-network-access "Public" \
  --azure-keyvault-kms-key-id $AKSKeyURI \
  --enable-addons azure-policy,monitoring,ingress-appgw \
  --enable-aad \
  --enable-azure-rbac \
  --enable-defender \
  --attach-acr $ACRName \
  --network-plugin azure \
  --pod-subnet-id $PodSubnetResourceID \
  --service-cidr 172.16.0.0/16 \
  --dns-service-ip 172.16.0.10 \
  --vnet-subnet-id $AKSSubnetResourceID \
  --api-server-authorized-ip-ranges <YOUR_IP_ADDRESS> \
  --appgw-id $AppGWResourceId \
  --node-count 2 \
  --node-vm-size $AKSPoolVMSize \
  --nodepool-taints CriticalAddonsOnly=true:NoSchedule \
  --nodepool-name sys \
  --zones 1 2 3 \
  --workspace-resource-id $LogAnalyticsWorkspaceResourceId \
  --no-ssh-key

AKSID=$(az aks show --name $AKSName --resource-group $ResourceGroup --query id -o tsv)

# Set the rights to the AGIC Identity
AGICAddonIdentity=$(az aks show --name $AKSName --resource-group $ResourceGroup -o tsv --query "addonProfiles.ingressApplicationGateway.identity.clientId")
az role assignment create \
  --assignee $AGICAddonIdentity \
  --scope $AppGWSubnetResourceID \
  --role "Network Contributor"

# Add a second nodepool for the app
AppNodepoolName="app"
AppNodepoolVMSize="Standard_D2as_v4"
az aks nodepool add \
  --cluster-name $AKSName \
  --name $AppNodepoolName \
  --resource-group $ResourceGroup \
  --enable-cluster-autoscaler \
  --enable-encryption-at-host \
  --max-count 3 \
  --min-count 0 \
  --mode User \
  --node-count 0 \
  --node-osdisk-type Ephemeral \
  --node-vm-size $AppNodepoolVMSize \
  --node-osdisk-size 50 \
  --pod-subnet-id $PodSubnetResourceID \
  --vnet-subnet-id $AKSSubnetResourceID \
  --zones 1 2 3

# Grant cluster-admin role to myself
MyID=$(az account show --query user.name -o tsv)

az role assignment create \
  --assignee $MyID \
  --scope $AKSID \
  --role "Azure Kubernetes Service RBAC Cluster Admin"

# Get the cluster credentials
az aks get-credentials --name $AKSName --resource-group $ResourceGroup --overwrite-existing
kubelogin convert-kubeconfig

# Import the image into the registry
az acr import --name $ACRName --source docker.io/library/nginx:latest

# Create a Kubernetes namespace for the application
kubectl create namespace testapp

# Create a test application
kubectl create deployment webapp --image=${ACRName}.azurecr.io/library/nginx:latest --replicas=3 --port=80 -n testapp
# Check the application deployment. It might take ~3-4 minutes because AKS will create a new node in the nodepool.
# Wait until the pods turn from "Pending" to "Running"
kubectl get pods -n testapp
# Create a Kubernetes Service for the app
kubectl expose deployment webapp --type=ClusterIP -n testapp
# Create an ingress rule
kubectl create ingress webapp-ingress --class=azure-application-gateway --rule="/=webapp:80" -n testapp

# Get the public IP address. This is the same as the AppGW's Public IP address
kubectl get ingress -n testapp

# Clean-up the playground
az group delete --name $ResourceGroup
az group delete --name $HubResourceGroup