Introduction
This post introduces an educational use-case what you can implement at home/office. The use-case is around object recognition but the focus is on the used tools and technologies and how to combine them. You can gain fundamental knowledge about:
- Remote edge cloud with Azure Arc
- On-premise Kubernetes cluster
- AI model training with Azure ML
- Solution Architecture thinking
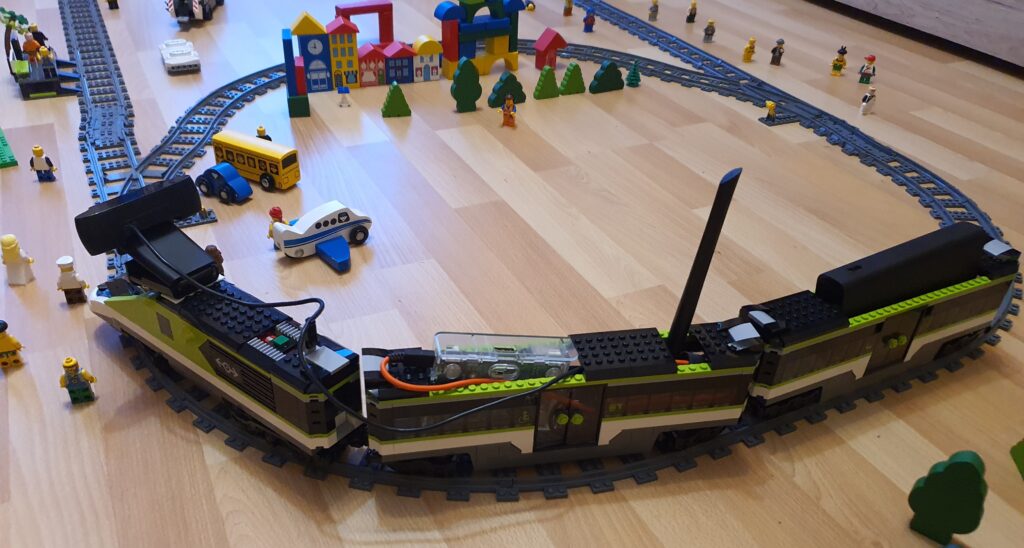
In this solution, we build up a system where we fix a camera to a (toy) train and let it go around and take pictures about the surroundings. We train an AI model which will recognize LEGO figures and mark them on the picture. And finally we will use a local server where we collect the pictures and it runs Kubernetes to host the model. It sounds complex but there are lot of supporting technologies which makes it easy to deploy.
Due to the high amount of involved technologies, I split the use-case to smaller pieces and posts. Each post focuses on one dedicated area of the project hence please fulfill the pre-requisites first.
The whole solution is documented on GitHub with focusing only on the technical steps without extra explanations: https://github.com/szasza576/arc-iotrains/
Pre-requisites
You will need the followings:
- Azure subscription (with ~€20 budget. If you don’t delete the environment then the Storage Account and the Container Registry will generate some costs.)
- An on-premise PC, VM, Server to install Kubernetes
- Install Kubernetes. See Kubernetes deployment
- Connect your cluster with Arc. See Azure Arc with on-prem Kubernetes
- Deploy an Azure ML environment and attach your Kubernetes cluster. See Azure ML with our own Kubernetes cluster
- Train your own model and deploy it to your Kubernetes cluster. See Azure ML in action with Lego figures
- USB Camera + Raspberry Pi … or an ESP32-CAM
- Powerbank
- A toy train with tracks and LEGO figures.
Note that I use an Nvidia GPU because the object detector model works with CUDA acceleration. Nevertheless CPU based inference shall work as well but it will require another “Environment” configuration what I don’t discuss here yet. Once I will have some time, I try to come back and update the article with CPU based inference so we can eliminate the GPU dependency.
Overview
The use-case
One picture says more than thousand words so this is what we would like to achieve.
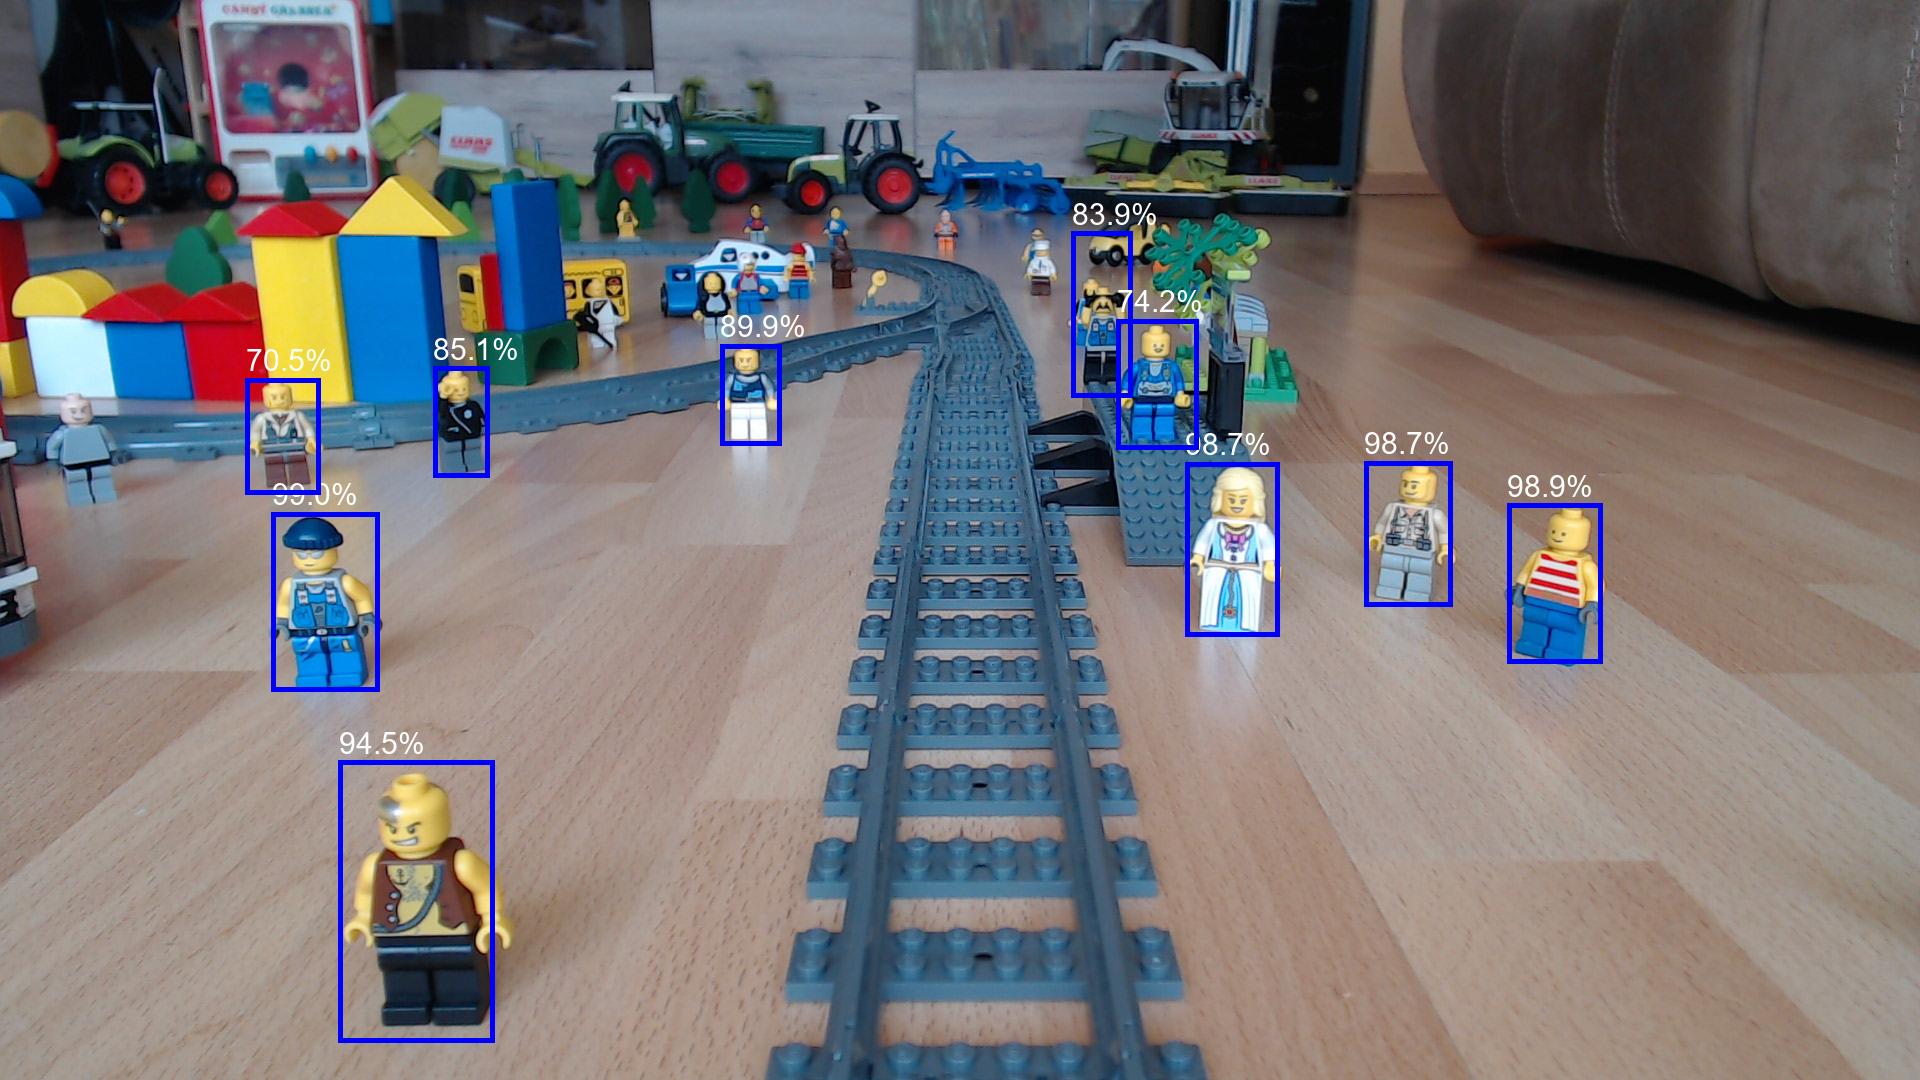
The idea here is an object recognition solution which finds and marks the LEGO figures. This can be useful for public picture collection where you need to mask people’s face and there you can use a blur effect instead of framing (just think to Google’s Streetview).
The Setup
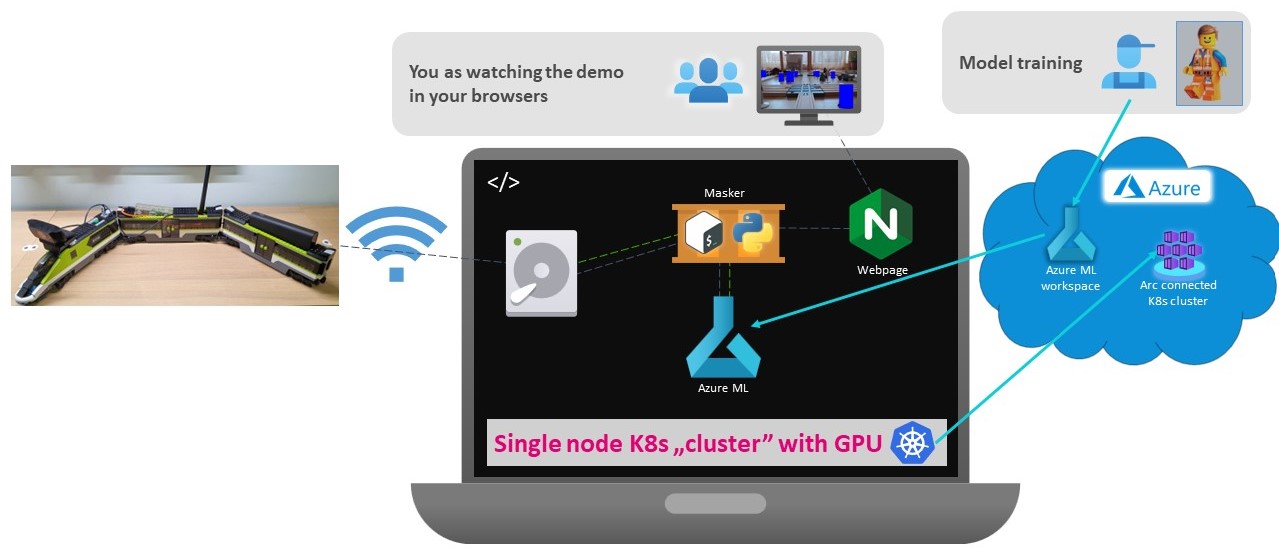
The train create pictures as fast as it can and saves it to a local server. The server is running Kubernetes and it is attached to Azure via Azure Arc. Arc ensures that we can manage and deploy services from Azure to the server. An AI model is trained in Azure with the help of Azure ML. Azure Arc can attach our on-premise server to Azure ML so we will see our server as compute cluster in Azure ML. Our own AI model can be deployed to the on-premise server with few clicks in the Azure ML studio. A small scripts (“Masker” on the picture) reads the storage area and sends the new pictures to the model endpoint for inference. The model identifies the minifigures and returns their coordinates. The Masker script draws a frame (or a full rectangle) to the coordinates to mark the found minifigures. Finally it saves both the original and the masked pictures to a webpage’s volume which visualizes the results.
The other post referred in the pre-requisite section already discuss about the Kubernetes, Azure Arc, Azure ML setup and shows how to build you own model.
This post focuses on the data collection (the train) and the data evaluation (inference) part.
Train
You can notice different train setups on the shared pictures. This is because as any solutions this also evolved. The very first setup used a small train with a USB camera and a Raspberry Pi (RPi). However the RPi is a small computer, it was still too big and heavy to the little train.
My son loves the trains and he got a LEGO train at Christmas. What a lucky situation as the LEGO train is much more massive and it can easily take the extra weight 🙂
This improved a lot on the mechanical stability.
Nevertheless, I really liked the little train so I created a solution based on ESP32-CAM which also works nicely and it is a much more cost effective solution than an USB CAM + Raspberry.
I will introduce both solutions and you can decide which you pick and implement.
LEGO train with Raspberry
On the below picture you can see an idea how to place the components but I leave the construction to you and instead I focus on the technical parts.
Just a hint: leave enough cable between the wagons so those can bend in the corners.
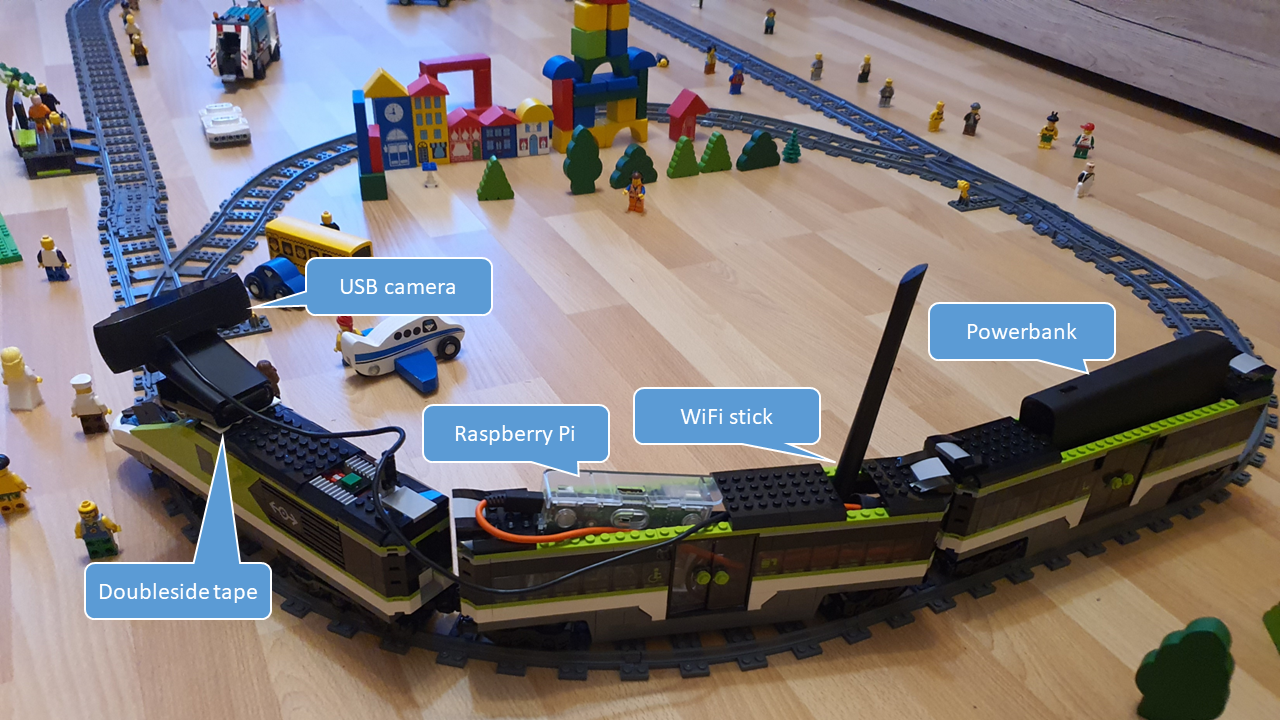
The setup is very simple. The USB camera is connected to the Raspberry, the WiFi stick as well. The powerbank gives enough power to the system to operate.
As you can see the WiFi stick is a bigger one. Originally, I tried with a WiFi4 (n) module but the picture transfer was very slow hence I used an external WiFi5 (ac) stick which brings much more bandwidth and the transfer time is negligible.
The Raspberry is a B+ variant so it is very old and doesn’t have too much compute power what we don’t need luckily. Most of the USB cameras also support (M)JPEG encoding on their side so we can grab pictures directly to jpeg. Just as a comparison: grabbing a picture and encoding by the RPi takes ~4 seconds while grabbing using the camera’s hardware encode takes ~0.5 seconds.
A small script will run on the RPi which grabs a picture and saves into the an NFS mounted folder. If you followed the steps on the Kubernetes deployment post then an NFS server shall be prepared on the server. We already set up a share for the NFS persistent volume. However it is not nice to put anything inside this directory it is easy to implement. (Note, in production always use dedicated folder and proper access control!!!)
Create a folder on the server:
mkdir -p /mnt/k8s-pv-data/train-pics
sudo chmod 777 /mnt/k8s-pv-data/train-pics
sudo chown nobody:nogroup /mnt/k8s-pv-data/train-pics
Now we can jump to the Raspberry setup
- Install a fresh Raspbian to the RPi
- Setup the WiFi access
- Configure a static IP address from the range of the earlier configured “NFS-CIDR”. In my case, I used 192.168.0.130
sudo tee -a /etc/dhcpcd.conf<<EOF
interface wlan0
static ip_address=192.168.0.130/24
static routers=192.168.0.1
static domain_name_servers=192.168.0.1,8.8.8.8
EOF- Mount the previously shared folder from the server
sudo apt update
sudo apt install -y nfs-common

echo "192.168.0.128:/mnt/k8s-pv-data/train-pics /mnt/pics nfs defaults 0 0" | sudo tee -a /etc/fstab- Download the picture taker script and restart the RPi
wget https://raw.githubusercontent.com/szasza576/arc-iotrains/main/pics-capture/pics.sh
chmod +x pics.sh

sudo reboot
The pics.sh script uses the v4l2-ctl tool to grab pictures from the camera. Based on your camera you might need to fine-tune the parameters, especially the “pixelformat”. I used a Logitech C922 camera in my setup.
You can use these commands to get your camera’s capability:
v4l2-ctl --list-devices
v4l2-ctl --list-formats-ext
If you use a camera which is not v4l2 compatible then you can use another like “fswebcam”, “streamer” or “ffmpeg”. I have to leave this setup to you as this is HW specific. Note that, the mentioned programs do the jpeg encoding by CPU so it might slow down the whole process.
The script currently grabs pictures in 720p which is a good balance between the speed and the quality. If you wish you can change the width and height parameters in the script. Also the picture resolution directly impacts the inference part so if you have a stronger GPU then you can go with higher resolution but if you use a notebook then it is smarter to decrease the resolution.
As a reference, analyzing a 1280×720 size picture takes ~40ms on a desktop with Nvidia 3080Ti and takes ~900ms on notebook with Nvidia 940M.
Train with ESP32-CAM
A cheaper and lighter solution is to fix an ESP32-CAM micro-controller to train. This very cheap (~€8) device can take good enough pictures for our use-case. Okay, you cannot nominate to any photo competition with this quality but it is fine here.
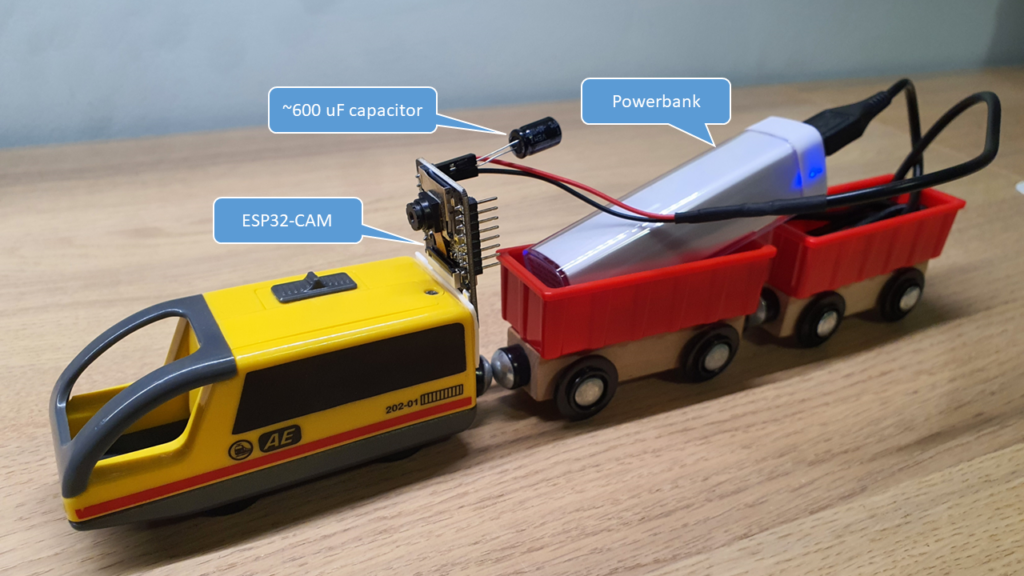
You can fix the controller with a doubleside tape. As the micro-controller is very conservative in the energy usage hence a small powerbank is enough.
The ESP is very sensitive to get proper 5V inputs. It draws a bit more when it boots and with a small powerbank it can lead to voltage drop and a restart. This would be an infinite loop hence a capacitor can help here in the stabilization. Its size doesn’t really matter but one between 100-1000 uF would be enough.
Also the ESP has its own protection against of voltage drop which is called brownout effect. This can be switched off by program.
For the programing, we can use the built-in “CameraWebServer” sample from the Arduino IDE. We need only few modifications like disabling the brownout protection and set up static IP address. We need the static IP address as the Server will connect to the ESP32 to grab the images. So the direction is different here. The RPi pushed the imaged but here the server pulls the images from the ESP32.
- Download the modified program from here: https://github.com/szasza576/arc-iotrains/tree/main/ESP32-CAM
- Open the CameraWebServer.ino file and configure your WiFi credentials. You can also change the IP address as well or you can leave mine as 192.168.0.131. Note that this IP can be anything in your range it is not needed to pick from the NFS-CIDR like in the RPi case because it won’t use NFS.
- Based on your own model you might need to select another camera module.
- Compile and Upload the file to your ESP32 (you can find guides on the internet if you stuck)
Once you flashed the device then you can test it in your browser and enter the IP: http://192.168.0.131
Note that it is just “http” and not “https” so if you see nothing then doublecheck this.
Detector (Marker)
The Marker service is a containerized bash and python scripts which picks a new image sends it to the AI endpoint for evaluation and then draw a frame to the got coordinates.
Watcher and Masking scripts
The watcher.sh bash script has 2 mode of operation:
- It grabs an image from the ESP32 controller
- It checks a “source” folder for new uploaded images
The mode depends on environmental variables which can be configured in Kubernetes.
Once a new image is ready then it calls the masking.py script which sends the picture to the RestAPI endpoint of the AI model which was deployed earlier. In the Rest response it will get the coordinates and it will draw a frame and saves the image in a new name which is the original name + “-masked”.
When the python script finished then the bash scripts continues and saves the processed and the original pictures in the “archive” folder for later reference. In addition it saves these 2 pictures in the webfolder and name them exactly as “original.jpg” and “masked.jpg”.
The webfolder is a common folder with an Nginx container which hosts a small Javascript webpage which loads the 2 images and updates the page in every second.
The watcher.sh always waits for fresh images so if there are no new images then it waits and doesn’t consume extra compute resource.
Kubernetes manifests
The above 2 scripts are organized into one container and deployed via Kubernetes. The Kubernetes manifest files ensure all the necessary configuration which are needed by the scripts.
Deployment is the main manifest which creates 1 pod with 2 containers. One which includes the scripts and another one which is an nginx service. As it was mentioned earlier the watcher.sh uses environmental variables to get its configuration these are the followings:
- “confidencethreshold” can be found in the deployment file. The AI model returns with a confidence value about the findings. By setting this value we can influence the python script to mask/frame only those objects where the confidence is higher then this value. As default it is configured to 0.7 which is 70% confidence.
- “espcamip” can be configured by a configmap. This is optional.
If it is configured then the watcher script tries to connect to the IP address and get an image.
If it is NOT configured then the watcher scrip checks the source folder for new images.
This is the switch between the 2 mode of operations. - “inference-secret” can be configured by a secret which includes the scoring endpoint’s URL and the key for authentication. These can be gathered from Azure ML.
- “blob-secret” can be configured by another secret. This is optional.
If this secret is defined then the watcher script also uploads the results to an Azure Storage Account. I use this solution for bigger demos where my uplink would be a bottleneck if I share my webpage. Likely you do NOT need this.
Besides these configuration the pod requires 2 persistent volumes:
- “source” volume is the NFS share folder where we upload the images. This is mounted via a hostpath persistent volume and its persistent volume claim. Note that if you have a multi-node setup and your pod is scheduled to another node than where you upload the images then this won’t work.
- “archive” volume is an automatically generated persistent volume by the NFS-subdirectory driver. Here we can store the processed and the original images for later use. Note that it can happen that the Marker service is not as fast as the picture generation. The watcher.sh always picks the latest image from the folder hence it can happen (and it’s likely) that it skips some images.
The minimalistic webpage can be also burnt a container image but it can be added from a ConfigMap. The ConfigMaps can store up to 1MB of data which is more then enough here and in this way we don’t need to build another container image for the website. The html page is stored in a configmap and it is attached to the nginx container.
Finally there is a service file which exposes the nginx webserver from the cluster. It is a LoadBalancer type service hence the cluster will allocate a routable IP address to this service. (From the previous guide) MetalLB will allocate an IP address from the “Ingress-range” like 192.168.0.141
Deployment
Similar to the previous post we will use variables here.
ACRName="iotrainsacr"
MLWorkspaceName="aml-iotrains"
First we need to build the Detector image. The easiest way to use our ACR for that and also store the image there. The following command will build directly from GitHub and stores the image in the ACR.
az acr build -r $ACRName https://github.com/szasza576/arc-iotrains.git#main:detector/dockerimage -f Dockerfile --platform linux -t detector:latestThe we can deploy the basic Kubernetes manifests like the Namespace, the HTML-configmap, the Marker-Service, the Persistent Volumes.
kubectl apply -f https://raw.githubusercontent.com/szasza576/arc-iotrains/main/detector/k8s-manifests/namespace.yaml
kubectl apply -f https://raw.githubusercontent.com/szasza576/arc-iotrains/main/detector/k8s-manifests/html-configmap.yaml
kubectl apply -f https://raw.githubusercontent.com/szasza576/arc-iotrains/main/detector/k8s-manifests/marker-service.yaml
kubectl apply -f https://raw.githubusercontent.com/szasza576/arc-iotrains/main/detector/k8s-manifests/pv-source.yaml
kubectl apply -f https://raw.githubusercontent.com/szasza576/arc-iotrains/main/detector/k8s-manifests/pvc-archive.yaml
kubectl apply -f https://raw.githubusercontent.com/szasza576/arc-iotrains/main/detector/k8s-manifests/pvc-source.yaml
OPTIONAL Note that, you shall create this ONLY with the ESP32-CAM. If you go with a Raspberry method then skip this step. If you use the ESP32-CAM then you need to create a ConfigMap with its IP address. Change the IP address in the below command if you used another one.
kubectl create configmap espcam-ip -n minifigures \
--from-literal espcamip="192.168.0.131"
We deployed the AI model from the Azure AI/ML studio earlier. This is a running container and it hosts a RestAPI endpoint. Its URL and Key can be found on the Endpoint’s page. The following commands use the Azure CLI to get these credentials and based on those it will create a Kubernetes Secret to store and attach it to the Marker app. Note that this works if you have only 1 Endpoint (as we expect here). If you need to redeploy then ensure to delete the old endpoint first.
AmlEndpoint=$(az ml online-endpoint list --resource-group $ResourceGroup --workspace-name $MLWorkspaceName --query [0].name --output tsv)
AmlURI=$(az ml online-endpoint show --name $AmlEndpoint --resource-group $ResourceGroup --workspace-name $MLWorkspaceName --query scoring_uri --output tsv)
AmlKey=$(az ml online-endpoint get-credentials --name $AmlEndpoint --resource-group $ResourceGroup --workspace-name $MLWorkspaceName --query primaryKey --output tsv)

kubectl create secret generic inference-secret -n minifigures \
 --from-literal scoreendpoint=$AmlURI \
 --from-literal scorekey=$AmlKey \
 --dry-run=client \
 -o yaml | \
 kubectl apply -f -
We built the container image and stored it in the ACR. The ACR requires authentication hence we need to create a PullSecret in Kubernetes. “Luckily” we activated the Admin account in the ACR so it generated a user and (2) password which can be used for authentication.
The following commands will grab these credentials by using the Azure CLI and then another command will create a Kubernetes Secret. Note the name of the secret, this is what you will find in the deployment file.
ACRUser=$(az acr credential show -n $ACRName -g $ResourceGroup --query username --output tsv)
ACRPassword=$(az acr credential show -n $ACRName -g $ResourceGroup --query 'passwords[0].value' --output tsv)

kubectl create secret docker-registry acr-secret -n minifigures \
  --docker-server="${ACRName}.azurecr.io" \
  --docker-username=$ACRUser \
  --docker-password=$ACRPassword
Finally we need to deploy the Marker Application itself. A Kubernetes deployment file brings all together and deploys our container. The manifest file can be downloaded from the Github repo but the registry name shall be replaced with your ACR name.
wget https://raw.githubusercontent.com/szasza576/arc-iotrains/main/detector/k8s-manifests/marker-deployment.yaml
sed -i s/"<YOURACR>"/$ACRName/g marker-deployment.yaml
kubectl apply -f marker-deployment.yaml
rm marker-deployment.yaml
This will create a pod which has 2 containers: the marker scripts and the nginx webserver.
Execution
Once everything else is ready then we can start generating pictures to our system.
If you built the Raspberry variant then you can log in to your RPi and start the pics.sh script to start generating pictures.
./pics.shOr if you built the ESP variant then just power on the ESP32 controller and ensure it booted up.
You can get the IP address of the webserver by running this command:
kubectl get svc -n minifigures maker-svcInsert the IP address into your browser as an http site (not https)
http://<MAKER'S IP ADDRESS>

#Example:
http://192.168.0.141
Troubleshooting
This is a complex project and it is likely you need to repeat/redo some steps. Don’t be discouraged this is in the game.
AI model redeployment
If you deploy a new AI model or redeploy an old one then you need to update the credentials in the ConfigMap.
AmlEndpoint=$(az ml online-endpoint list --resource-group $ResourceGroup --workspace-name $MLWorkspaceName --query [0].name --output tsv)
AmlURI=$(az ml online-endpoint show --name $AmlEndpoint --resource-group $ResourceGroup --workspace-name $MLWorkspaceName --query scoring_uri --output tsv)
AmlKey=$(az ml online-endpoint get-credentials --name $AmlEndpoint --resource-group $ResourceGroup --workspace-name $MLWorkspaceName --query primaryKey --output tsv)

kubectl create secret generic inference-secret -n minifigures \
 --from-literal scoreendpoint=$AmlURI \
 --from-literal scorekey=$AmlKey \
 --dry-run=client \
 -o yaml | \
 kubectl apply -f -
Then you need to restart the Marker App to get the new configuration. The easiest way is to delete the pod and let Kubernetes to recreate it.
kubectl delete pod -n minifigures -l app=markerFailed first AI model deployment
When you deploy your first AI endpoint then your cluster will download a container which includes all components necessary to run your model. This might be more than 10GB and takes a while. It can happen that your endpoint deployment fails due to timeout.
In this case wait until the image is pulled and your container is created on your cluster. Then delete the endpoint and recreate it. The recreation will use the same image which will be cached on your machine and hence the deployment will be much faster.
Issues with Nvidia containers
It can happen that the Nvidia containers won’t turn to ready state. This can happen especially after node restarts. In this case the easiest solution is to delete all nvidia related containers in the kube-system namespace.
Use the “kubectl get pods -n kube-system” command, find the nvidia pods and delete them with the “kubectl delete pods -n kube-system <NAME_OF_THE_POD>“