Introduction
AI/ML are complex topics and getting familiar with them and training our first model can be challenging. Azure ML simplifies the process and make it easy as an entry point to the AI/ML journey.
This article will will guide you through on an AI model training with Azure ML. It shows the whole process and at the end of the article you shall have a working model which can recognize Lego minifigures (or anything what you train) from pictures. As part of the AzureML the model will be deployed from the Azure ML Studio and we can use RestAPI for scoring.
Pre-requisites
This guide doesn’t have any special pre-requisites but a simple Azure subscription and few bucks for consumption.
Machine Learning in nutshell
Instead of going into deep how does the AI work, here I would like to focus more on the process how can we use it.
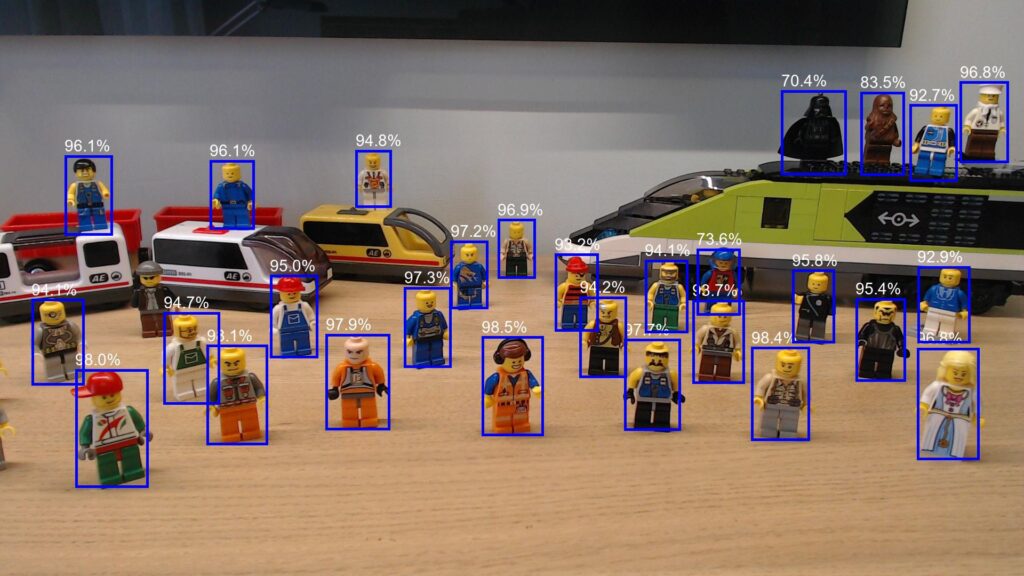
Let’s take an example like finding all the Lego figures on a picture automatically by AI.
- Create pictures from Lego minifigures and store them in a central storage. More pictures means better accuracy but create at least some hundreds (one thousand is perfect).
- Annotation/labeling means that we need to manually mark the pictures
- Train a model with some random parameters
- Test the trained model how does it perform
- Select the best model from a batch of trainings. Instead of just train 1 model, we can train multiple ones with different parameters then we can select the one which performs the best. Slightly change on the model parameters and until we find it a well performing model repeat steps 3-4.
- Running our ML model: this is the point where we have a trained and smart model and we deploy it on a compute node. In this article we will use our K8s cluster as compute capacity.
- Inference/Scoring: we would like to use our model to evaluate a content. For example finding all Lego figures on a picture. We feed the pictures to our model (typically via a RestAPI) and the model gives back the coordinate of the minifigures.
Regarding the whole training think it like this way: we have a base model (like a YOLO or R-CNN) which can recognize object but it has an empty brain and it has no idea what a Lego figure looks like. It is like a human brain. Until somebody doesn’t show a picture about several smörgås till we cannot imagine what is it. But if I show you 10 pictures about smörgås then you learn it and you can identify as well.

(Smörgås is sandwitch in Sweden.)
In the next chapters we walk through the entire process more deeply and have a working environment.
Azure ML workspace
Training an AI model is a complex process and requires several services. When we deploy an Azure ML workspace then Azure automatically deploys most of these additional services and hide them in the background so we don’t need to bother about them. Of course in an enterprise environment we have the option to deploy them according to the company’s compliance and attach them to the Azure ML workspace.
The following picture show the components which will be used under the Azure ML workspace umbrella.
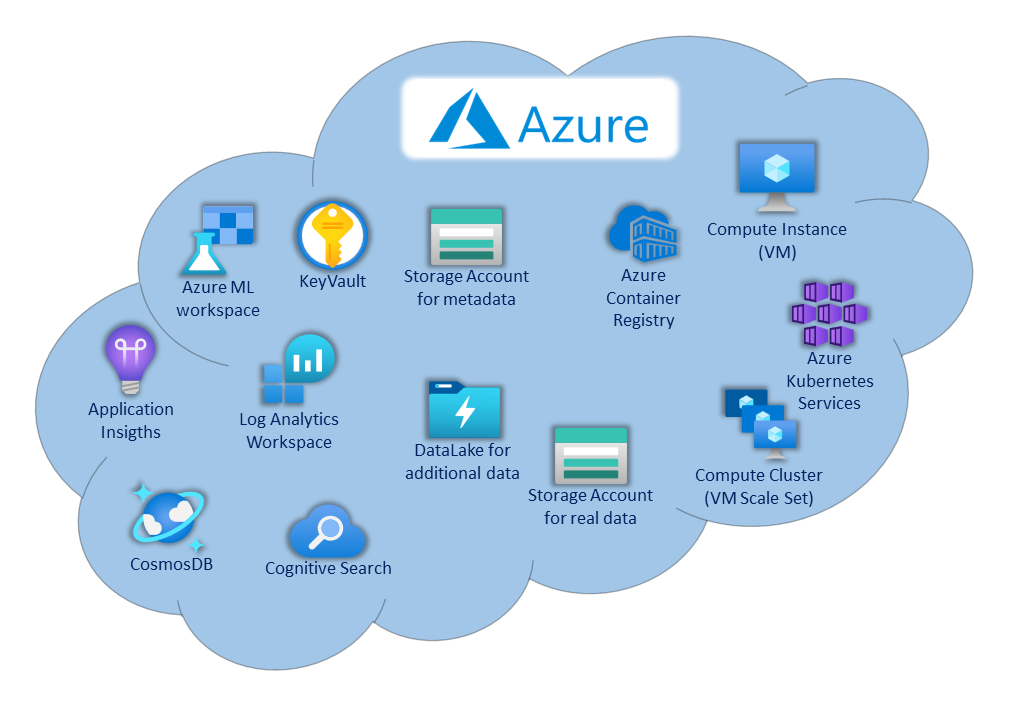
Azure ML components
- Azure ML workspace is the umbrella component which brings together the resources
- Azure KeyVault stores our secrets like connection tokens, keys, passwords, etc.
- Storage Account for metadata acts as the default storage for all the metadata. In Azure ML it isn’t necessary to store the data in this storage account but this is used to store all the metadata which are used to refer to real data. Nevertheless it can also store the real data too.
- Application Insights handle the logs from the trainer VMs, endpoint and all the components in the workspace.
- Log Analytics Workspace is the backend of the Application Insights.
- CosmosDB and Cognitive Search are used to analyze the high amount of logs stored.
- Datalake or additional Storage Accounts can be used to store the real training or scoring data. These are external storage solutions which can be attached to the Azure ML.
- Azure Container Registry stores container images. These container images provide a runtime environment to our models. All the necessary components are installed inside this image which are needed by our model like Python Torch.
- Compute Instance, Compute Cluster and AKS are used as compute capacity to train our model then run it for inference.
Deploy Azure ML
If you created an Azure ML workspace in the previous blog post then you can skip this entire chapter and jump to the Input picture creation chapter.
However the Azure ML environment is complex due to the lot of components but its deployment is relatively simple.
Variables
Similar to the previous articles, we will use variables for the deployment to make it easily configurable.
ResourceGroup="Arc-IoTrains"
Location="westeurope"
ACRName="iotrainsacr"
MLWorkspaceName="aml-iotrains"
Azure ML workspace
In a lab environment we can leave all sub-component creation to Azure. In a production environment we would independently create and harden the Storage Account, the KeyVault, the Container Registry, the User-assigned identities, Policies, etc. But this is far from a production environment so we can be lazy and use a single command.
az group create --name $ResourceGroup --location $Location
az acr create \
--resource-group $ResourceGroup \
--name $ACRName \
--admin-enabled true \
--sku Basic
ACRID=$(az acr show \
--name $ACRName \
--resource-group $ResourceGroup \
--query id \
--output tsv)
az ml workspace create \
--resource-group $ResourceGroup \
--name $MLWorkspaceName \
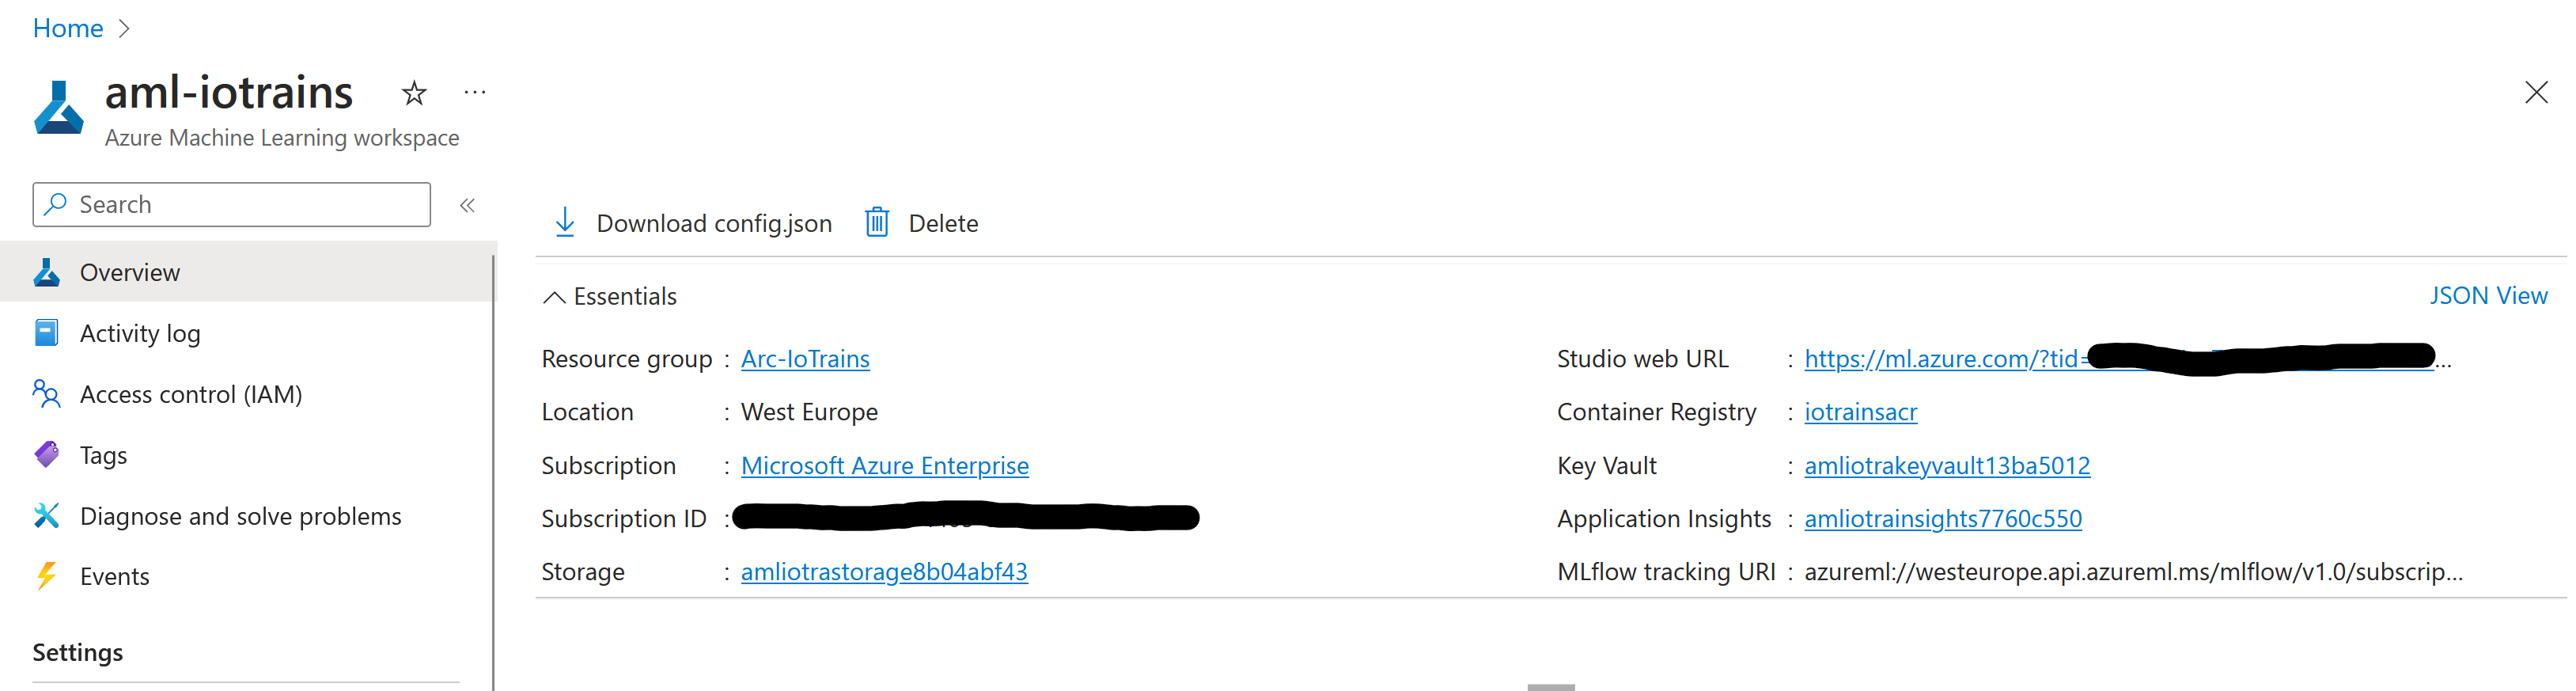
--container-registry $ACRNameOnce the deployment is ready then navigate to the Azure Portal and search our freshly created Azure ML workspace. It shall look like something like this.
Input picture creation
As a first step, we need to create pictures about the subject what we would like to train to our model. In this case those will be Lego minifigures. The model accuracy and quality will be better if we feed in more and more pictures hence we will need some hundreds of pictures from the Lego figures.
Some aspects too keep in mind:
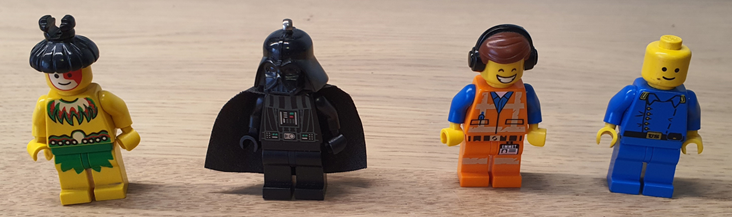
- Have as diverse input as possible to have the best results. If you have 80% blue figures then the model will be biased and it might not recognize yellow figures (yeah this is racists which is not tolerated).
- However Dart Vader is funny but he is very different from the others so it might mislead our training if you add it to the set.
- Use similar camera quality to that one what you will use for scoring. E.g.: if you use a 20MPixel camera for training but you will use an ESP32-CAM for scoring then the model will struggle.
- A good idea is to build the environment first and then start collecting pictures and use those for the training. Try to avoid artificial pictures.
- Around 500 pictures will be good while 1000 pictures will be great.
- One picture can contain multiple figures. The amount of figures counts.
- Try to collect pictures from different angle as well, not just front facing.
Create Data set
Now as we have the pictures then we shall upload them. As mentioned earlier we can use external Storage Account but we can use the default one as well … what we will do here.
- Open the Azure ML studio if it isn’t open yet.
- Click on Data on the left menu – You shall arrive to the Data assets page. Click on the Create button
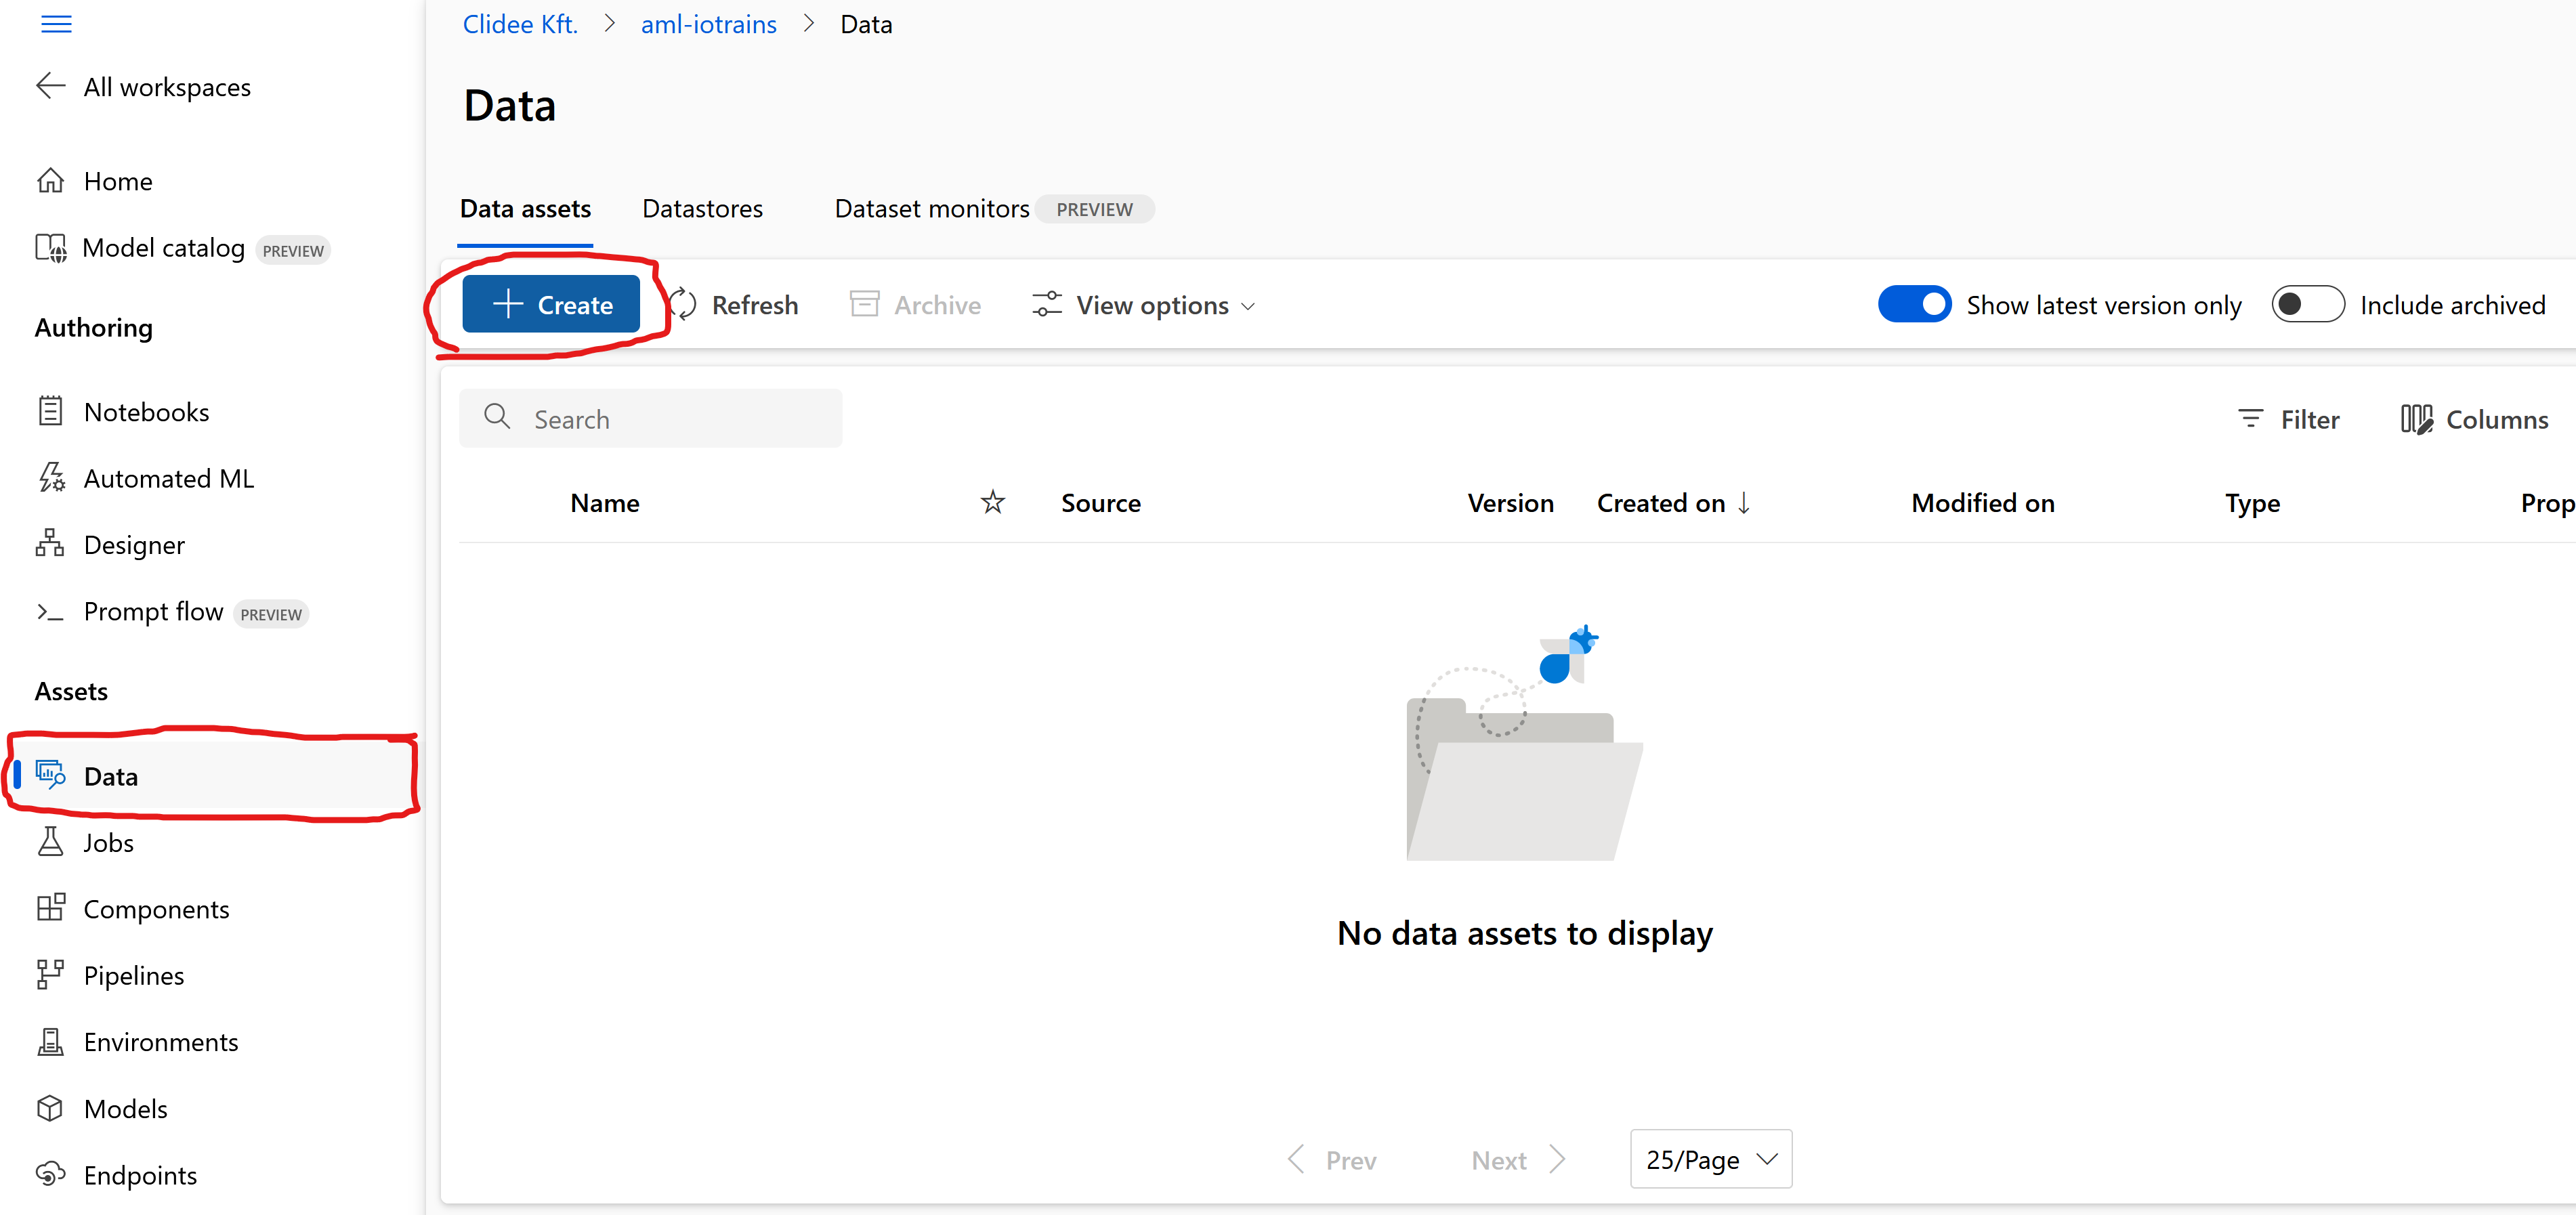
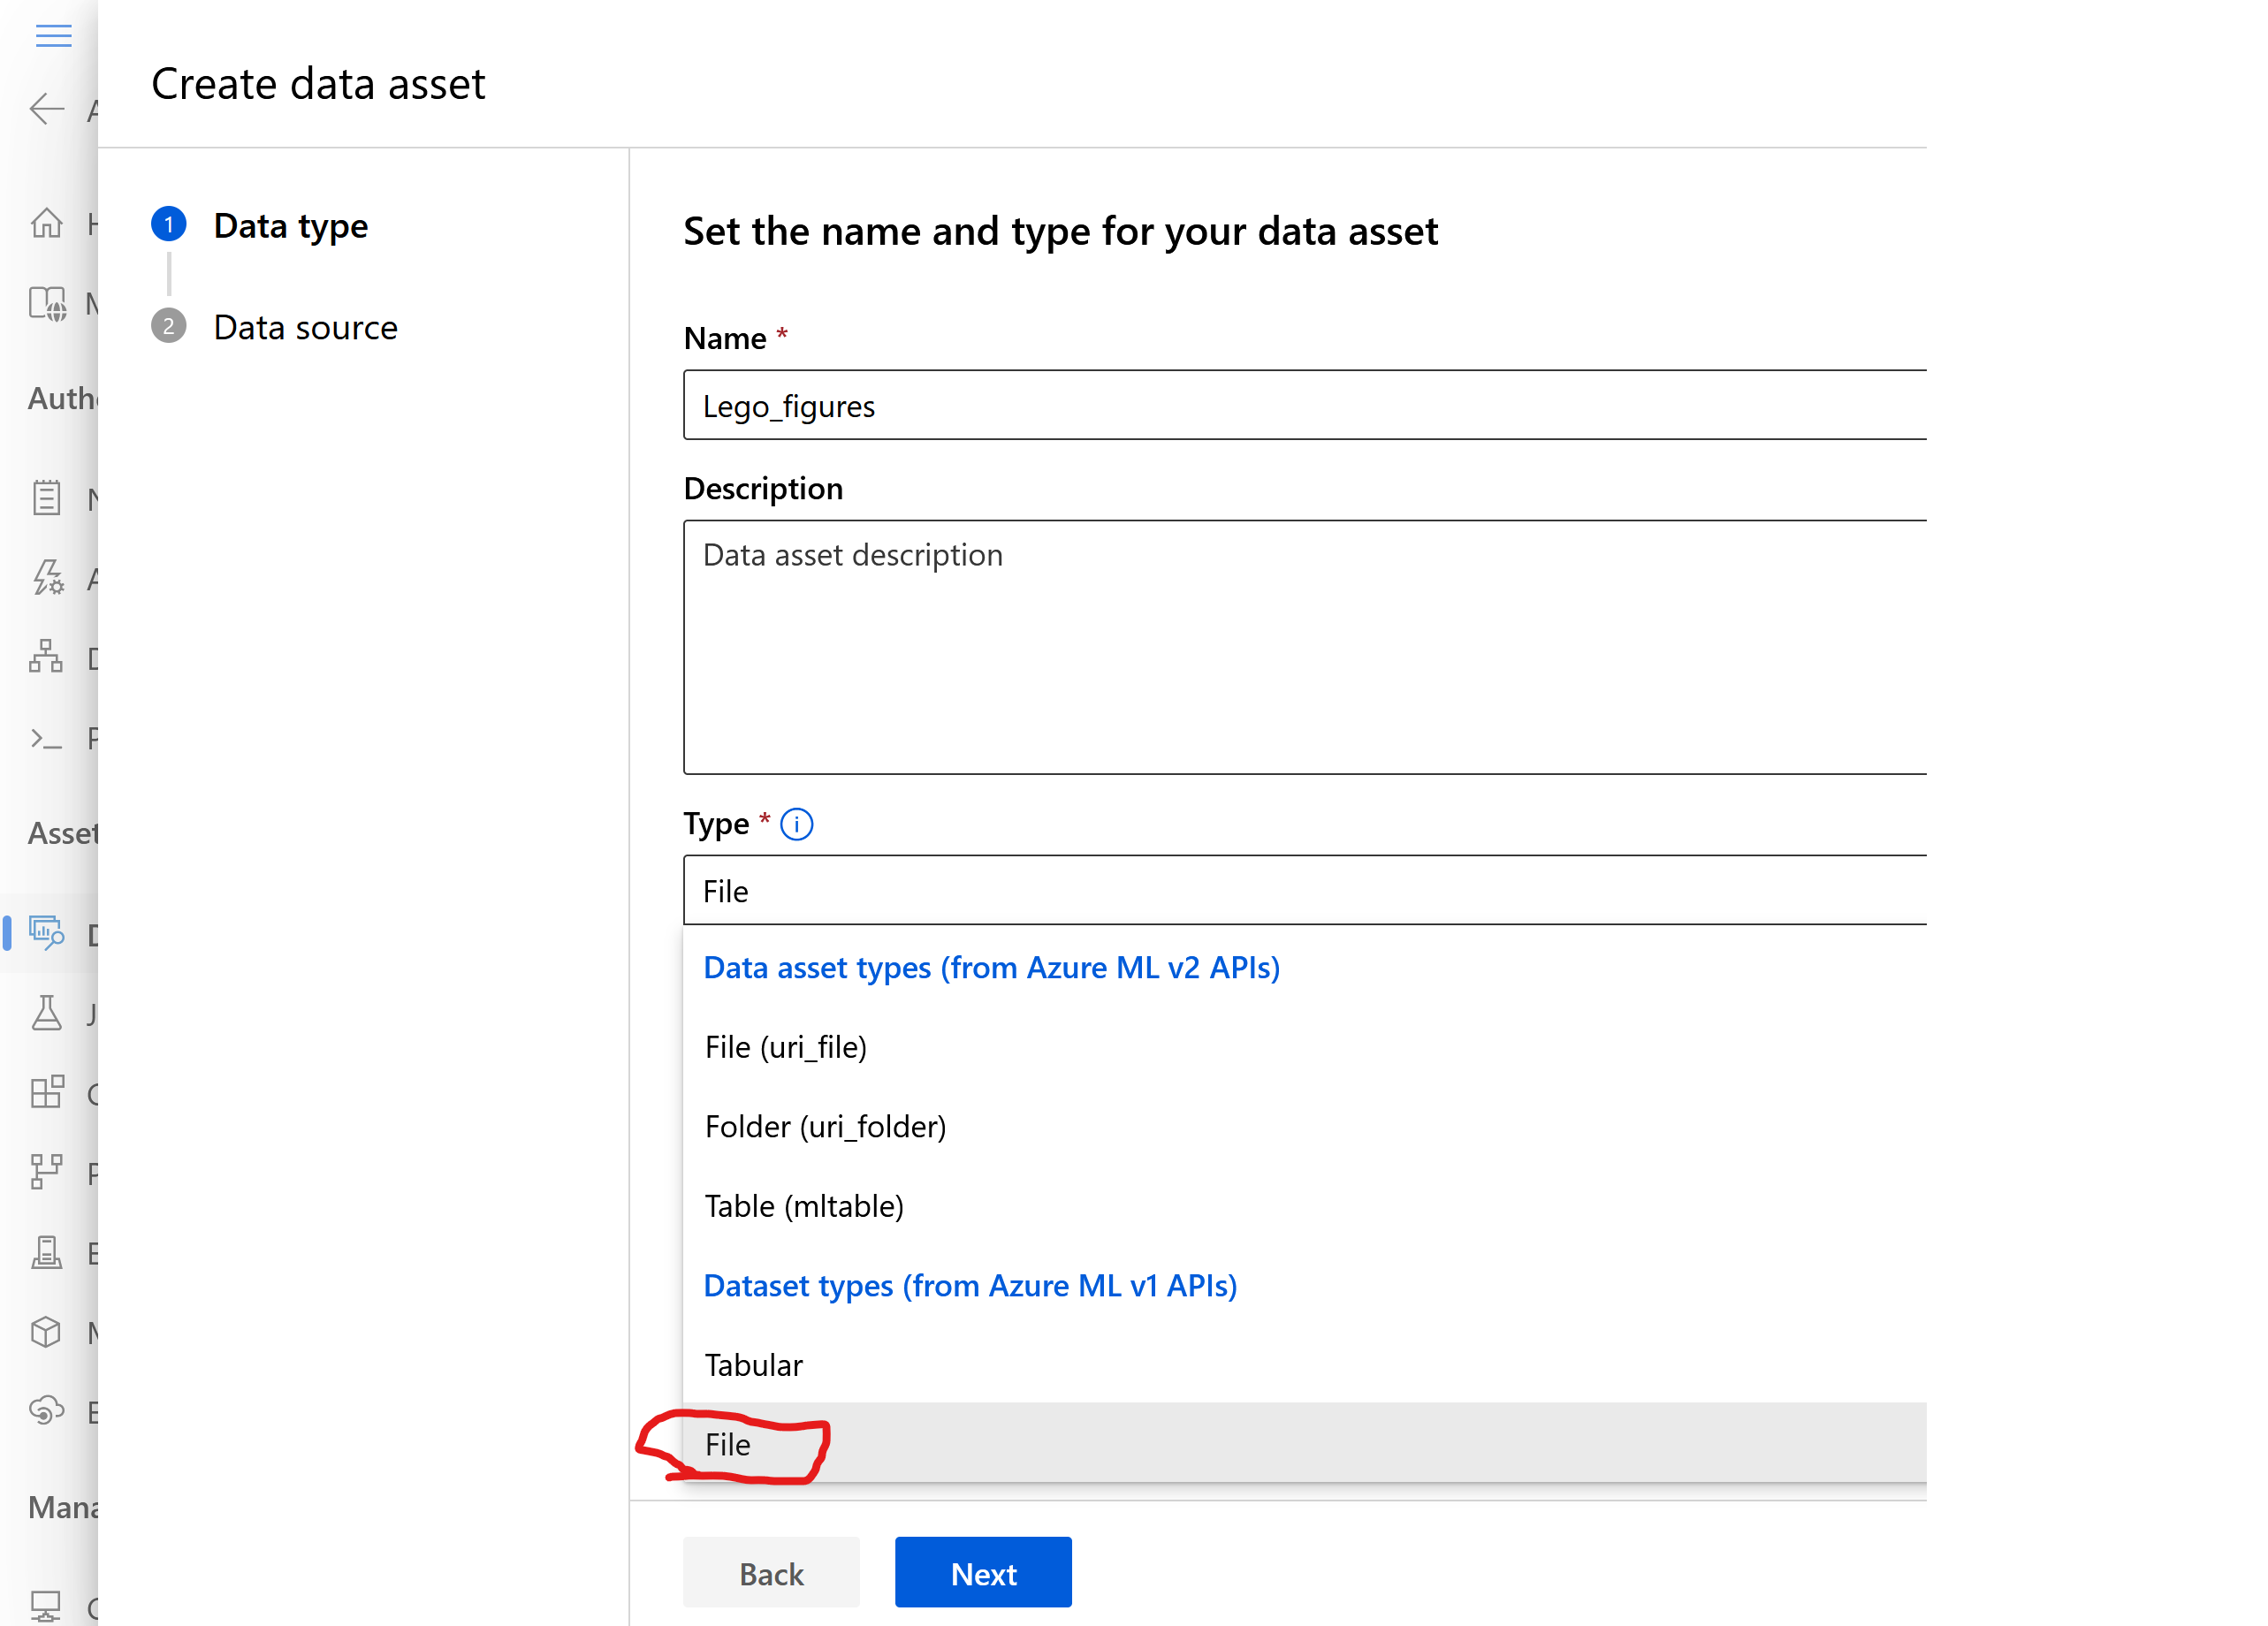
- Give a name like “Lego_figures”
- Select Type as Dataset types (from Azure ML v1 APIs) / File. It is at the most bottom. If you select wrong type then it won’t be visible in the Labeling.
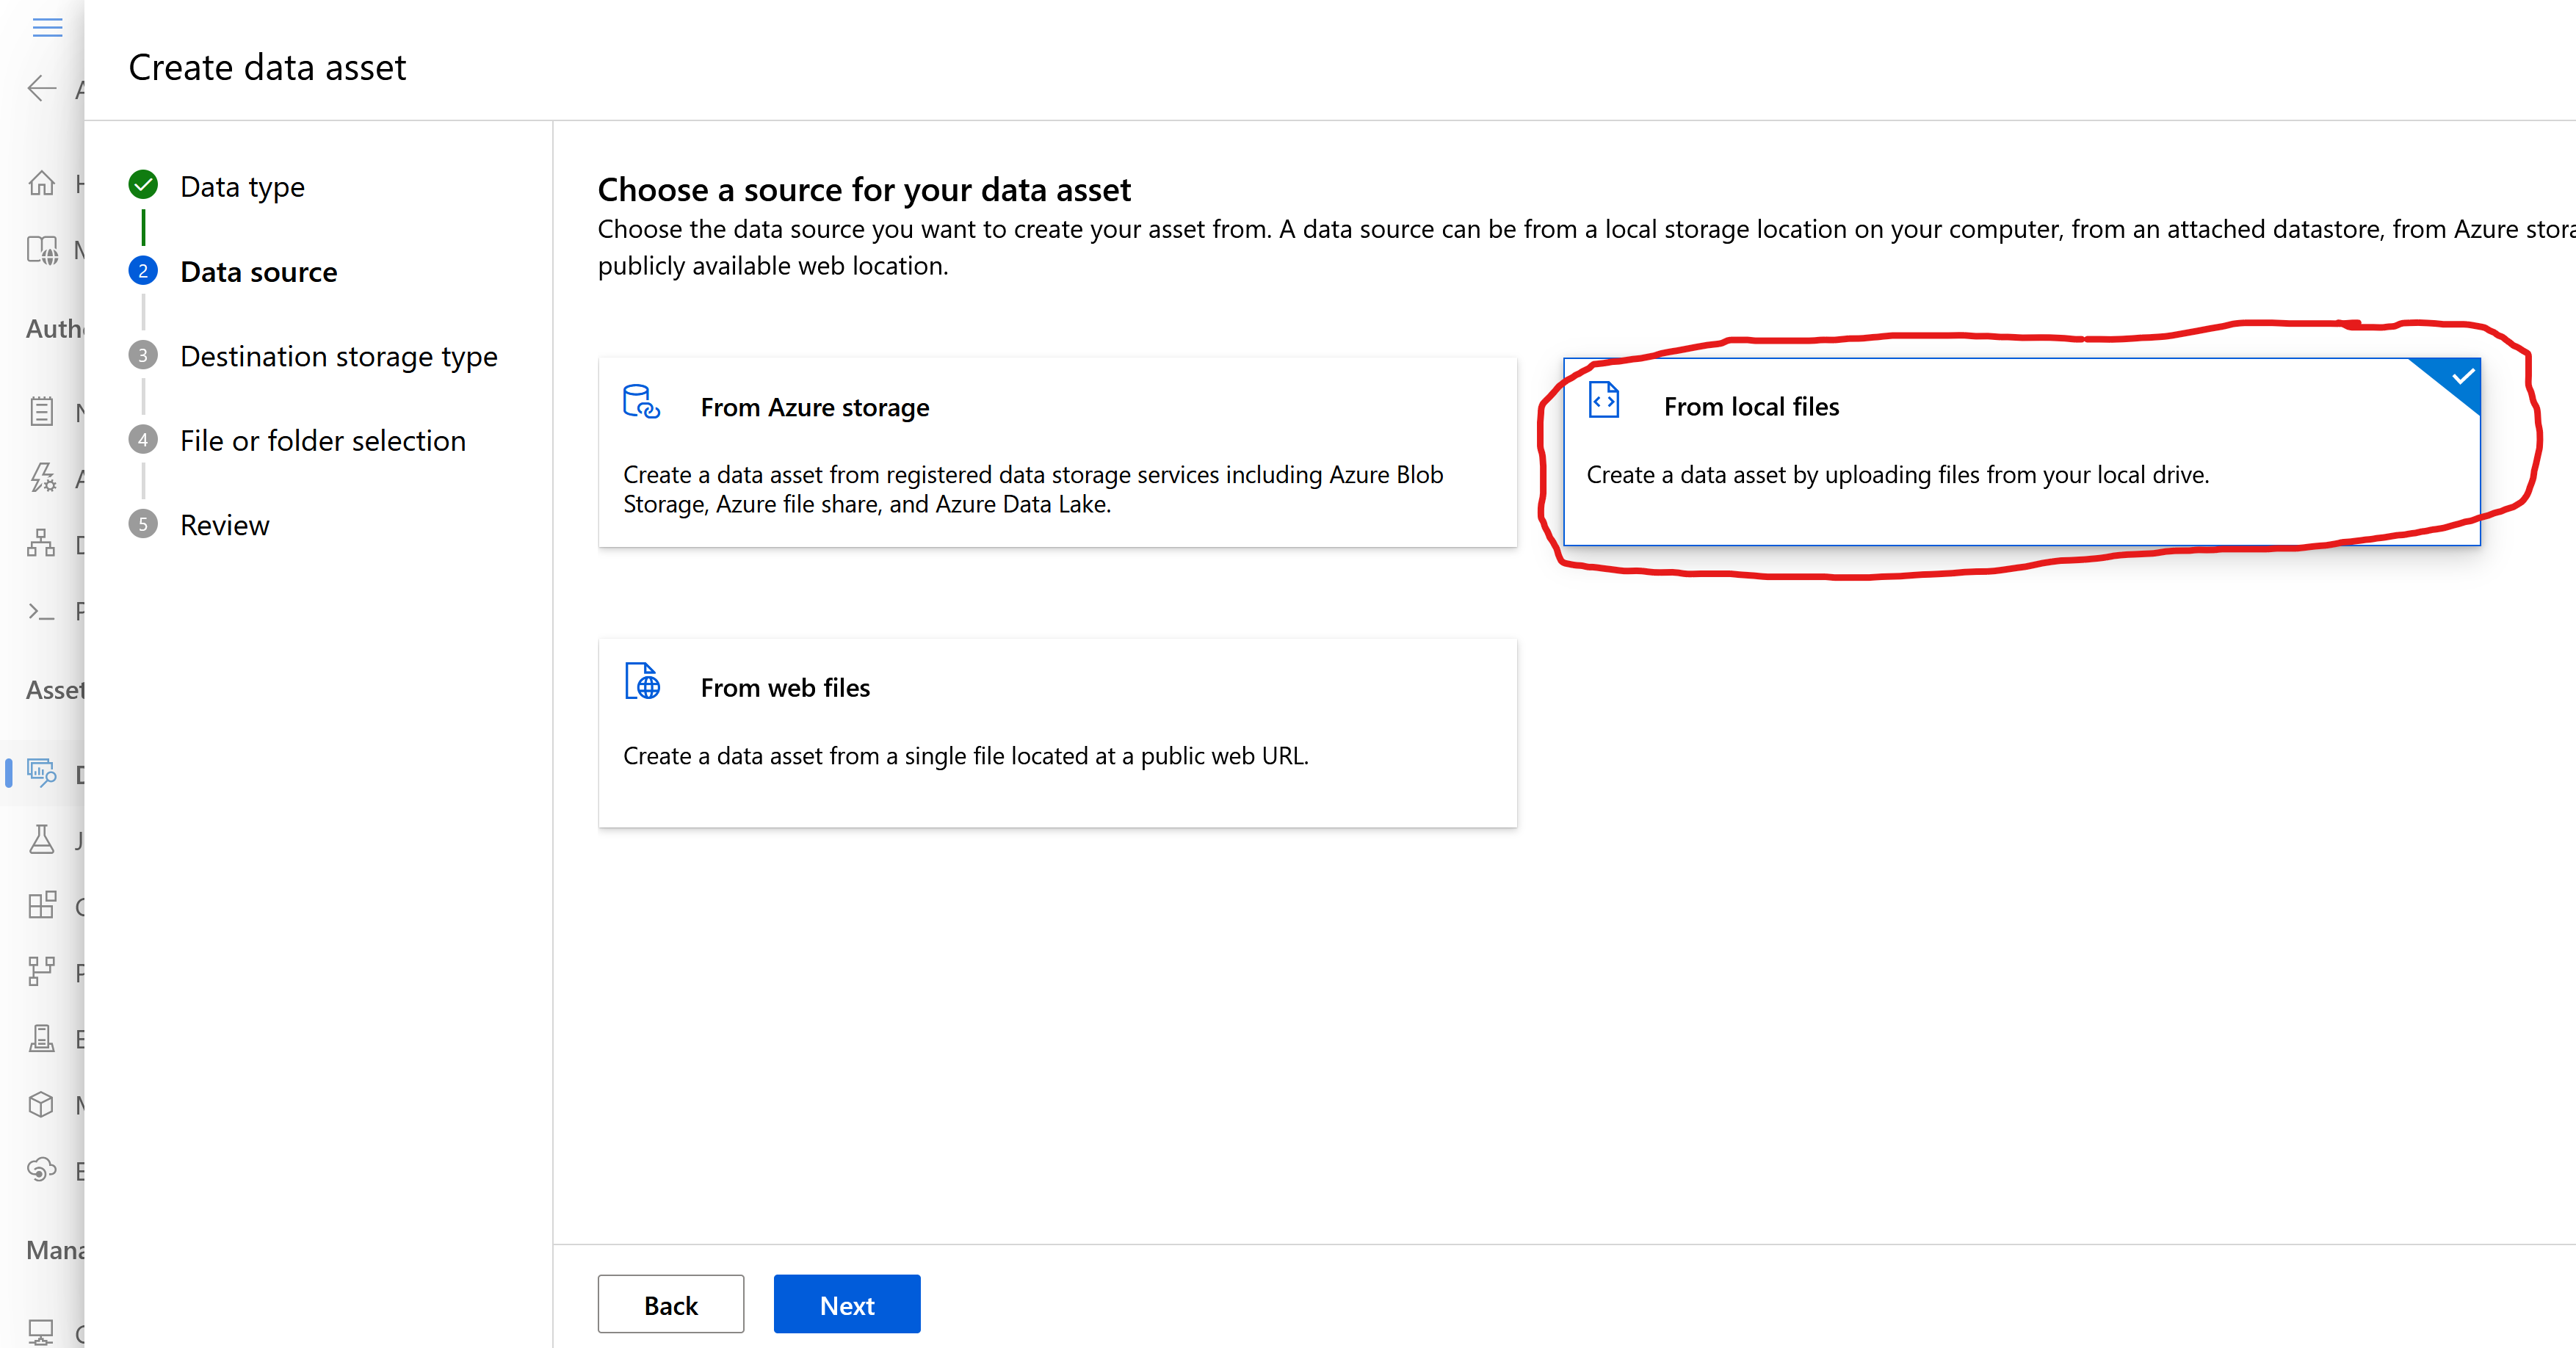
- On the Data source page select From local files
- On the Storage type keep the recommended Azure Blob Storage and the selected “workspaceblobstore“
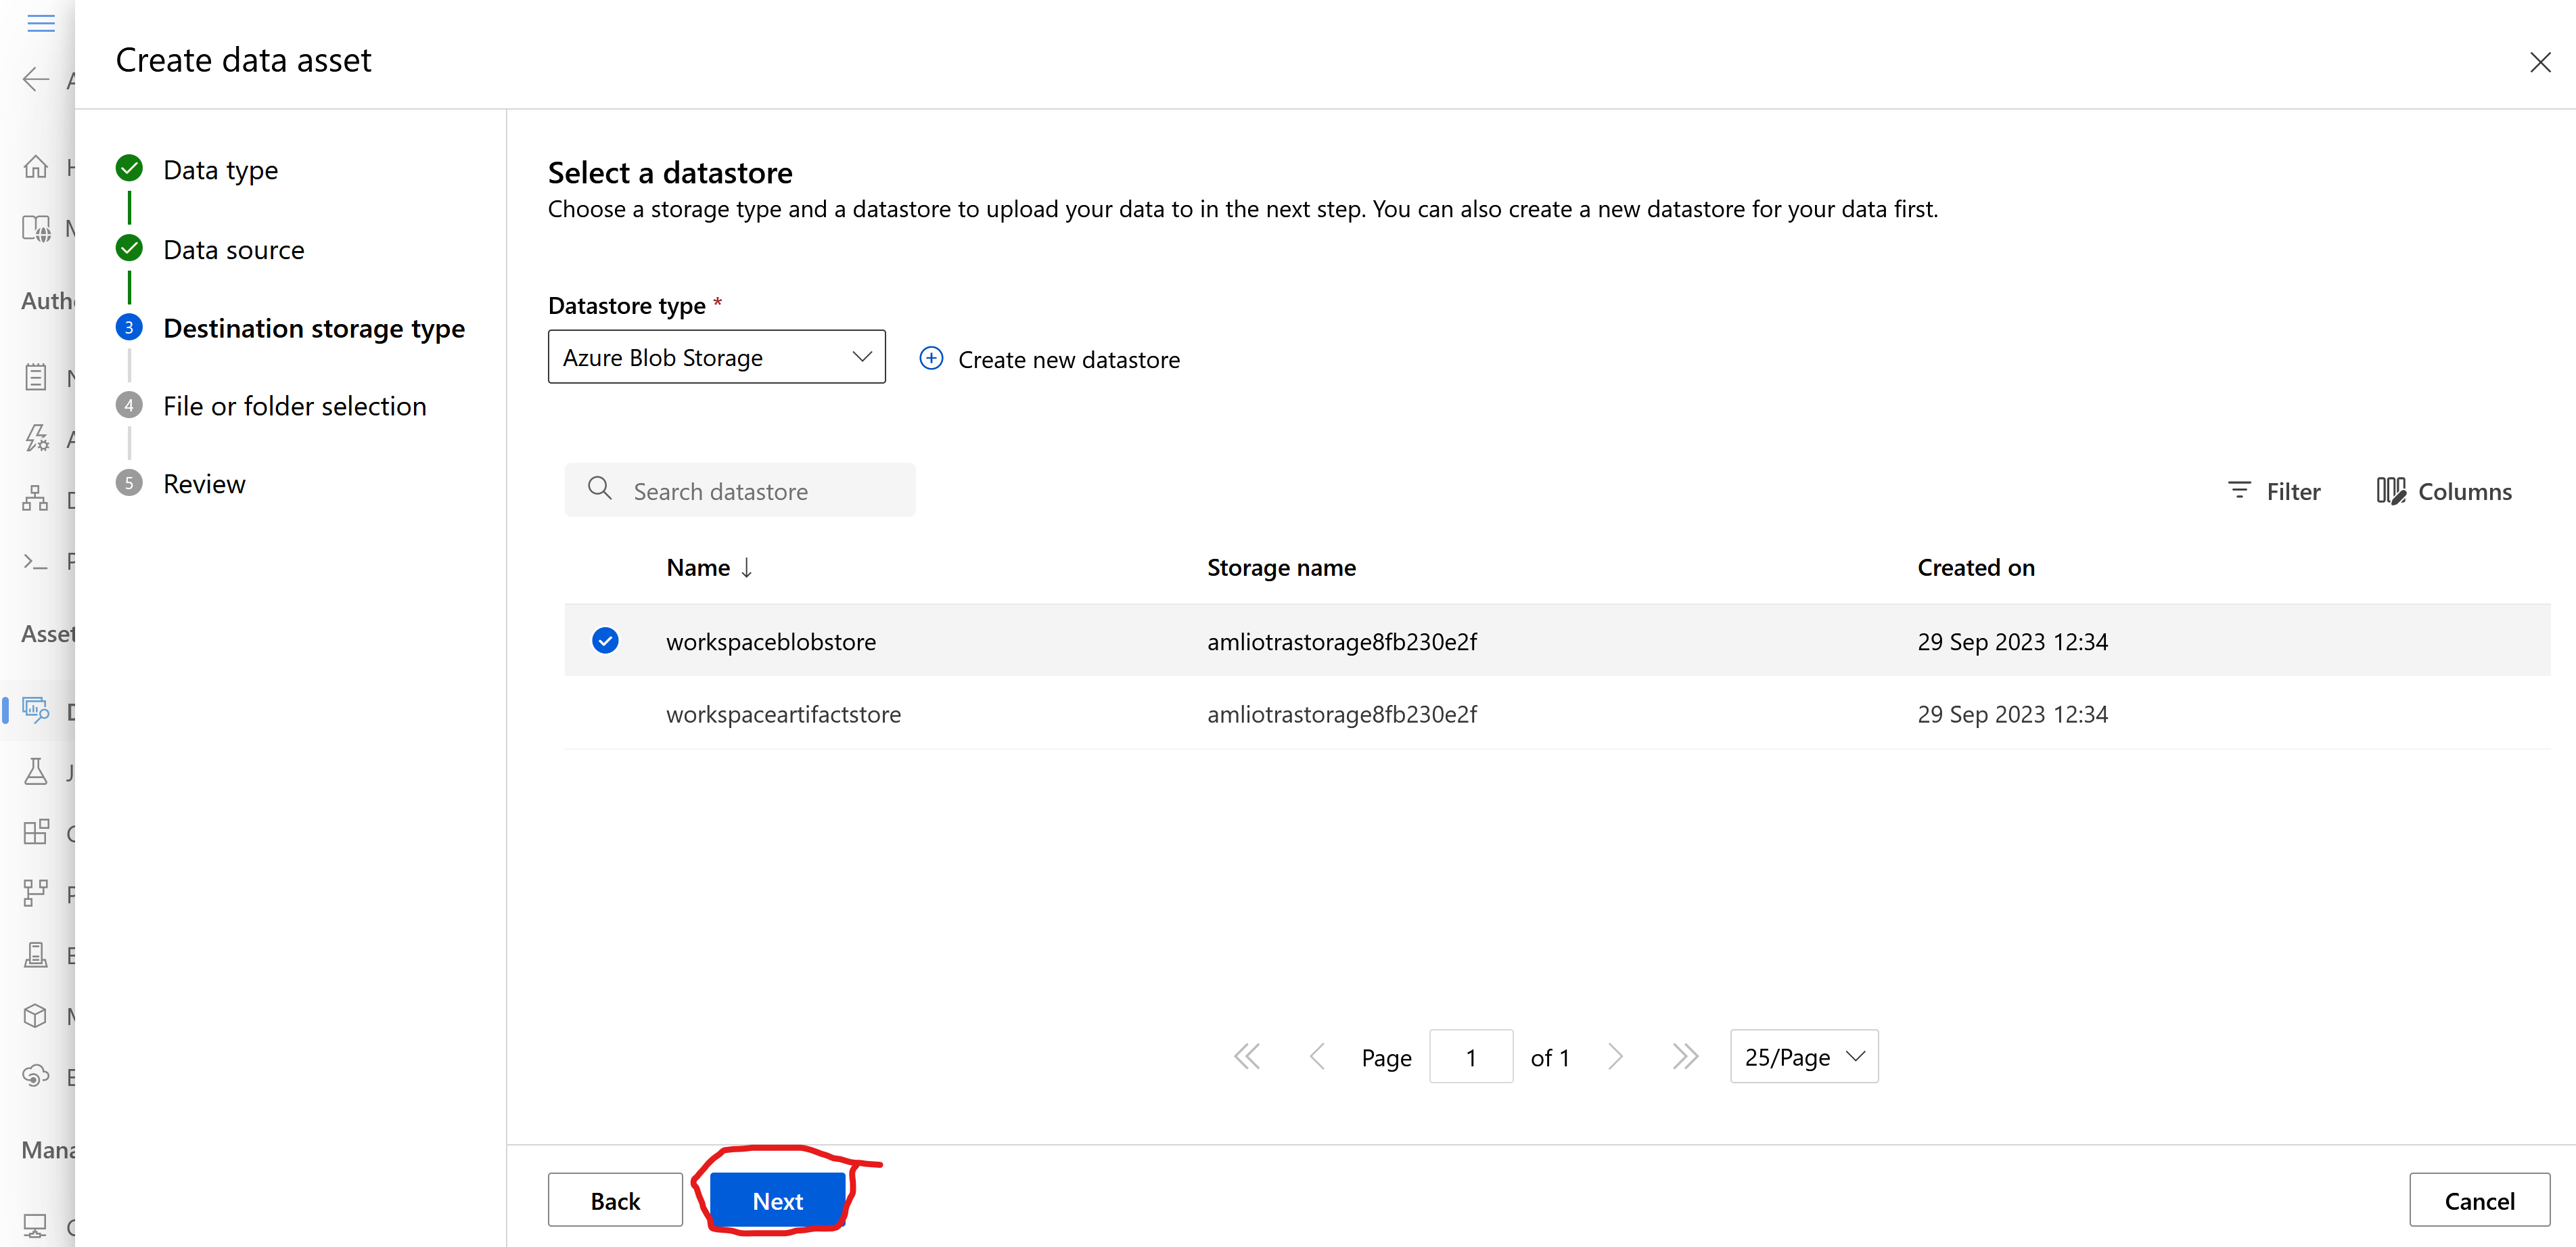
- On the Folder selection page click on the Upload button and select the folder where you stored your pictures
- Wait until the upload is done
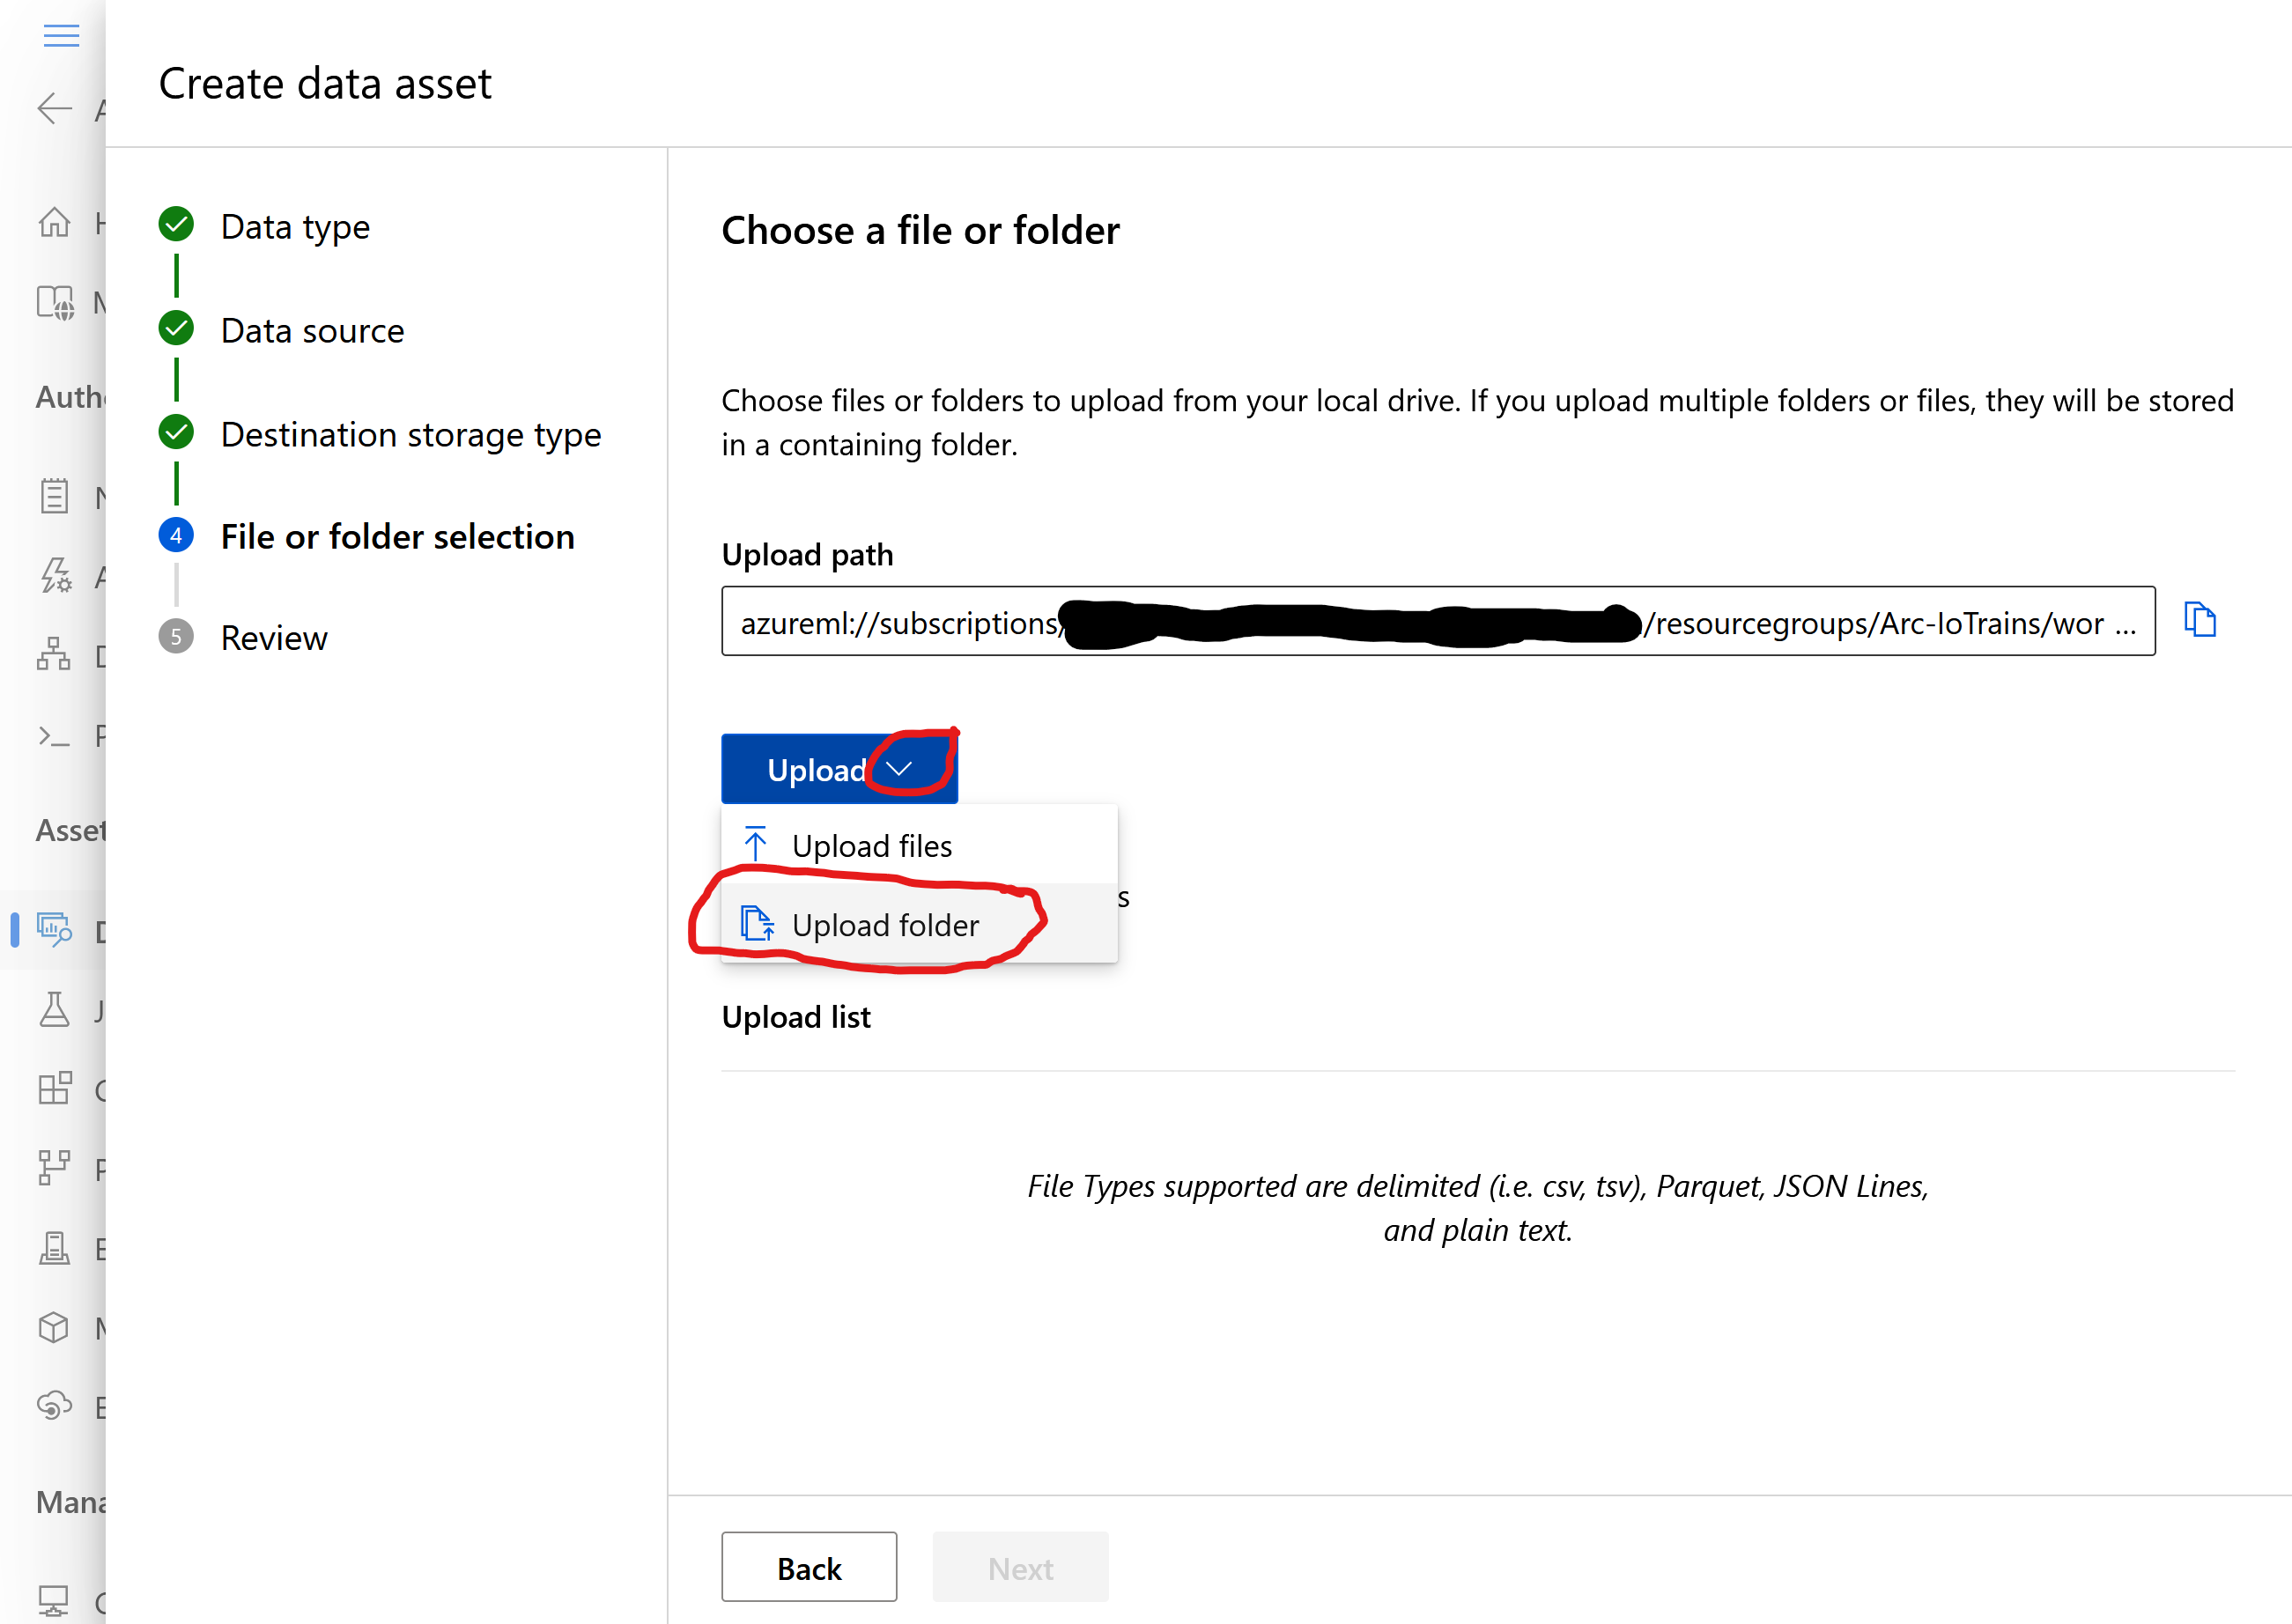
- Next-Next-Finish
Super, we have our training data. Take a coffee/tea because the next one will need you stamina.
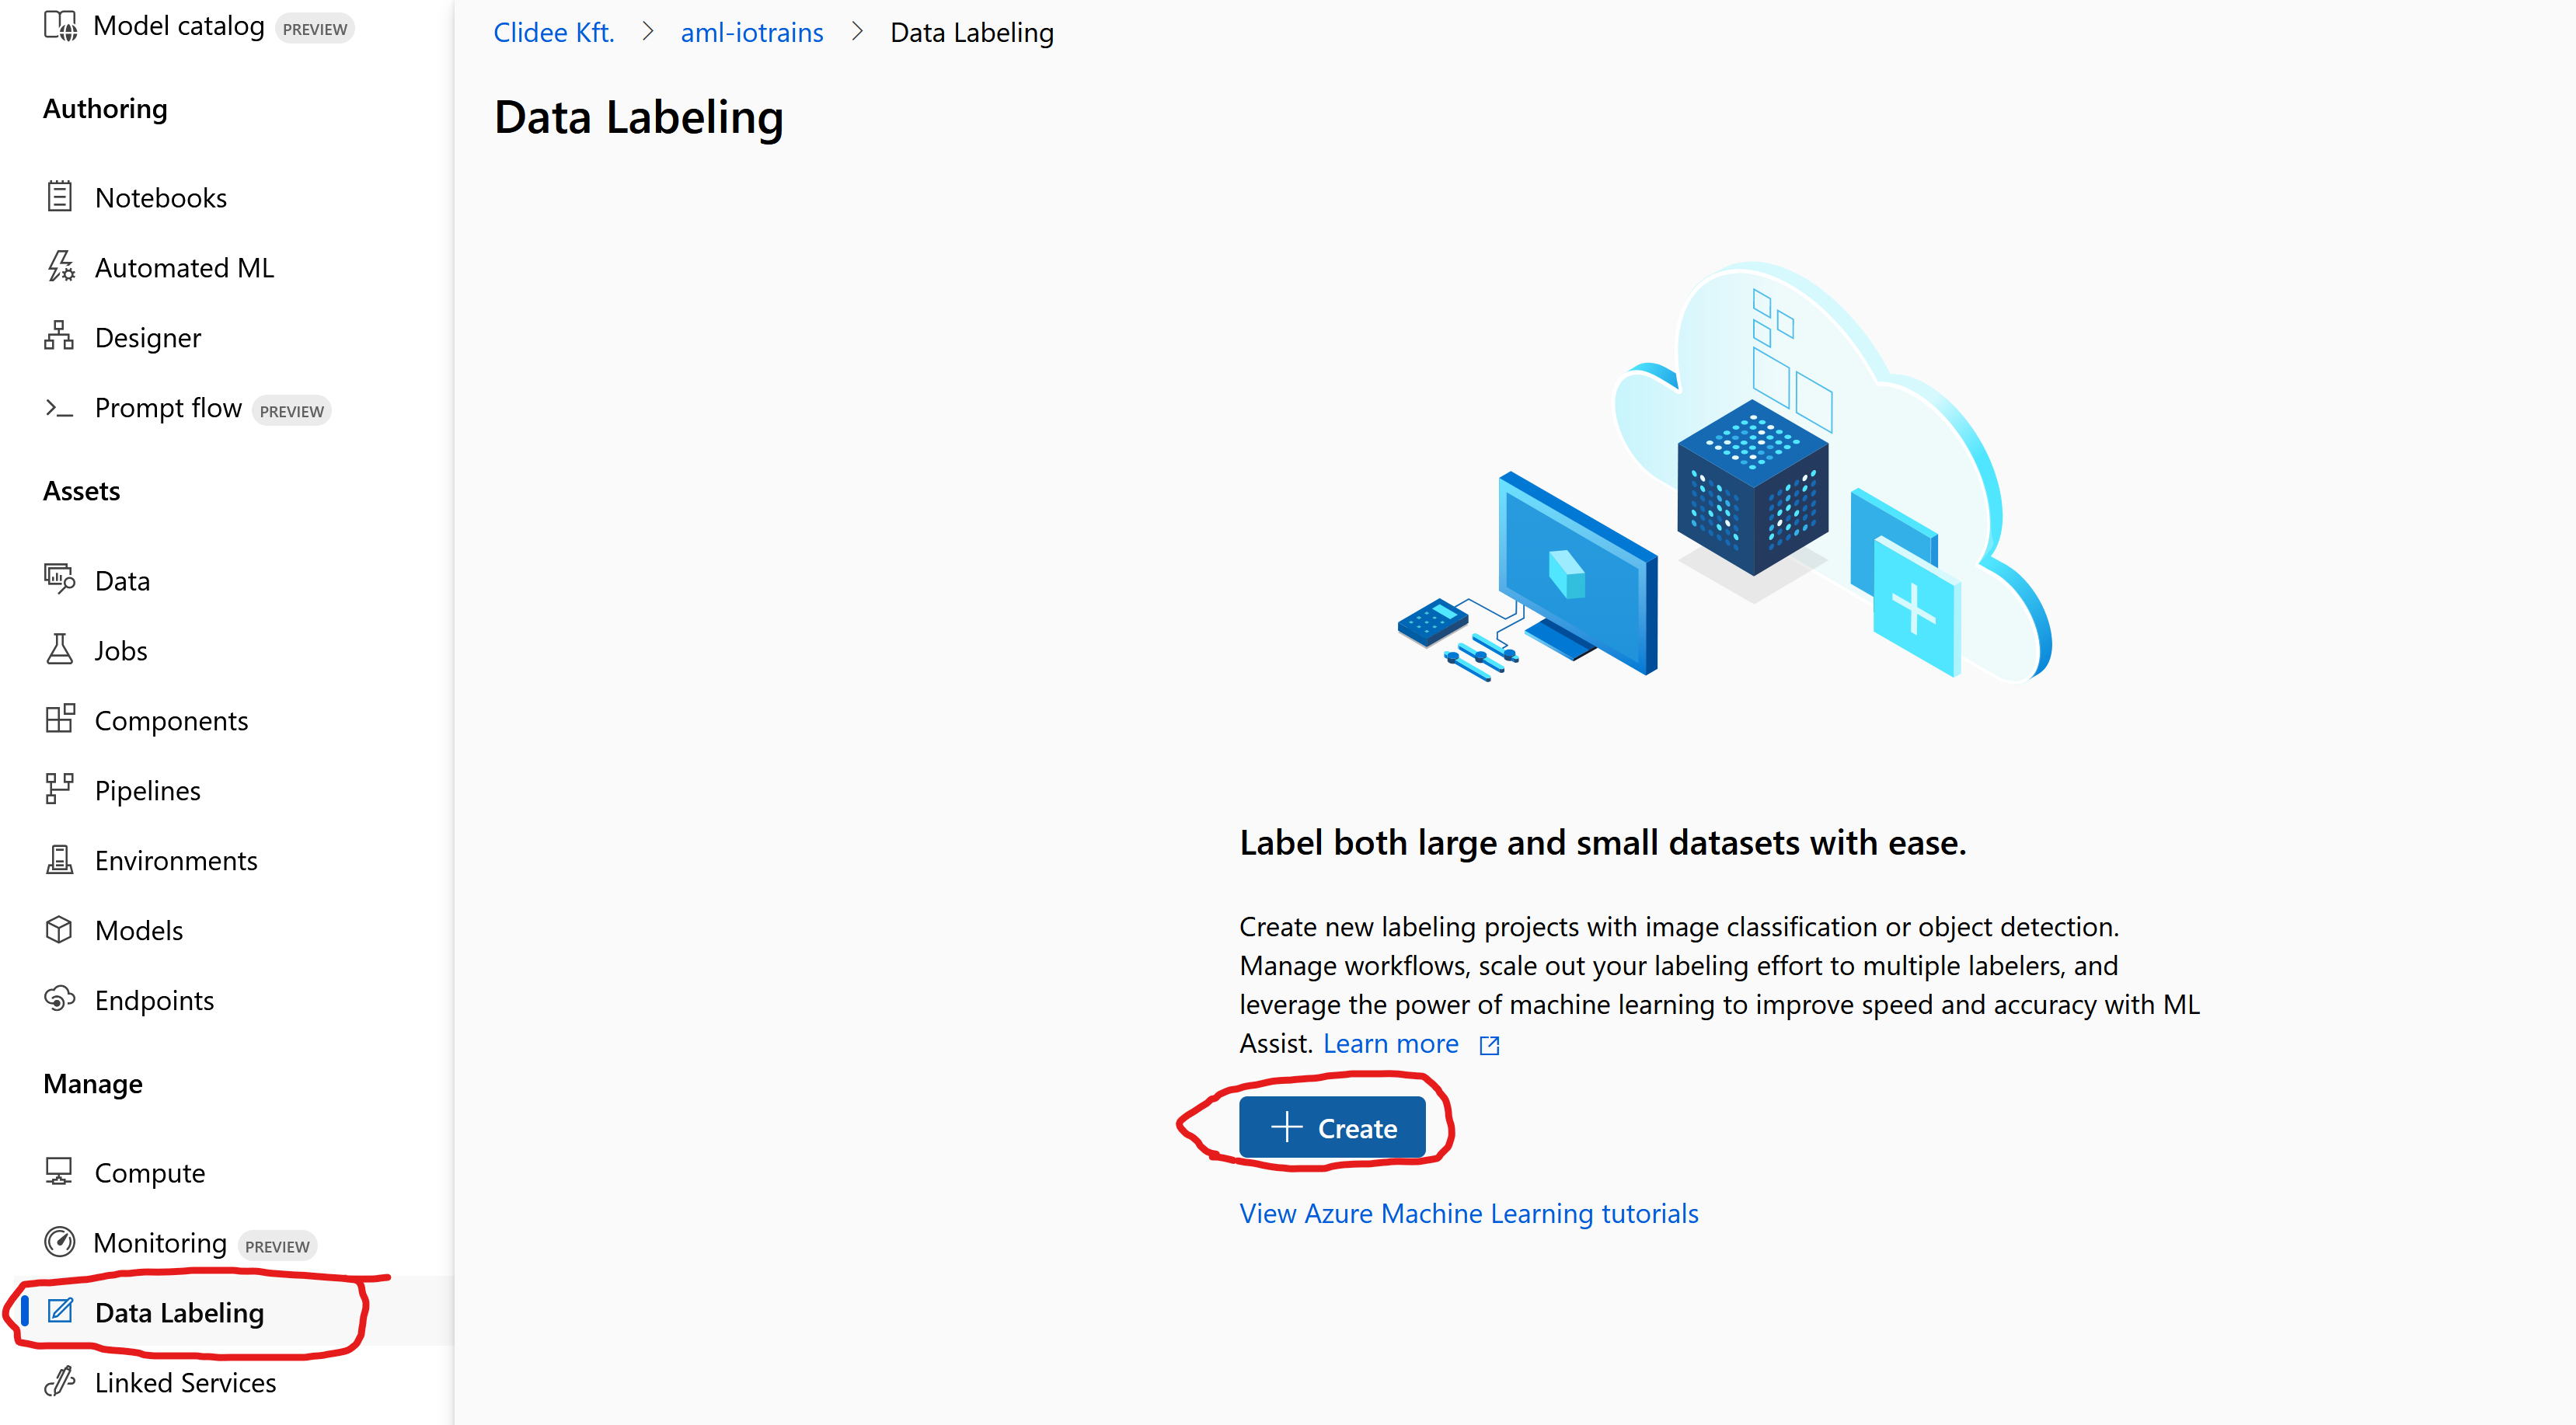
Data Labeling
Labeling or Annotation is the process when we mark the objects on our pictures what we would like to train to our model. More practically, we need to draw a box around the Lego figures. Azure ML studio provides a tool for this what we will use in this step.
- Click on the Data Labeling at the bottom of the left menu
- Click on Create
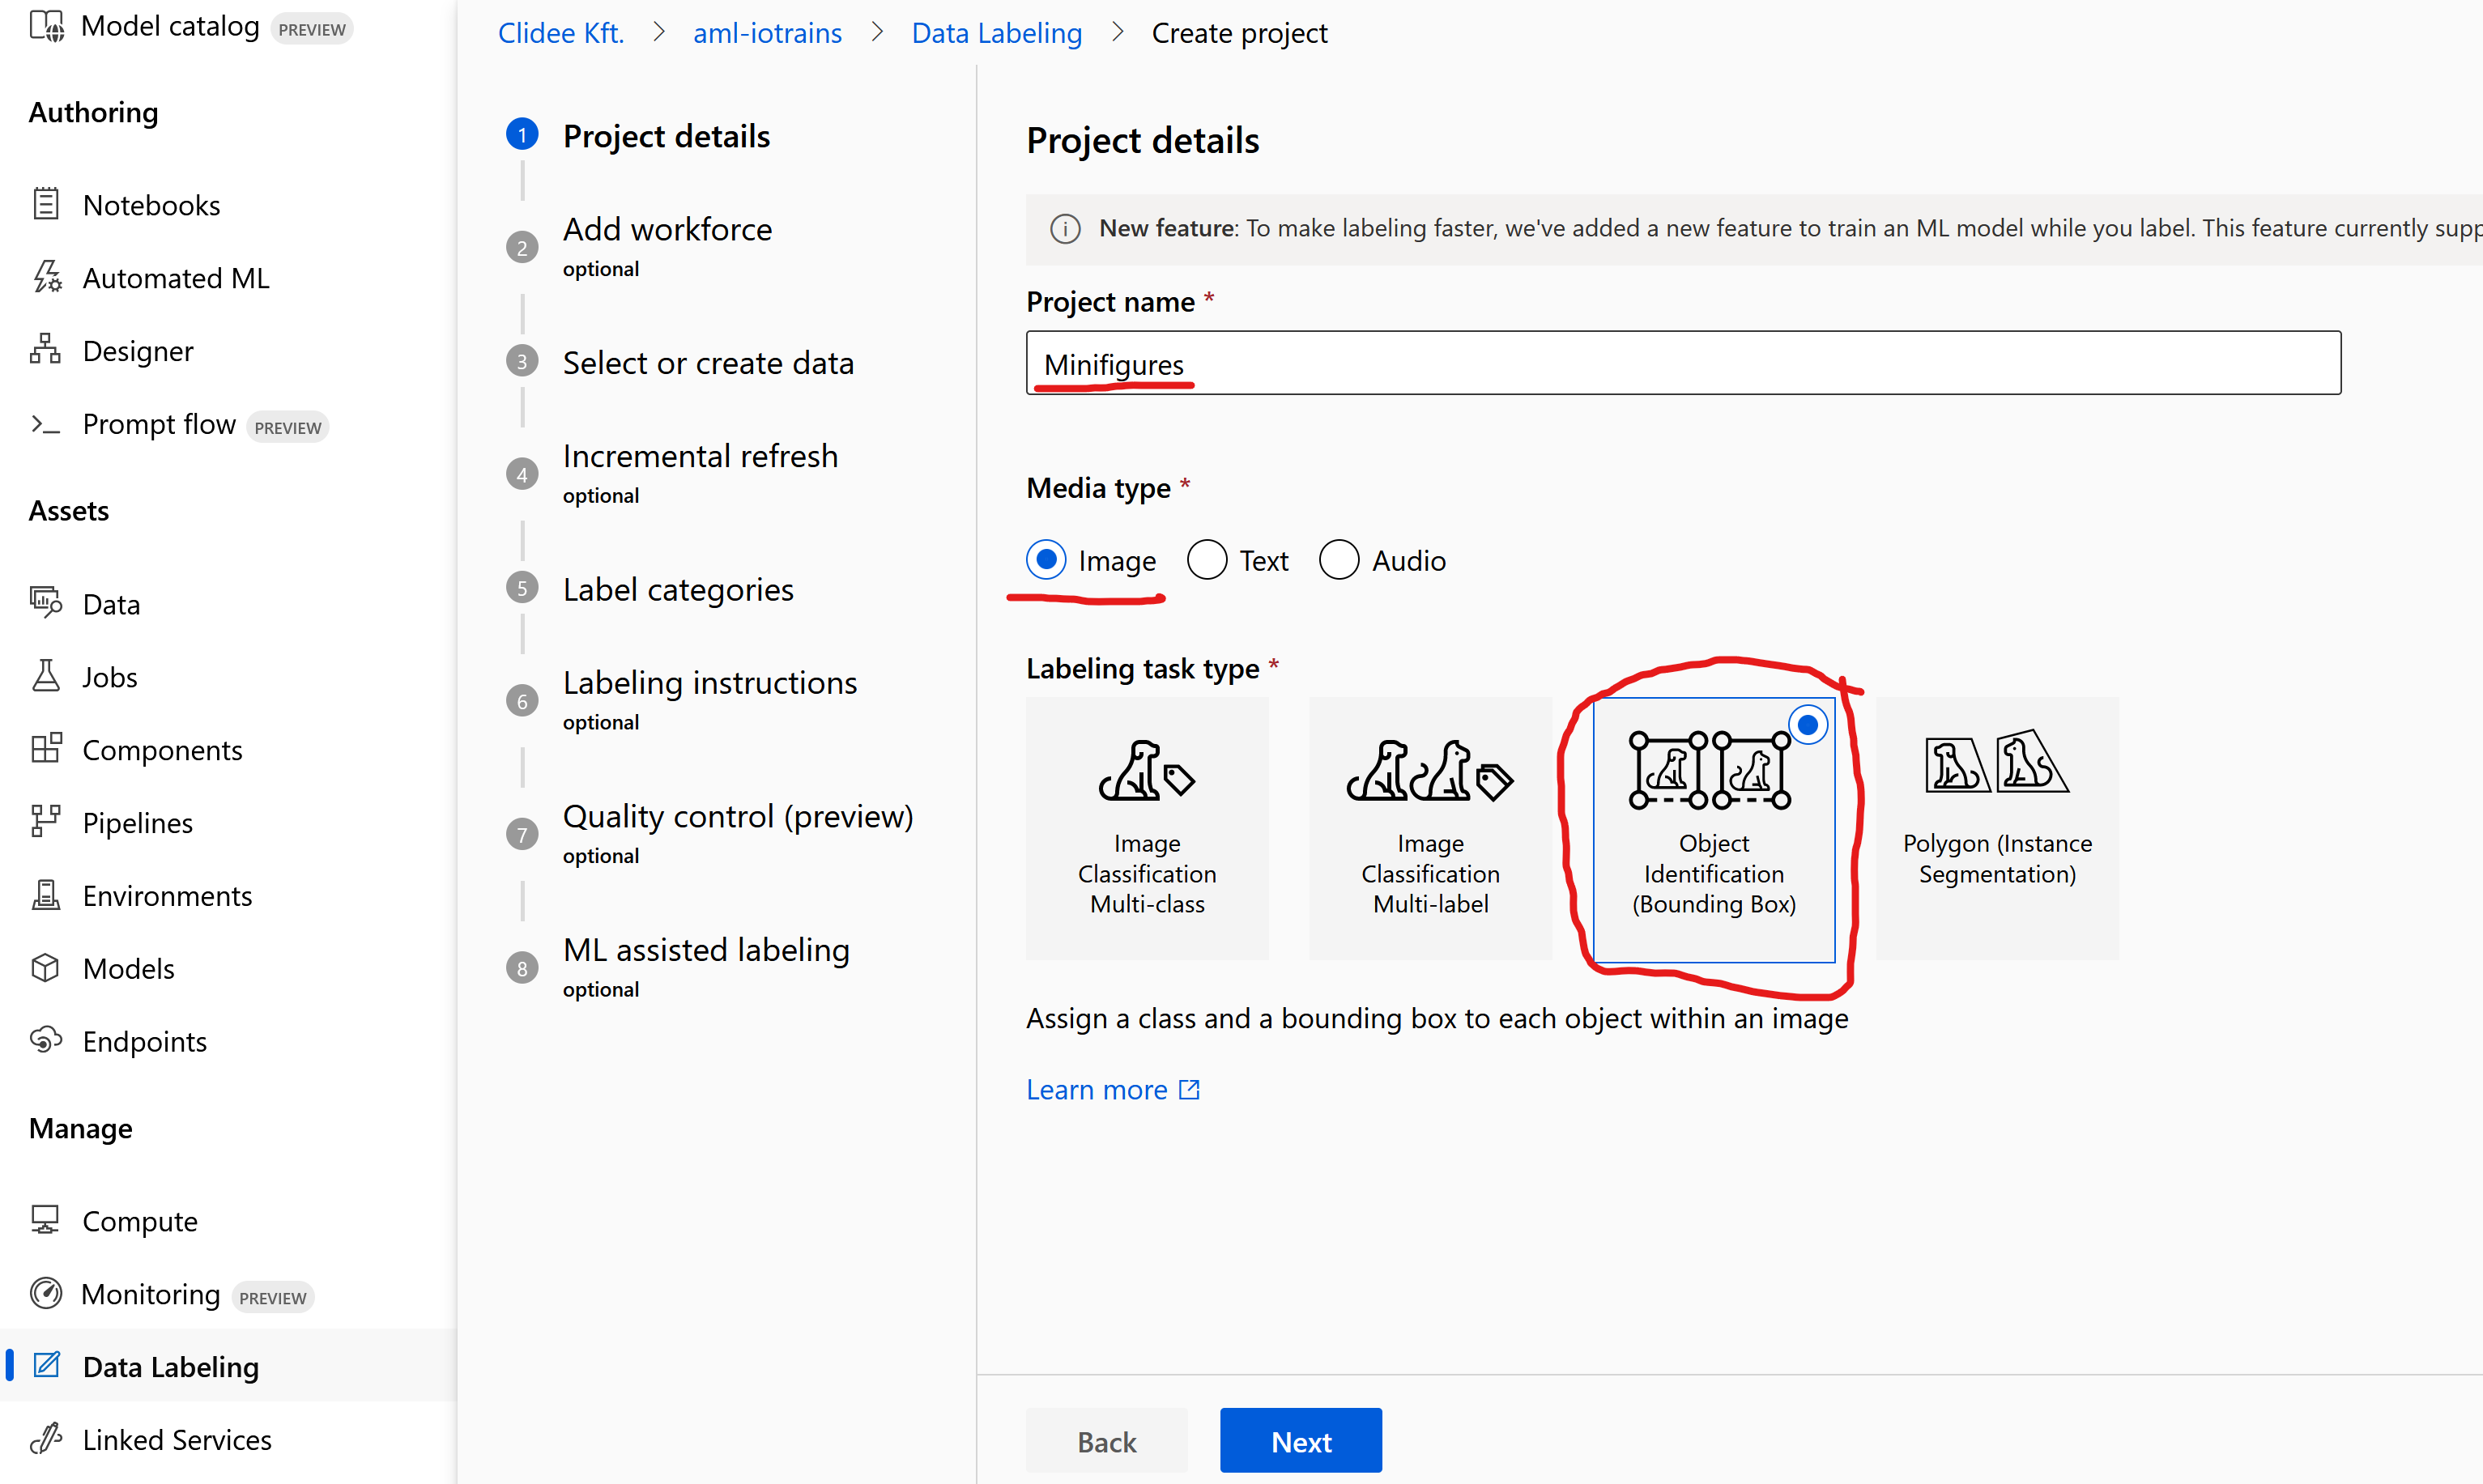
- Give a name like “Minifigures“
- Media type remains as Image
- Labeling task type shall be Object Identification (Bounding Box) … Next
- Skip Add workforce … Next
- On the Select or create data select the previously created “Lego_figures” dataset. (Put a checkmark to front of the name.)
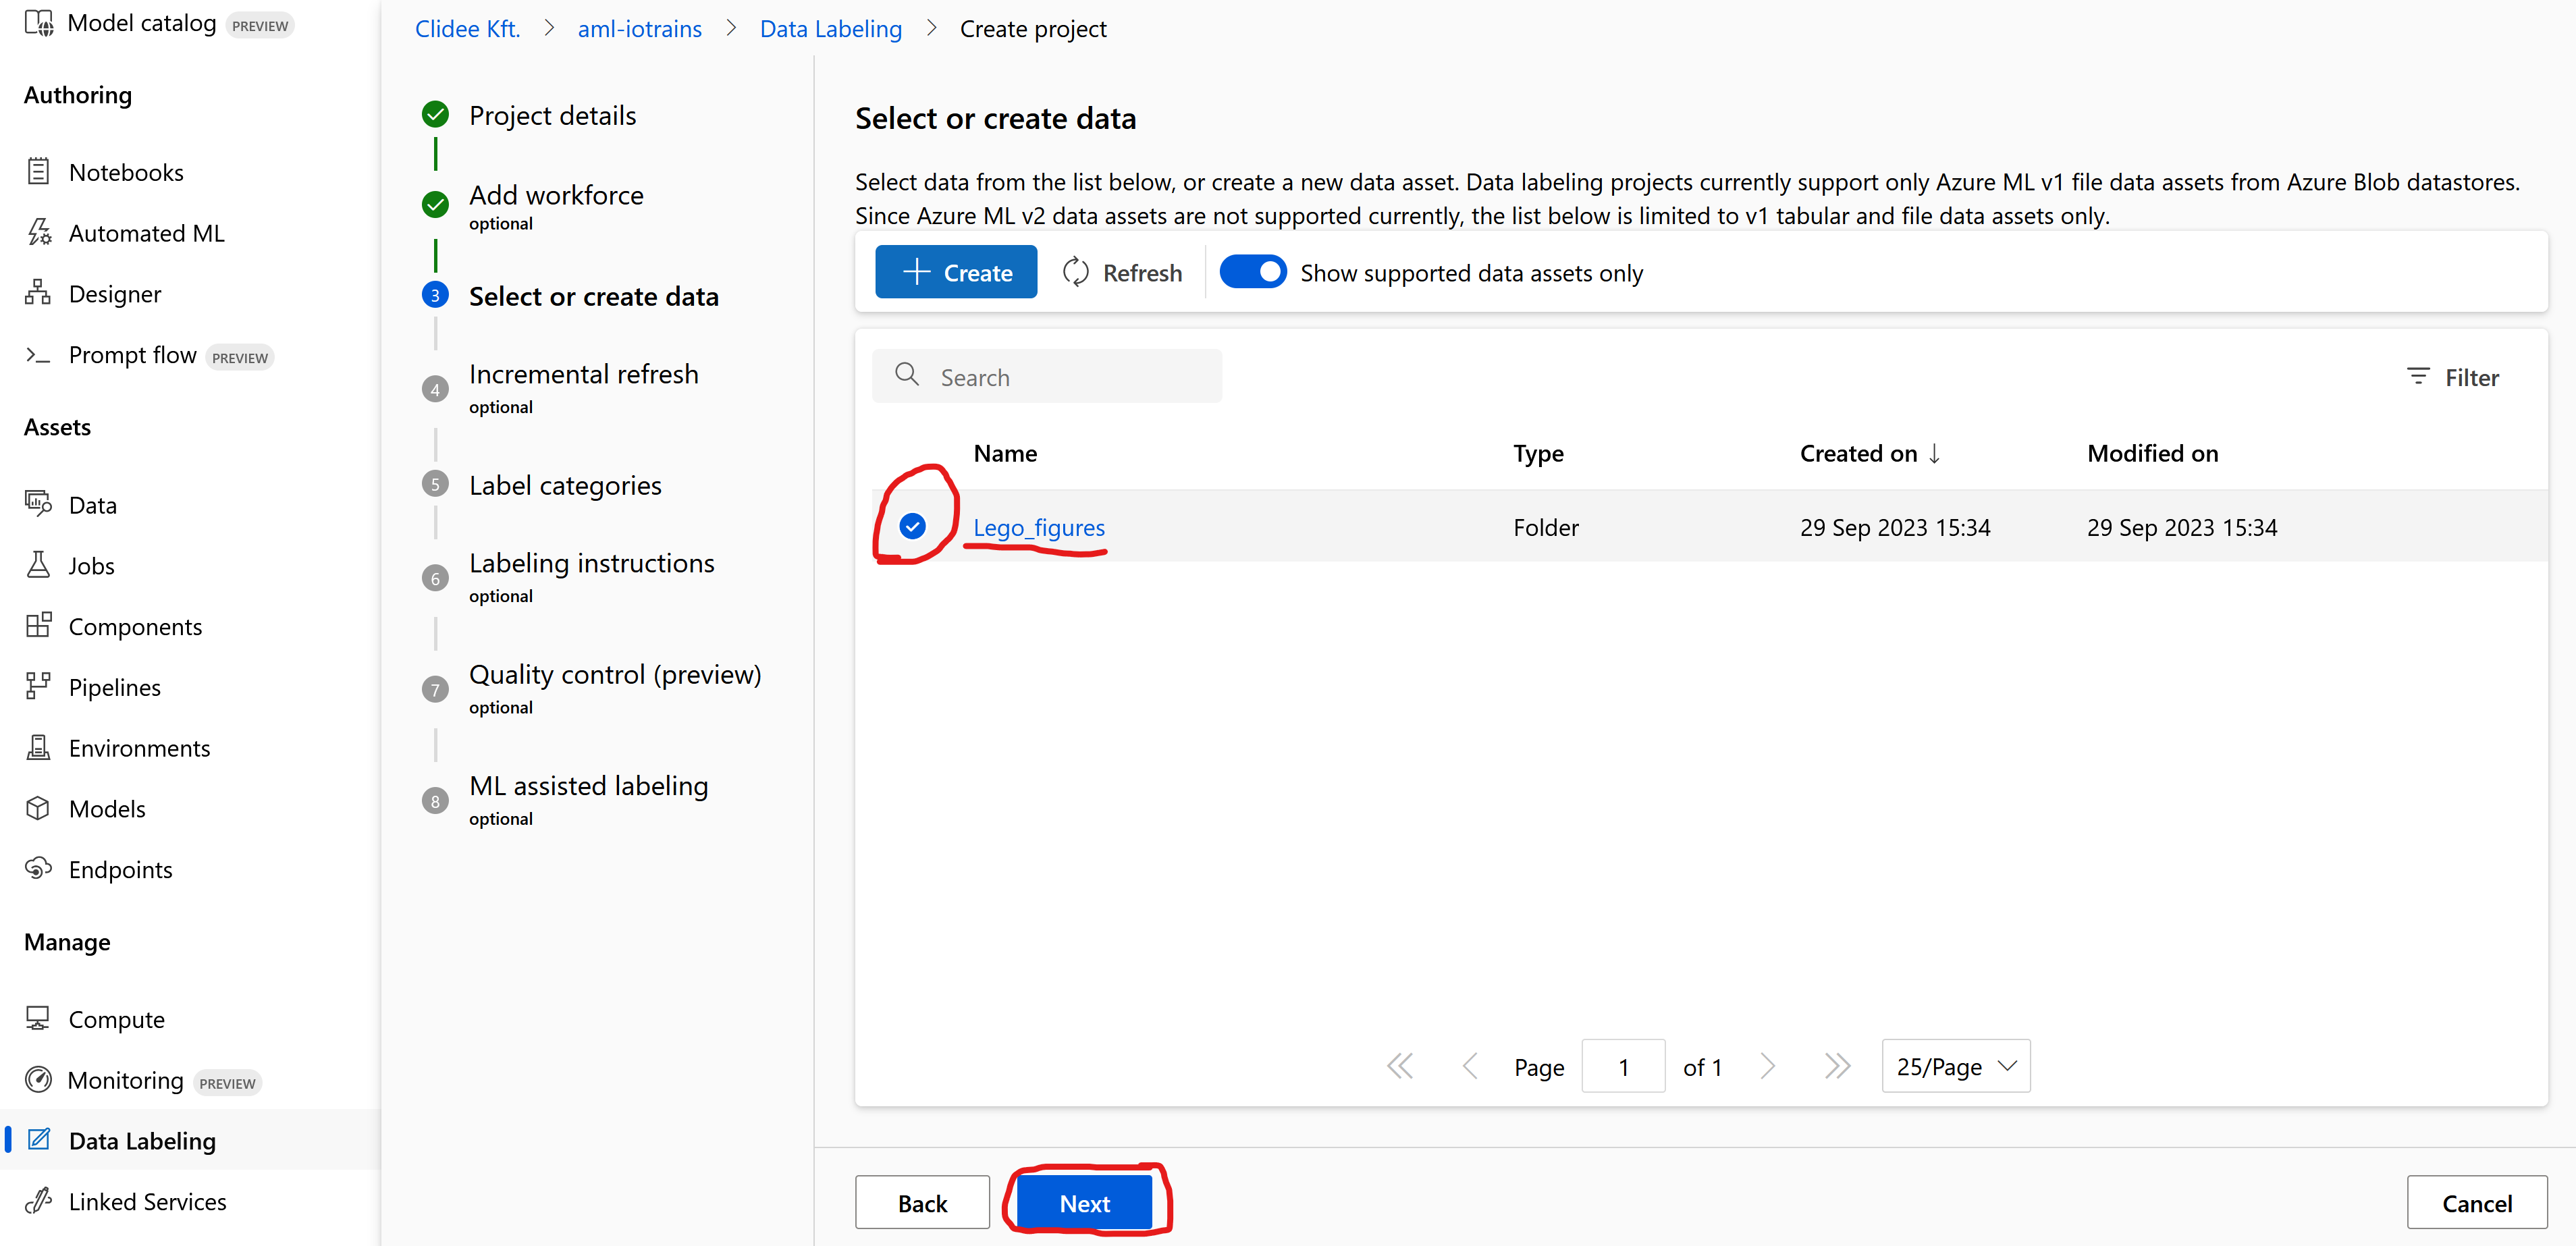
- Skip the Incremental refresh … Next
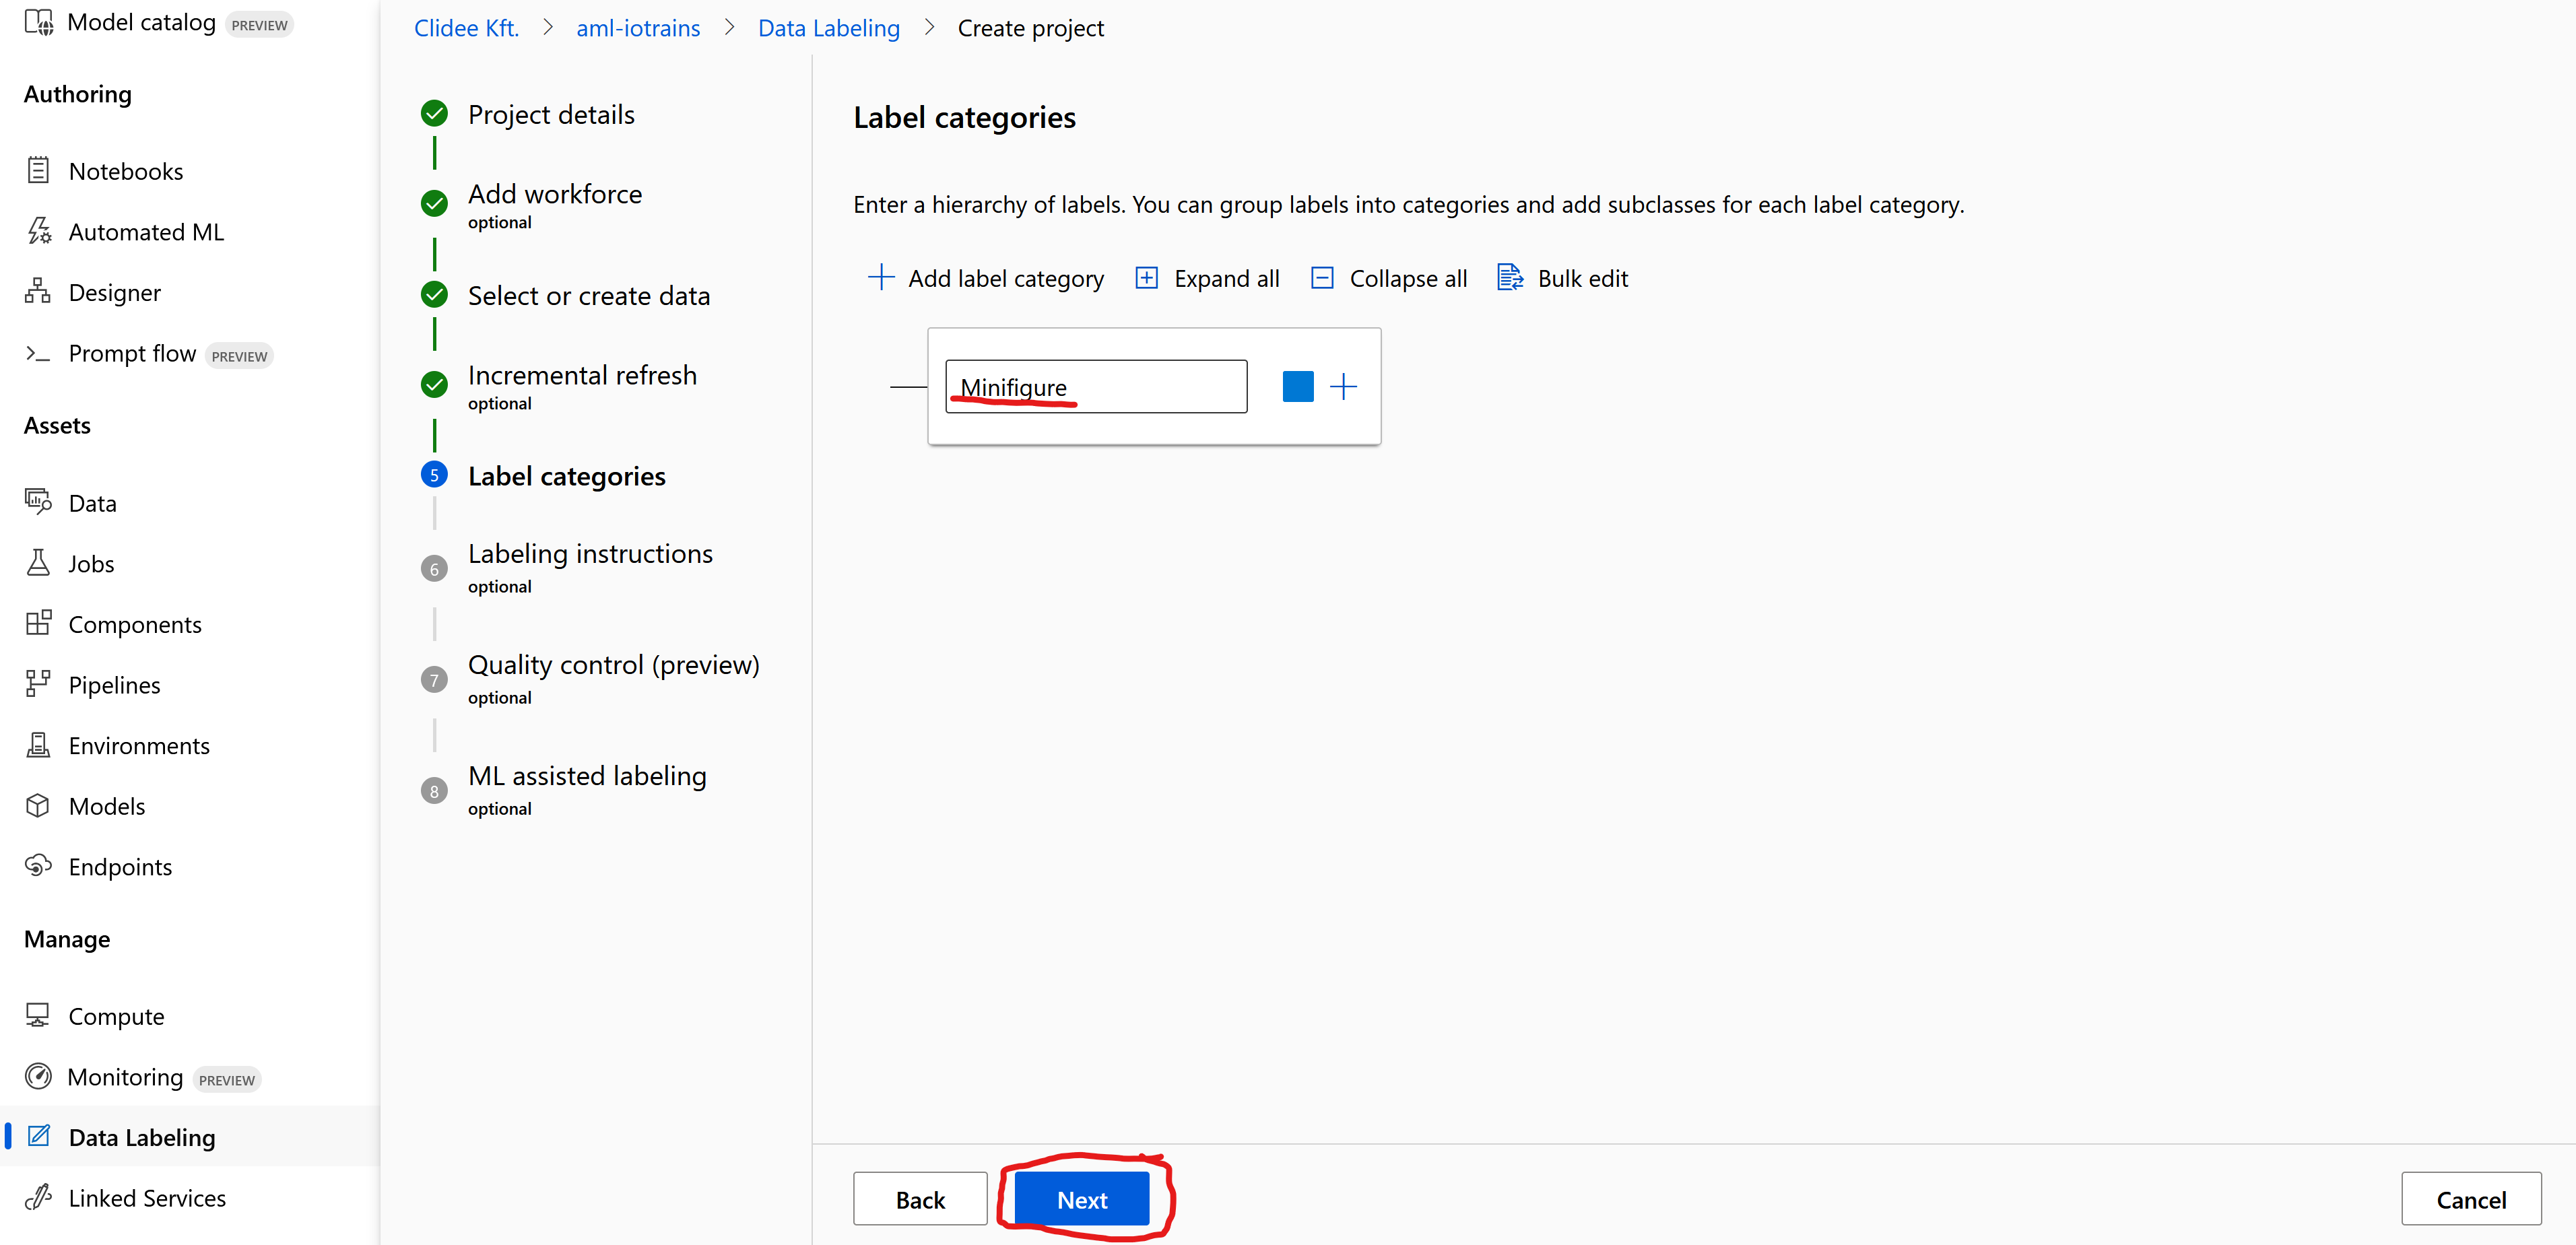
- At the Label categories add a label like “Minifigure”
- Skip the Label instructions … Next
- Skip the Quality control … Next
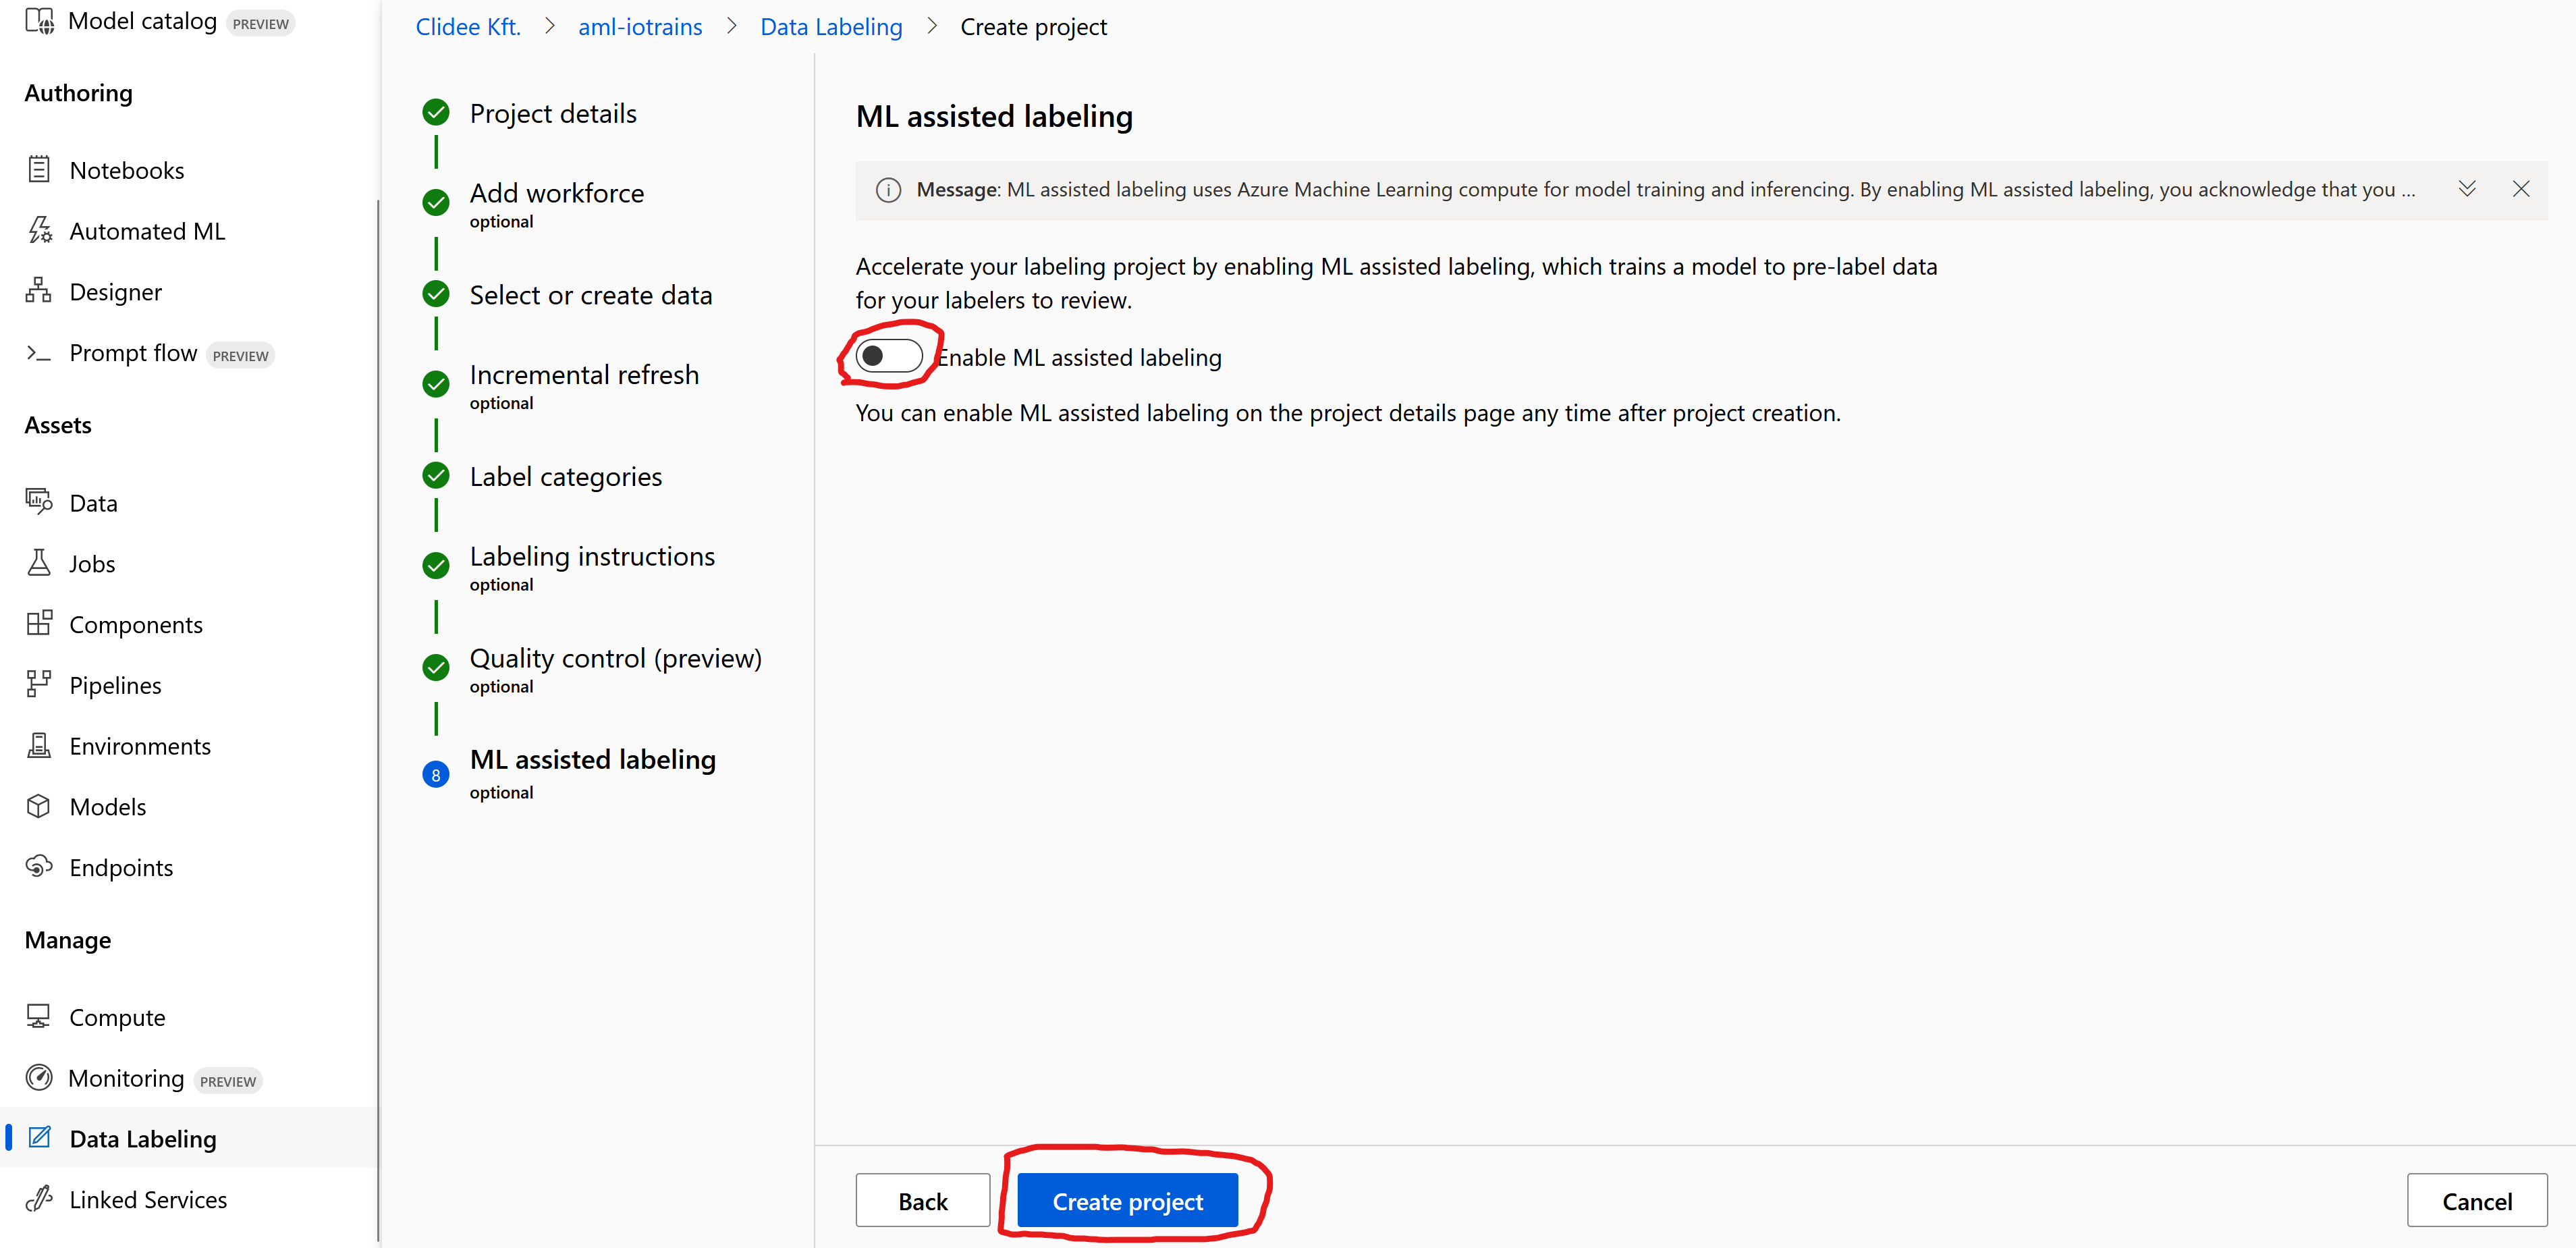
- Disable the Enable ML assisted labeling (it works only with huge datasets) … Create project
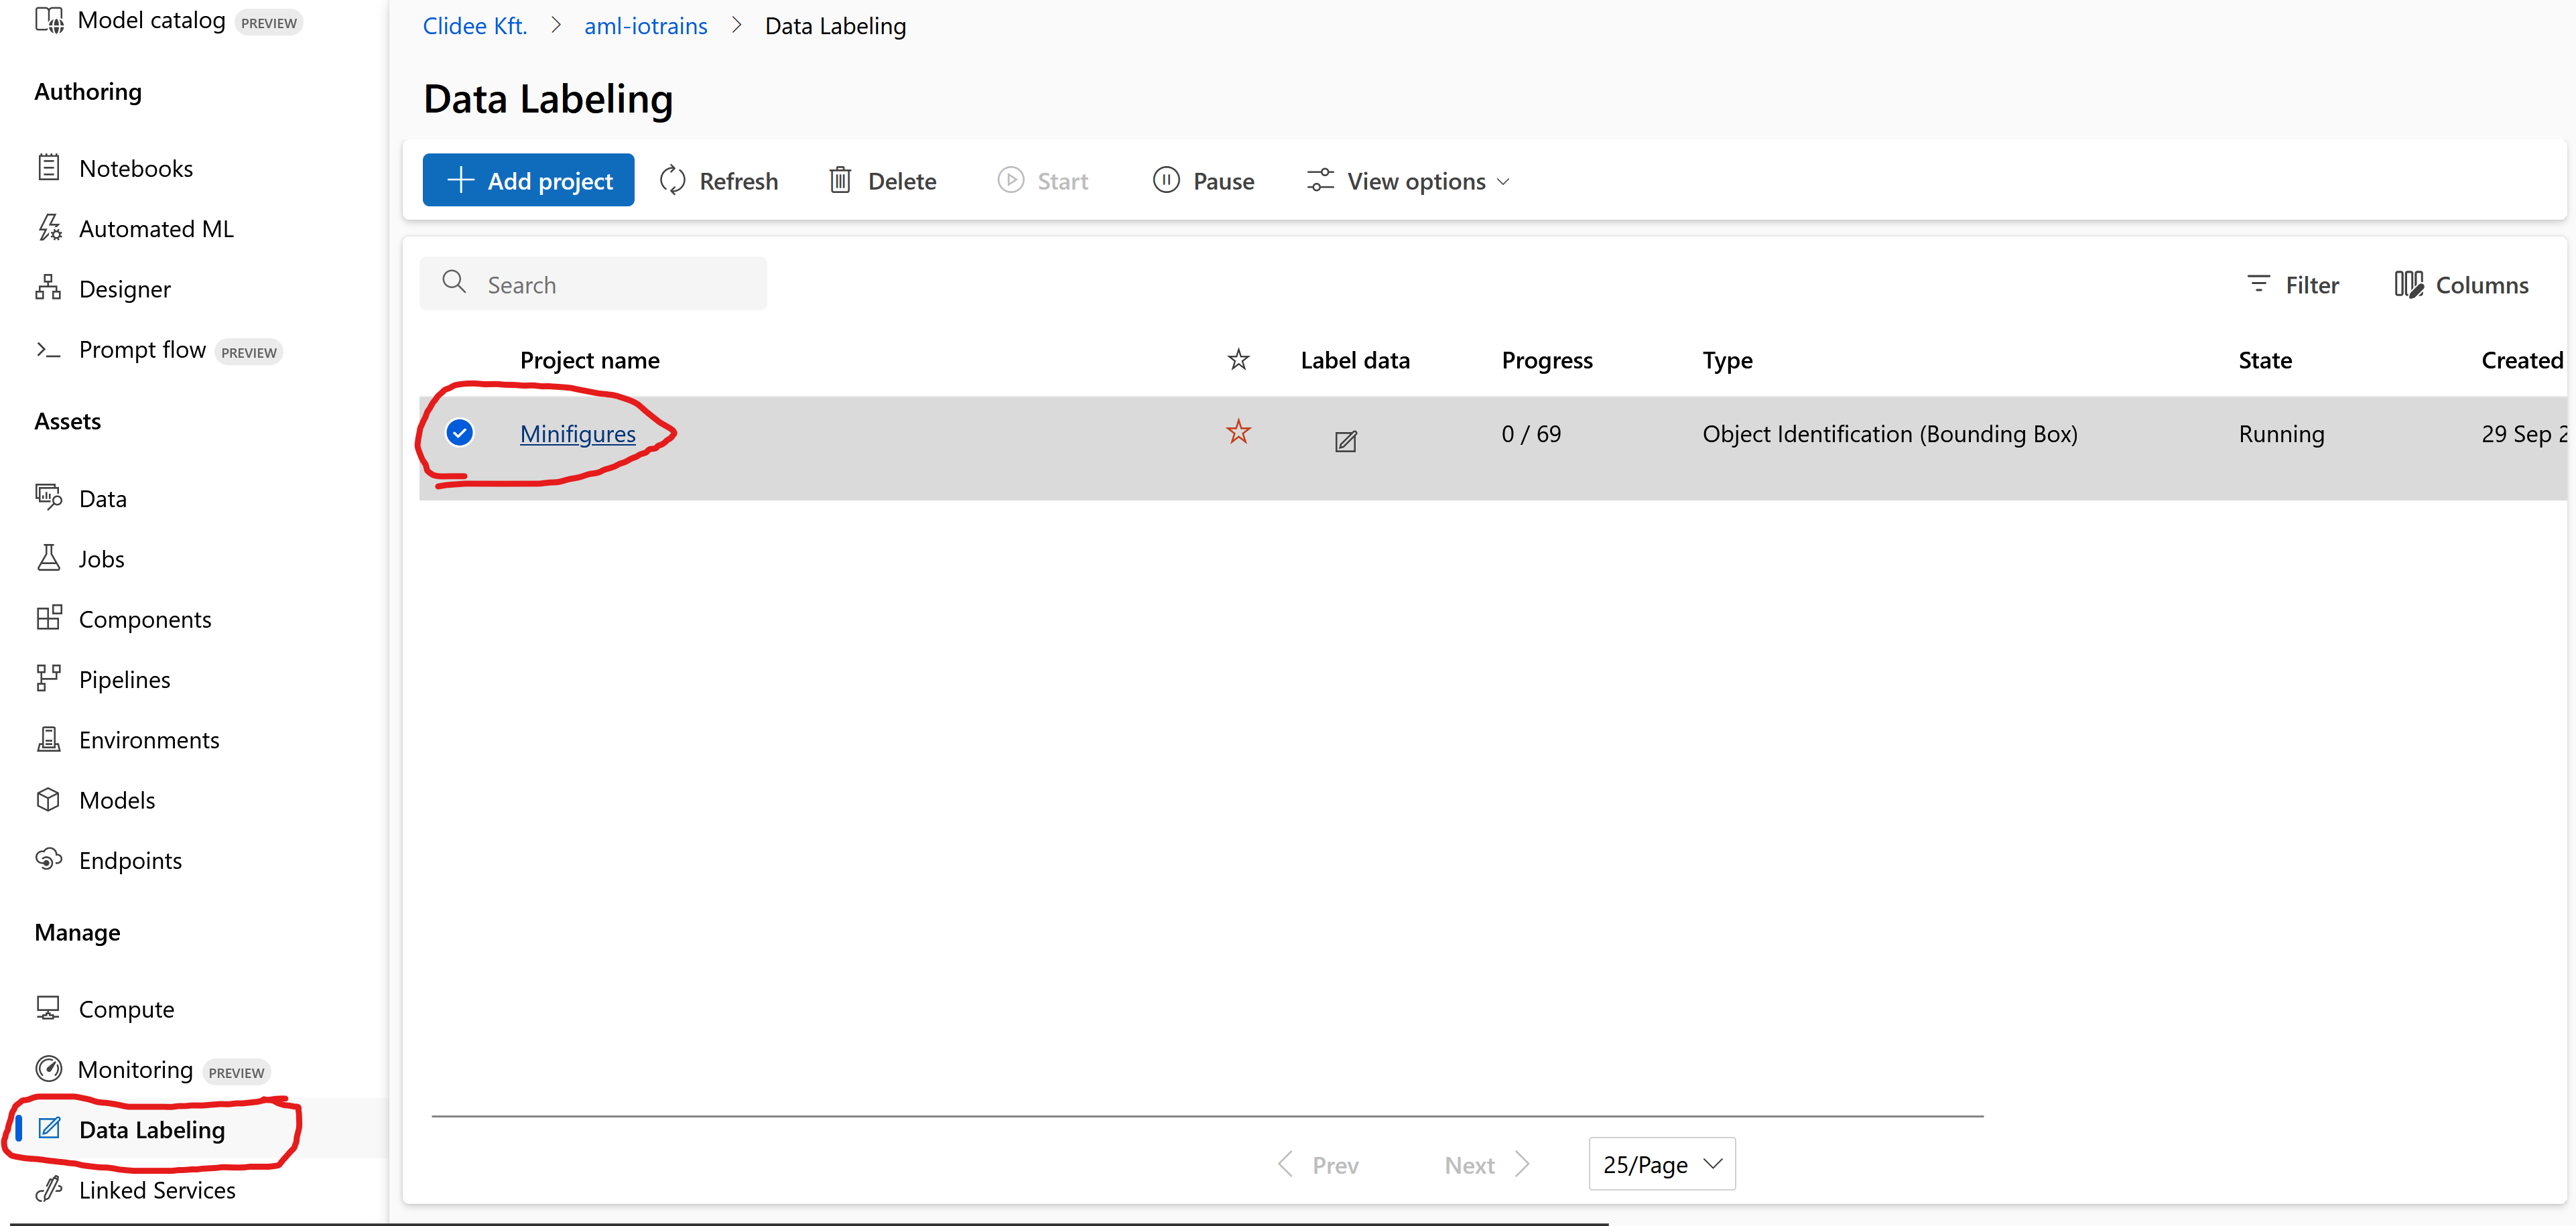
Hurray, we have our Labeling project. It is time to do the dirty (and most boring) job, the labeling.
- Click on the freshly created “Minifigures” project and open it.
- Click on the Label data button to start labeling
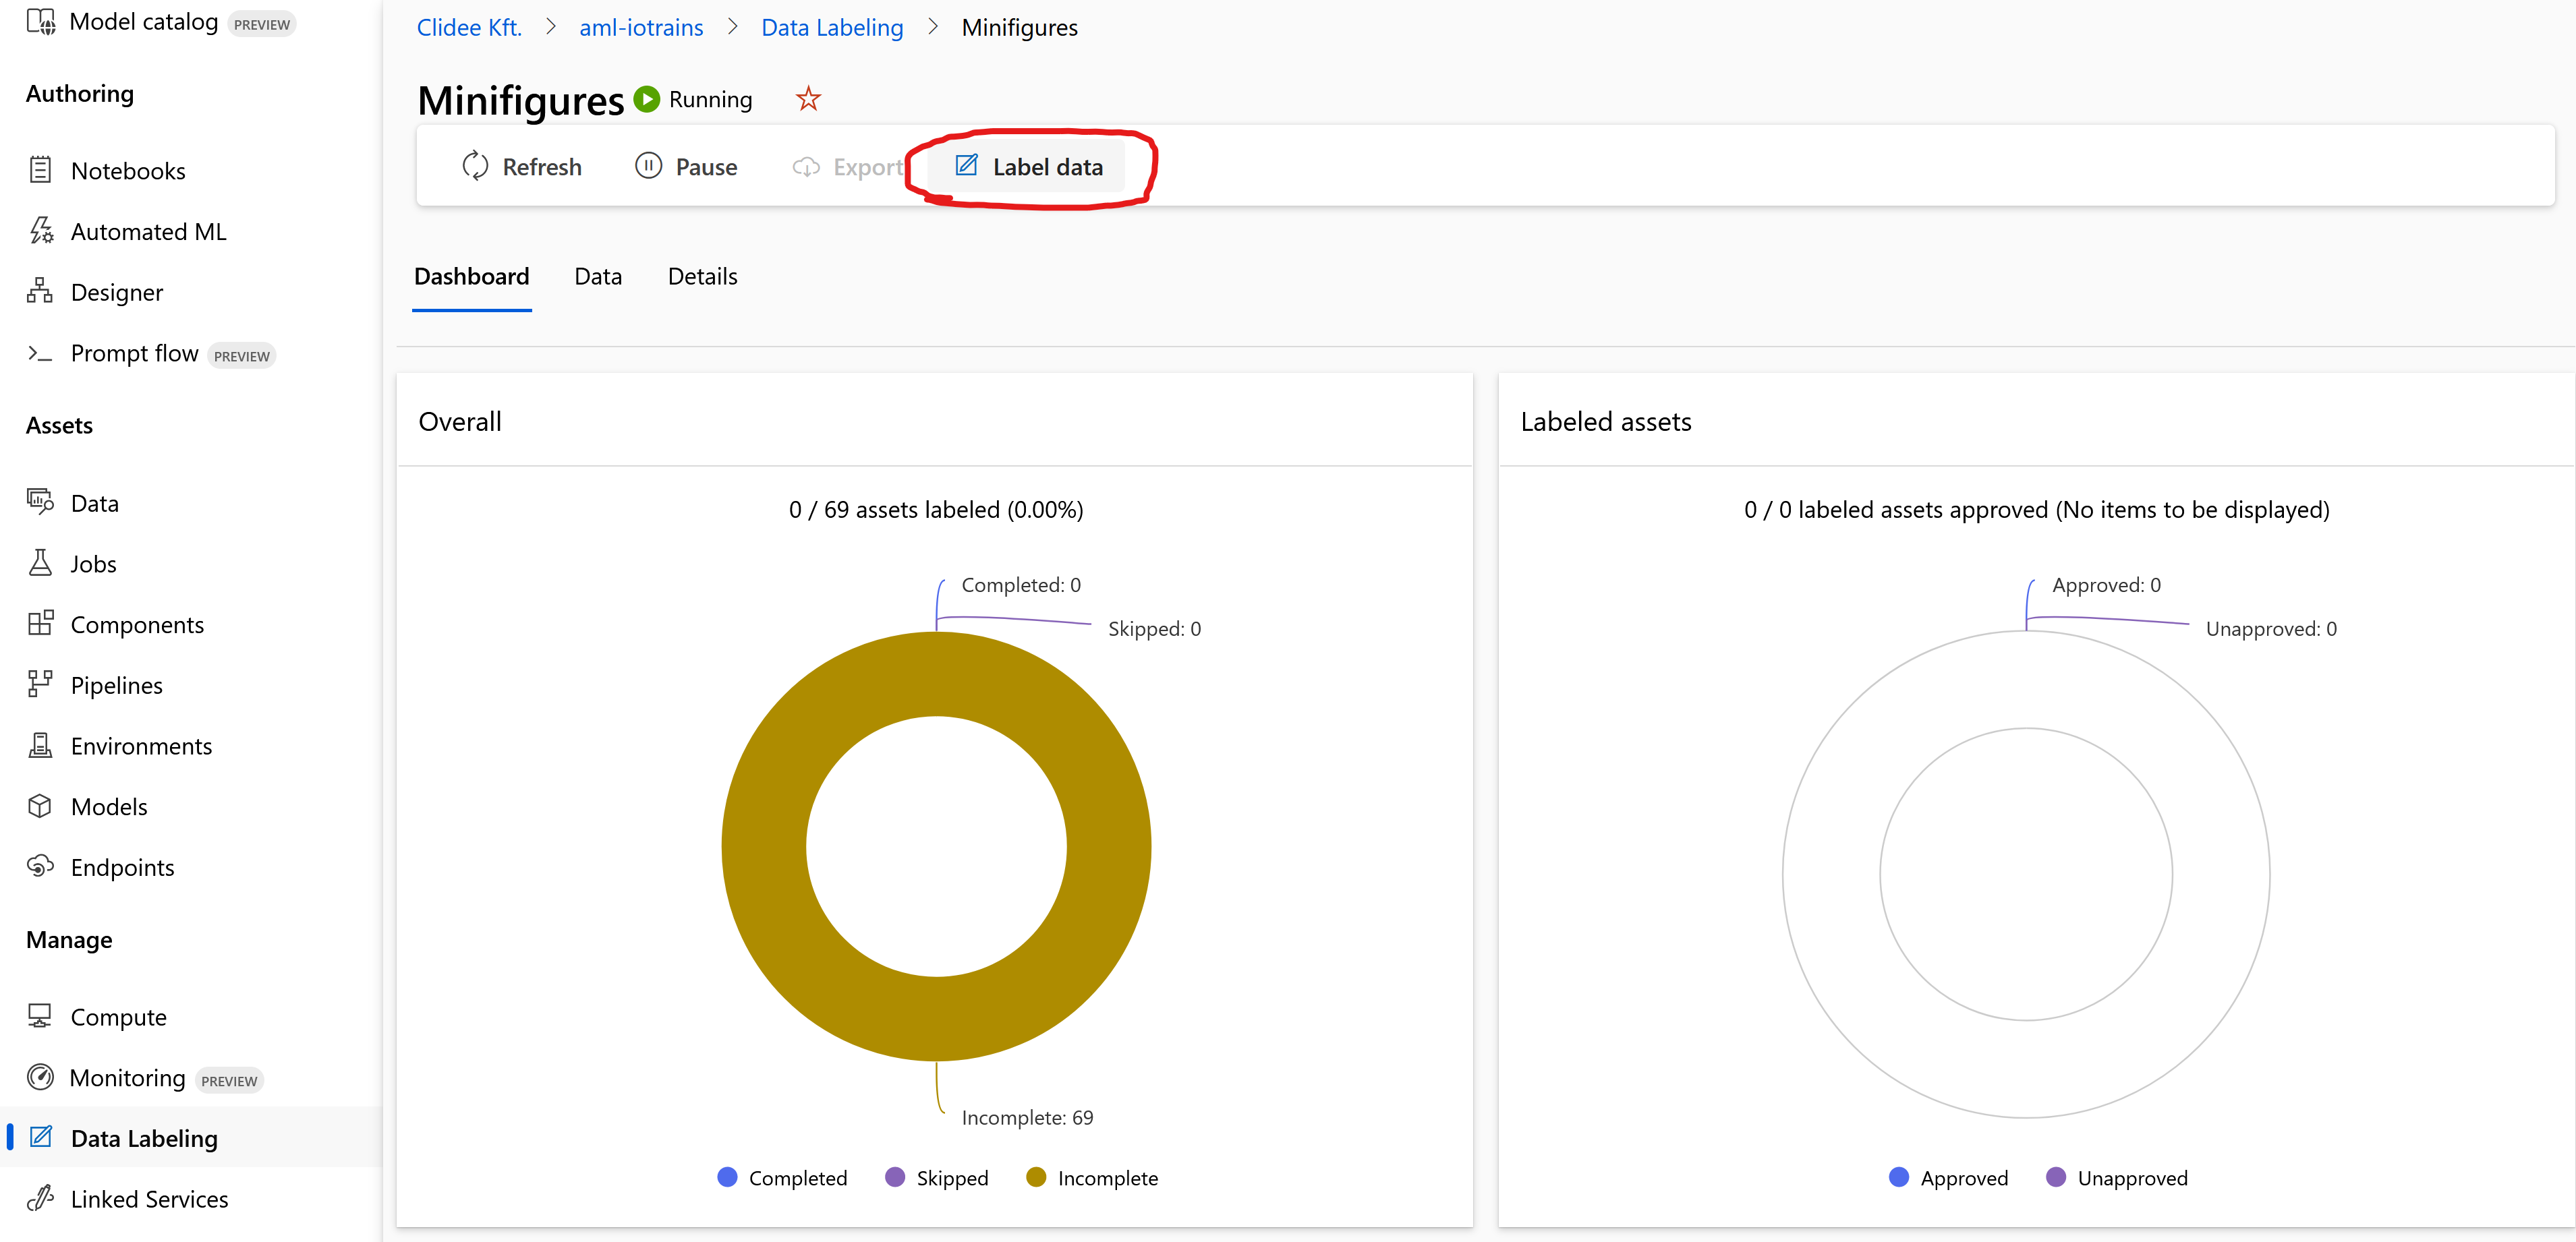
- Our (randomly selected) first picture loads into a small editor interface.
- Draw a small box to all Lego figures on your picture.
Select only just the reasonable guys. Skip those who are far or only small parts are visible or heavily blurred. - Once all minifigure is selected then click on the Submit button.

- Once you finish with all the pictures then go back to the Labeling project’s page.
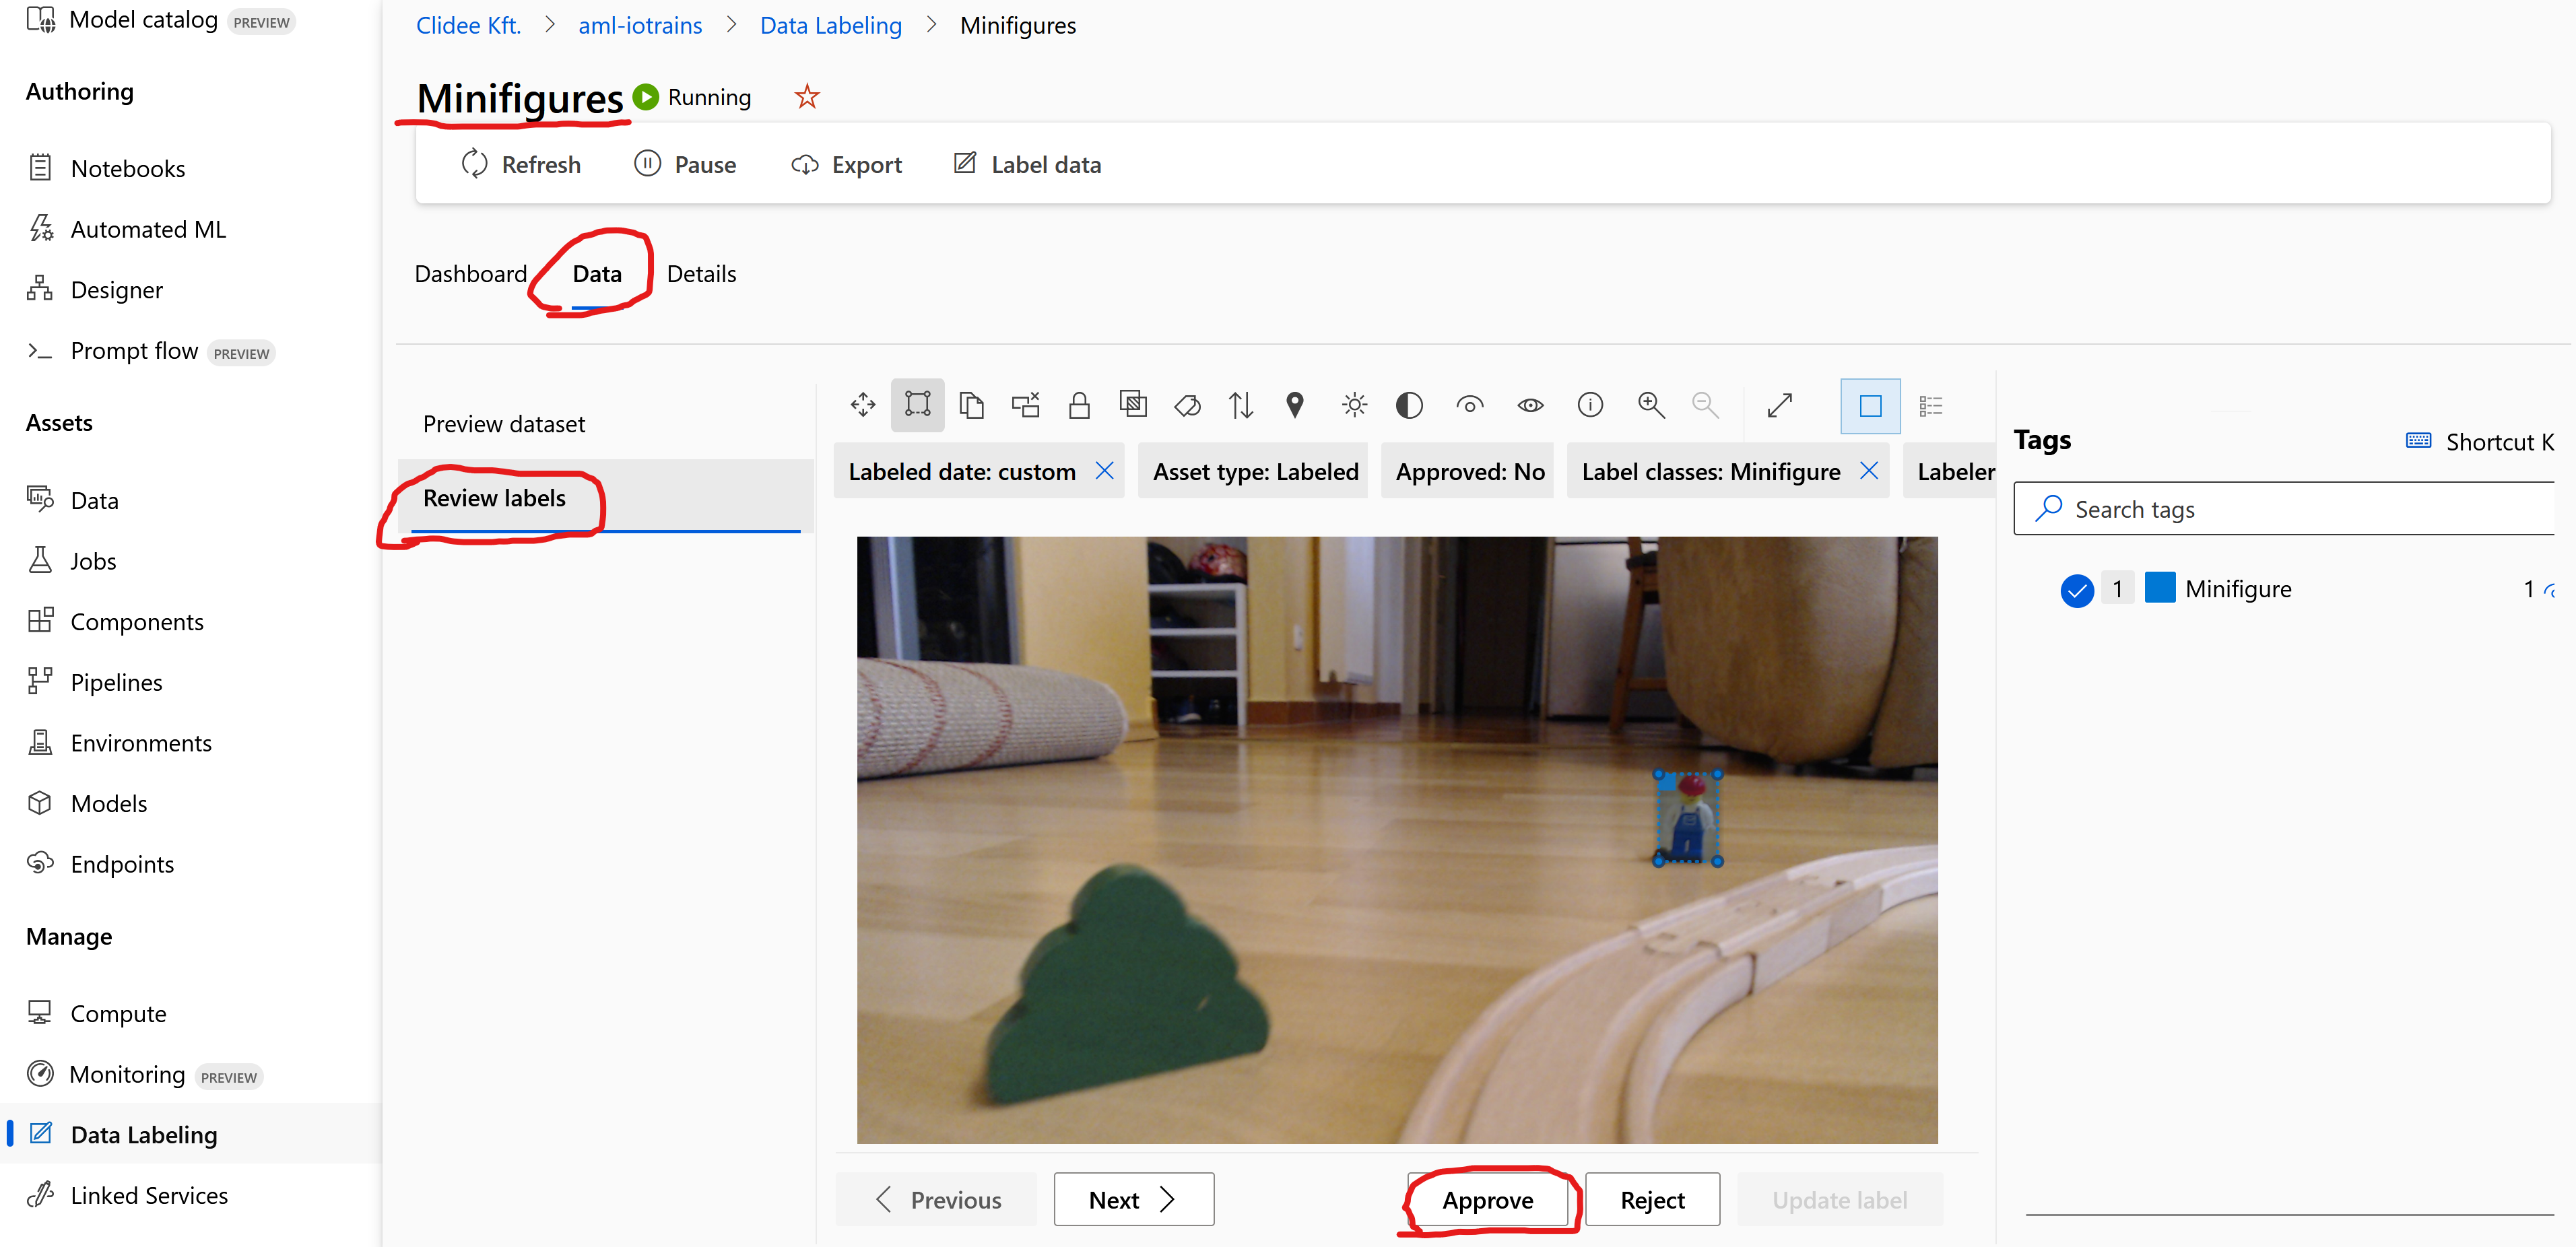
- Go to the Data tab and select Review labels
- Here you can check your work and you can approve or update all your pictures.
- Approve all pictures
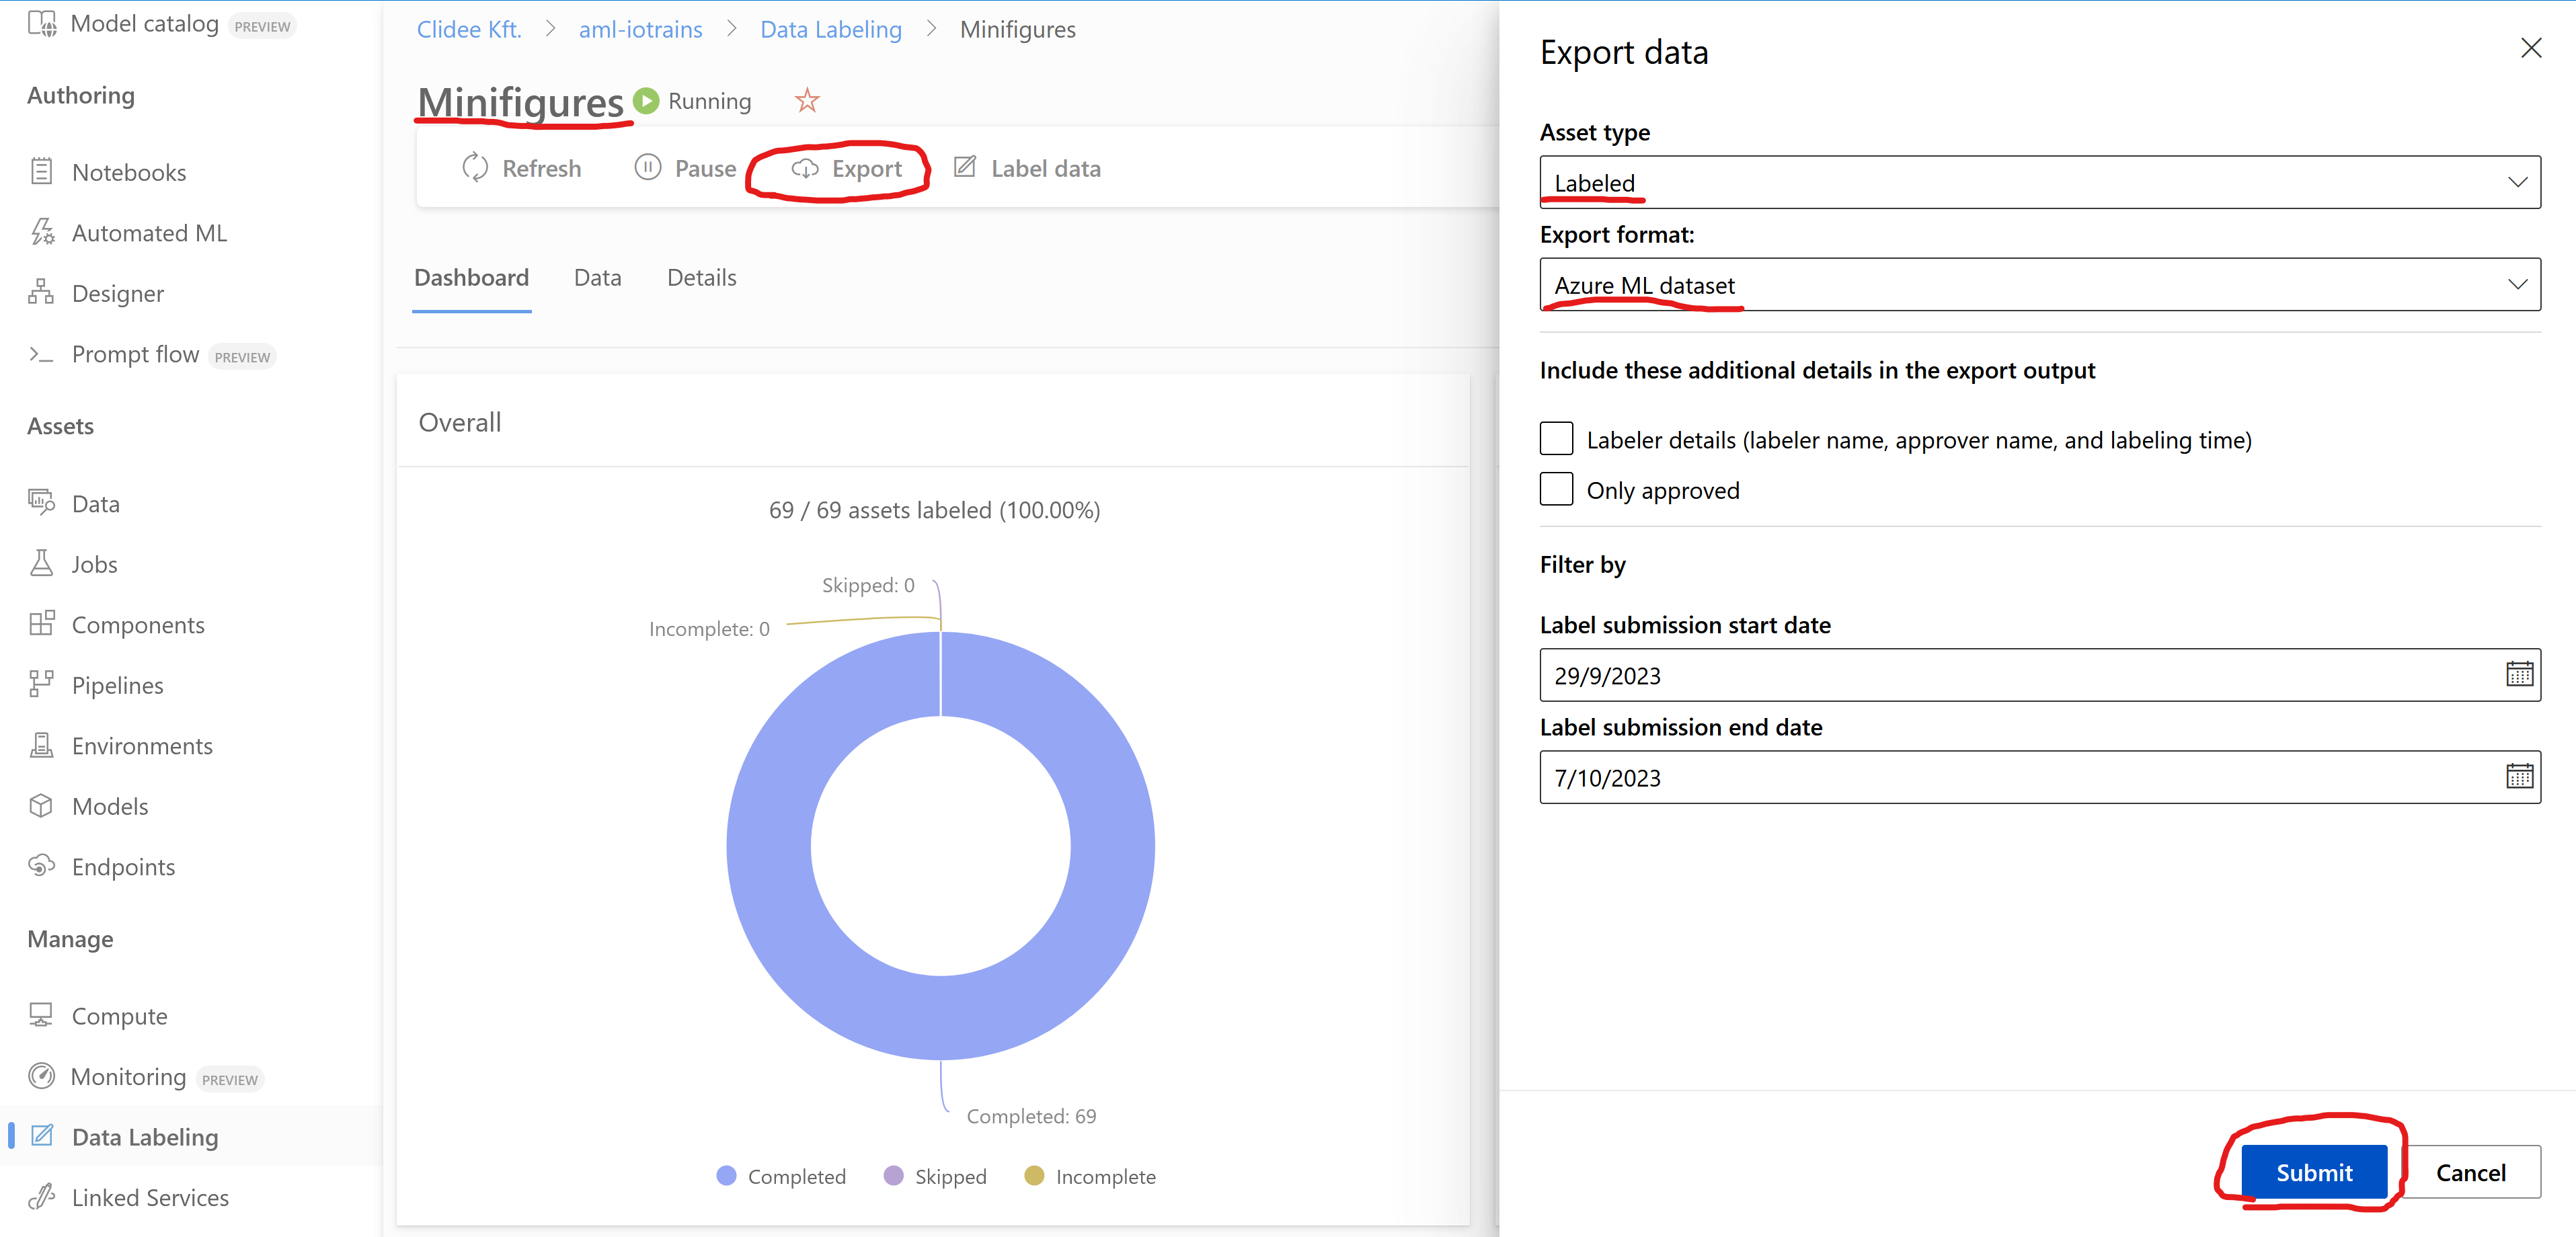
- Finally we need to export our achievment.
- Go back to the labeling project page and push the Export button at the top.
- Set the Asset type as “Labeled“
- Set the Export format as “Azure ML dataset“
This was the most painful part so you deserve a short break 😉
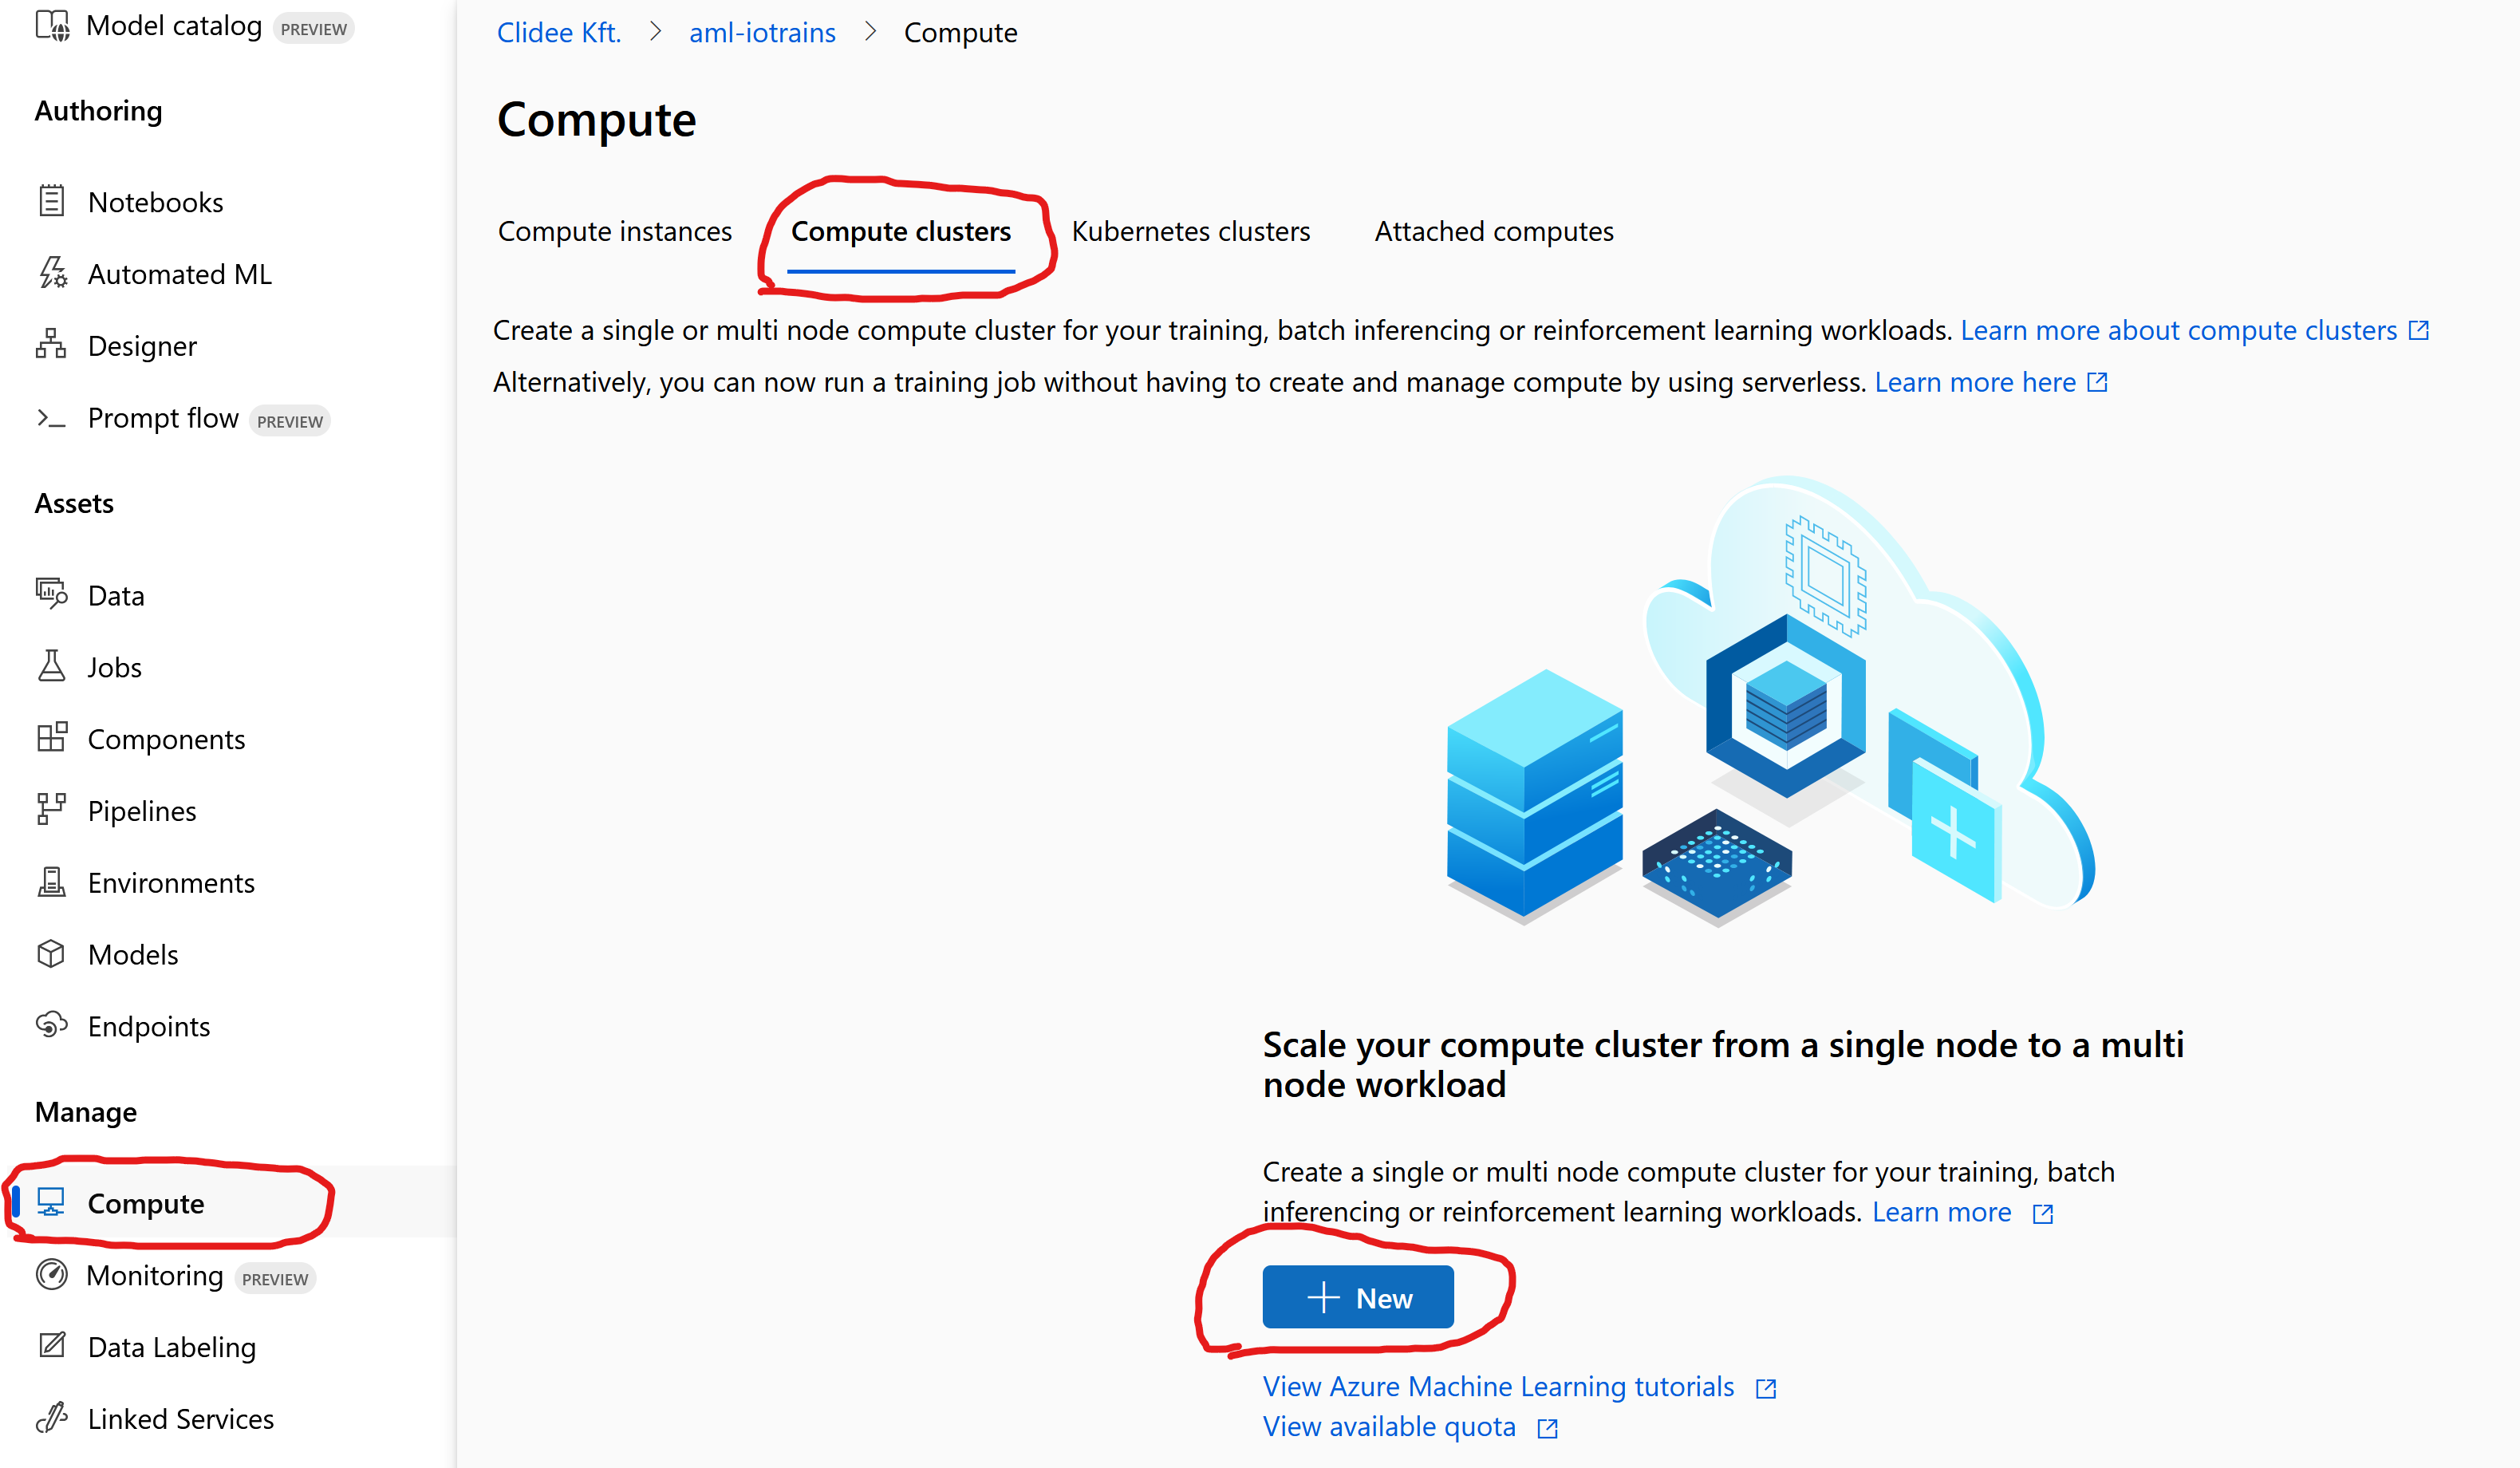
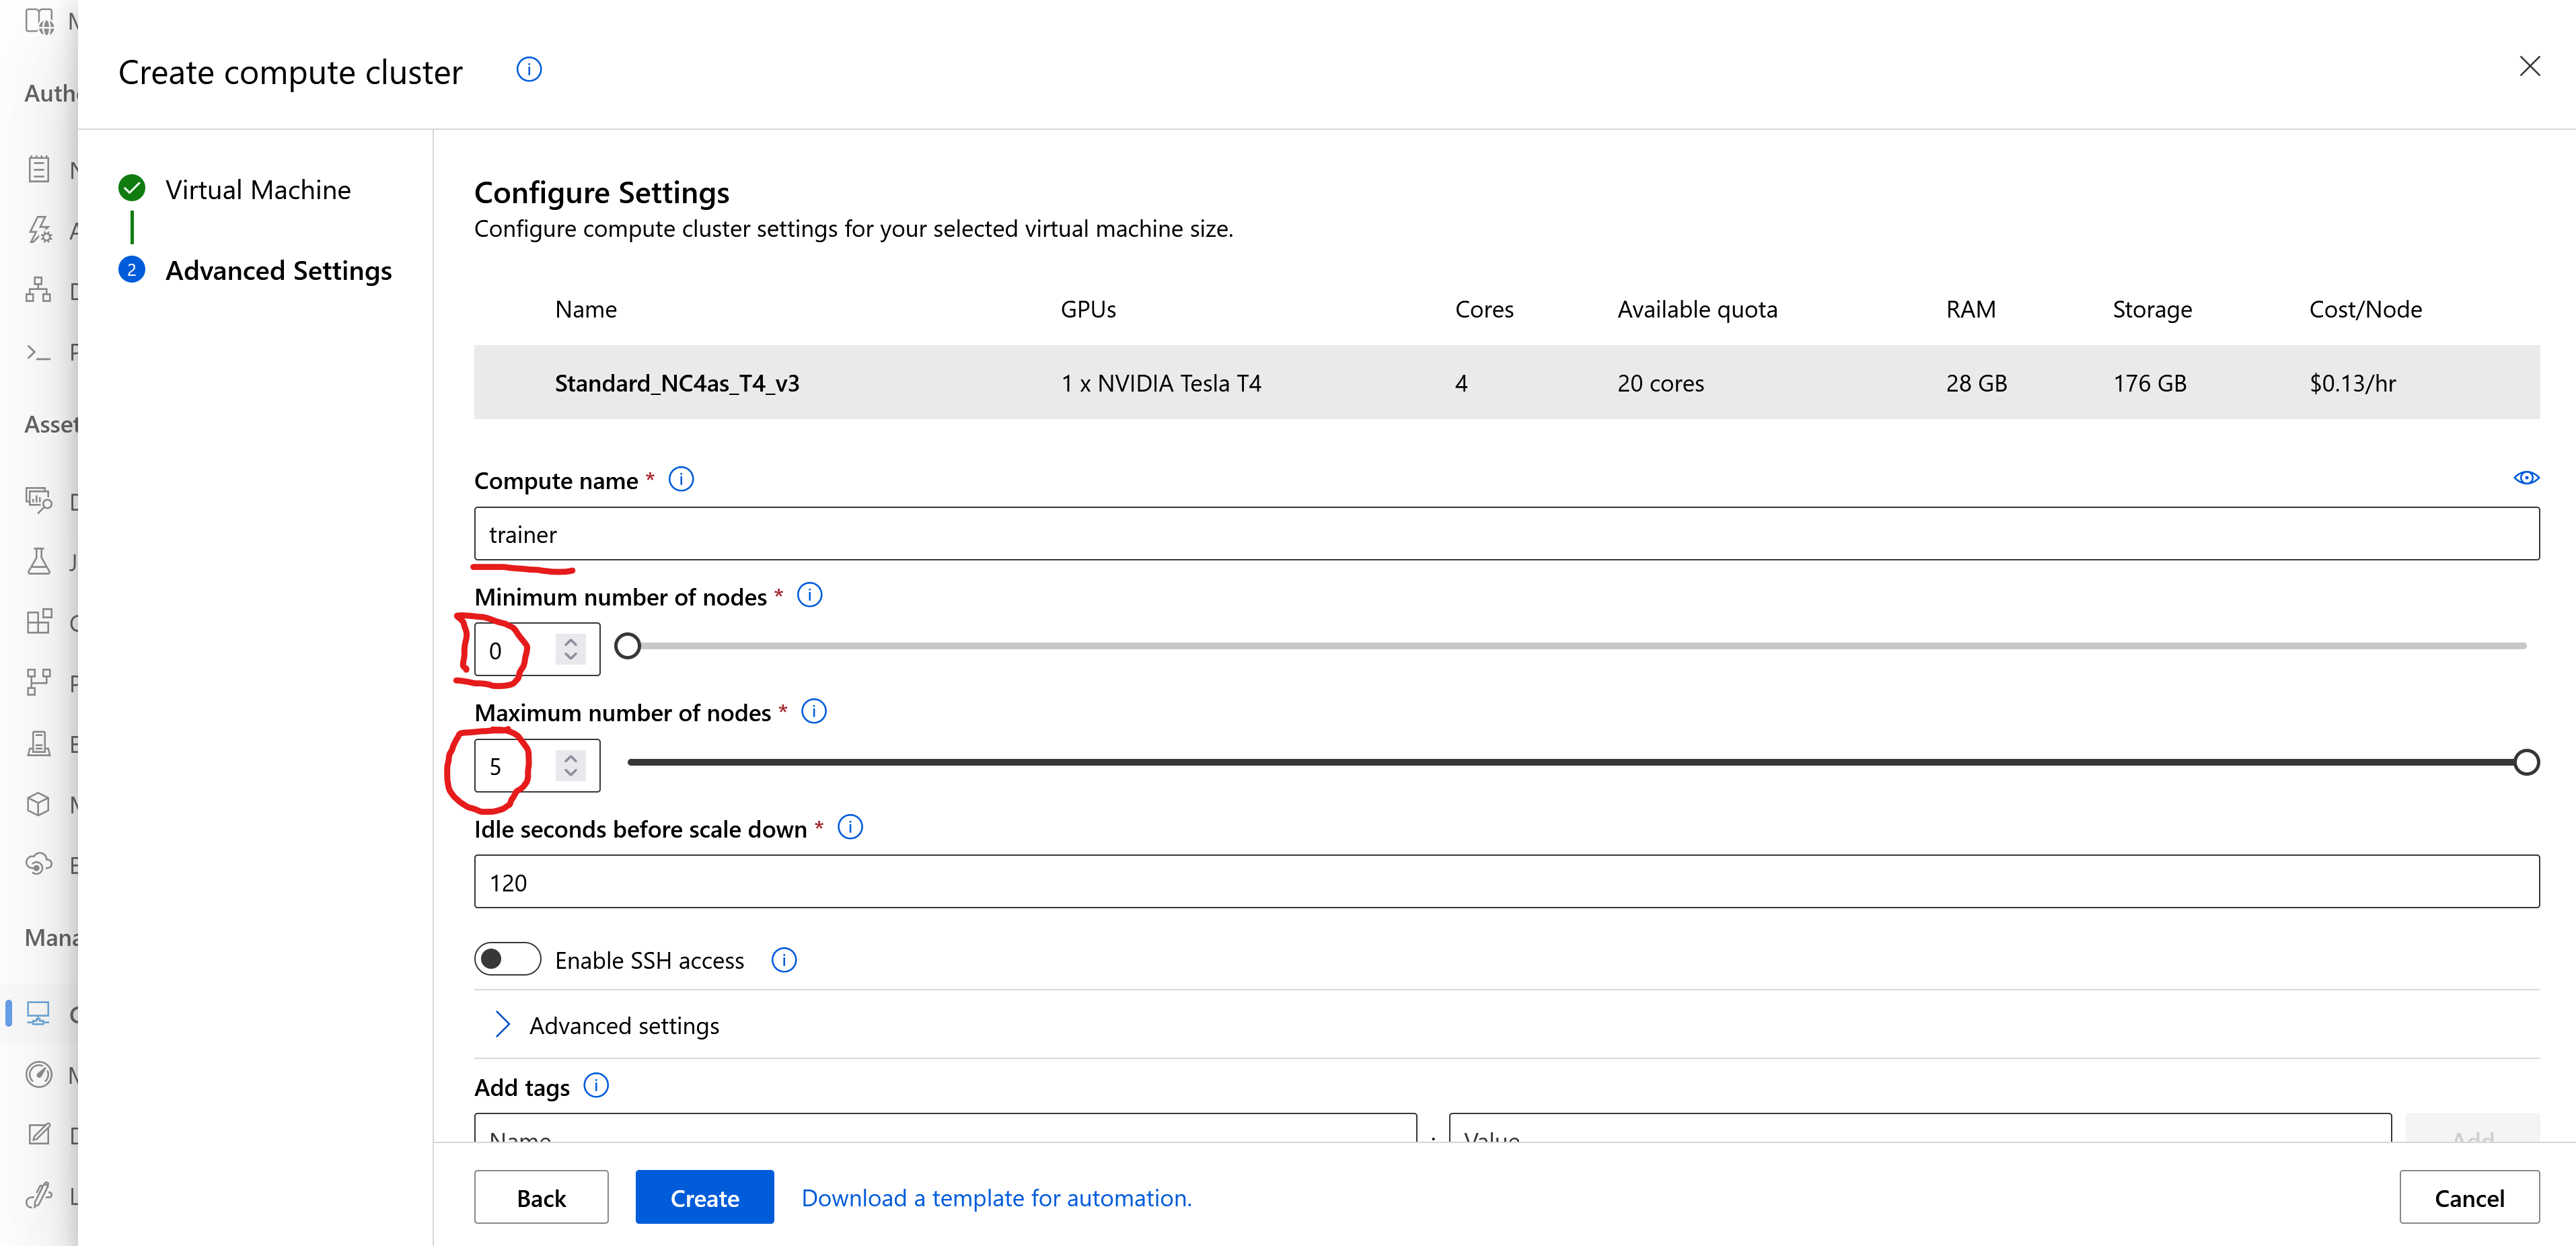
Create Compute Cluster
A compute cluster is needed to train our model. You can create a Virtual Machine Scale Set which will automatically scale based on the required amount of jobs.
- Go to the Compute menu and select the Compute cluster tab
- Select your location. Mine is “West Europe”
- Set the Virtual machine tier as “Low priority”
Low priority nodes are cheap but those are Spot instances which means that they can be revoked anytime.
You might go with Dedicated nodes as well but nowadays it is pretty hard to get quota to those nodes.
If you don’t have enough quota then I suggest to request increase to the “Low priority cores” as it is easier to achieve. - Set the Virtual machine type as “GPU”
Object detection works best with CUDA acceleration hence it requires GPU accelerated nodes. - Set the Virtual machine size as “Select from all options”
- Select the cheapest VM which is at this time: “Standard_NC4as_T4_v3”
For our simple project the smallest VM is fine.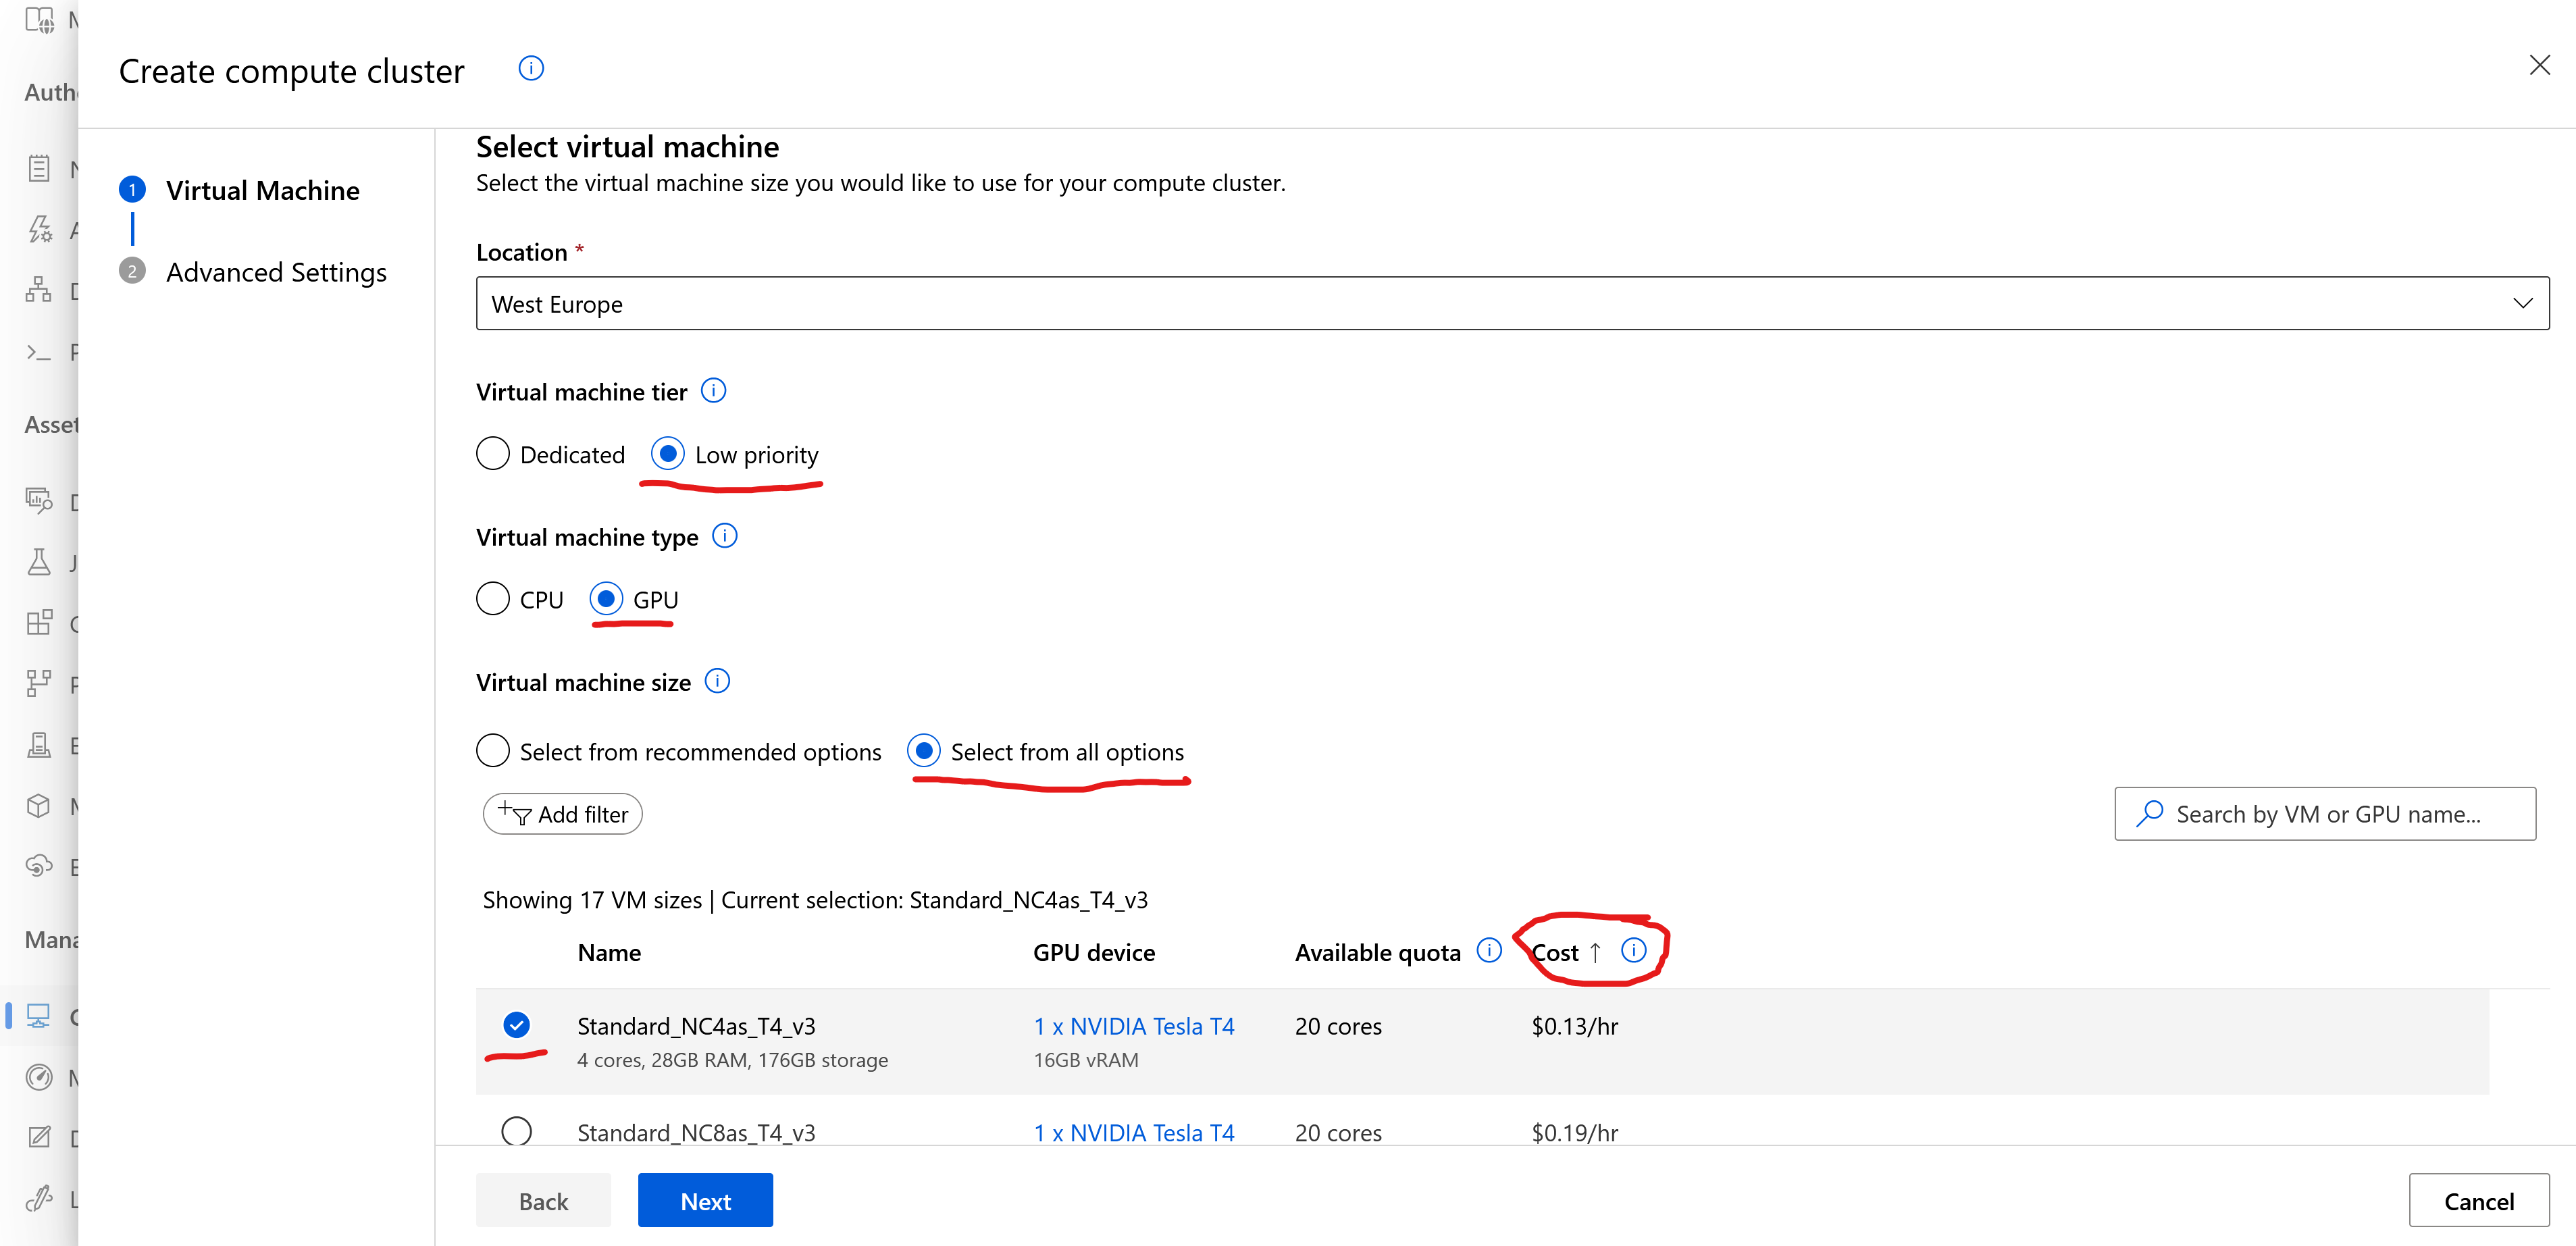
- Name your cluster like “trainer” or any other meaningful name.
- Set the Minimum number of nodes as “0”
- Set the Maximum number of nodes as “5”
- Click on Create
Model training with Auto ML
Here is where the magic happens. Training an AI model is more a trial and error method. The system trains a random AI model based on the input data and then it checks (validates) how does it perform. If it doesn’t perform well then it tries to train it again by changing a bit on the training process parameters. The raw AI models have some own parameters which can be fine-tuned to change on the behavior and learning process. These are called hyper-parameters during the learning process.
Azure Auto ML will repeat this process until it reaches the best performing model. We need to provide the input data, our expectation and the edges of the hyper-parameter set. Then the Auto ML will create several configurations and starts the teaching parallel.
Earlier we created a Compute Cluster for the training. Note several things:
- However its name is “Cluster” but this isn’t a Kubernetes cluster. It is a cluster of VMs (Virtual Machine Scaling Set to be precise).
- The cluster is used for speed up the training as we can run parallel trials on different nodes. This also means we could train also with 1 single node as well.
- The advantage of the cluster is that parallel execution. From cost point of view it is almost the same as a single node because it will shut down the idle nodes so it scales to our needs. N times more expensive but N times faster too.
- Bigger models like the famous ChatGPT require multi-GPU machines or even big clusters which acts as 1 logical computer. (See Nvidia DGX cluster)
Our use-case is fine with the smallest T4 GPU.
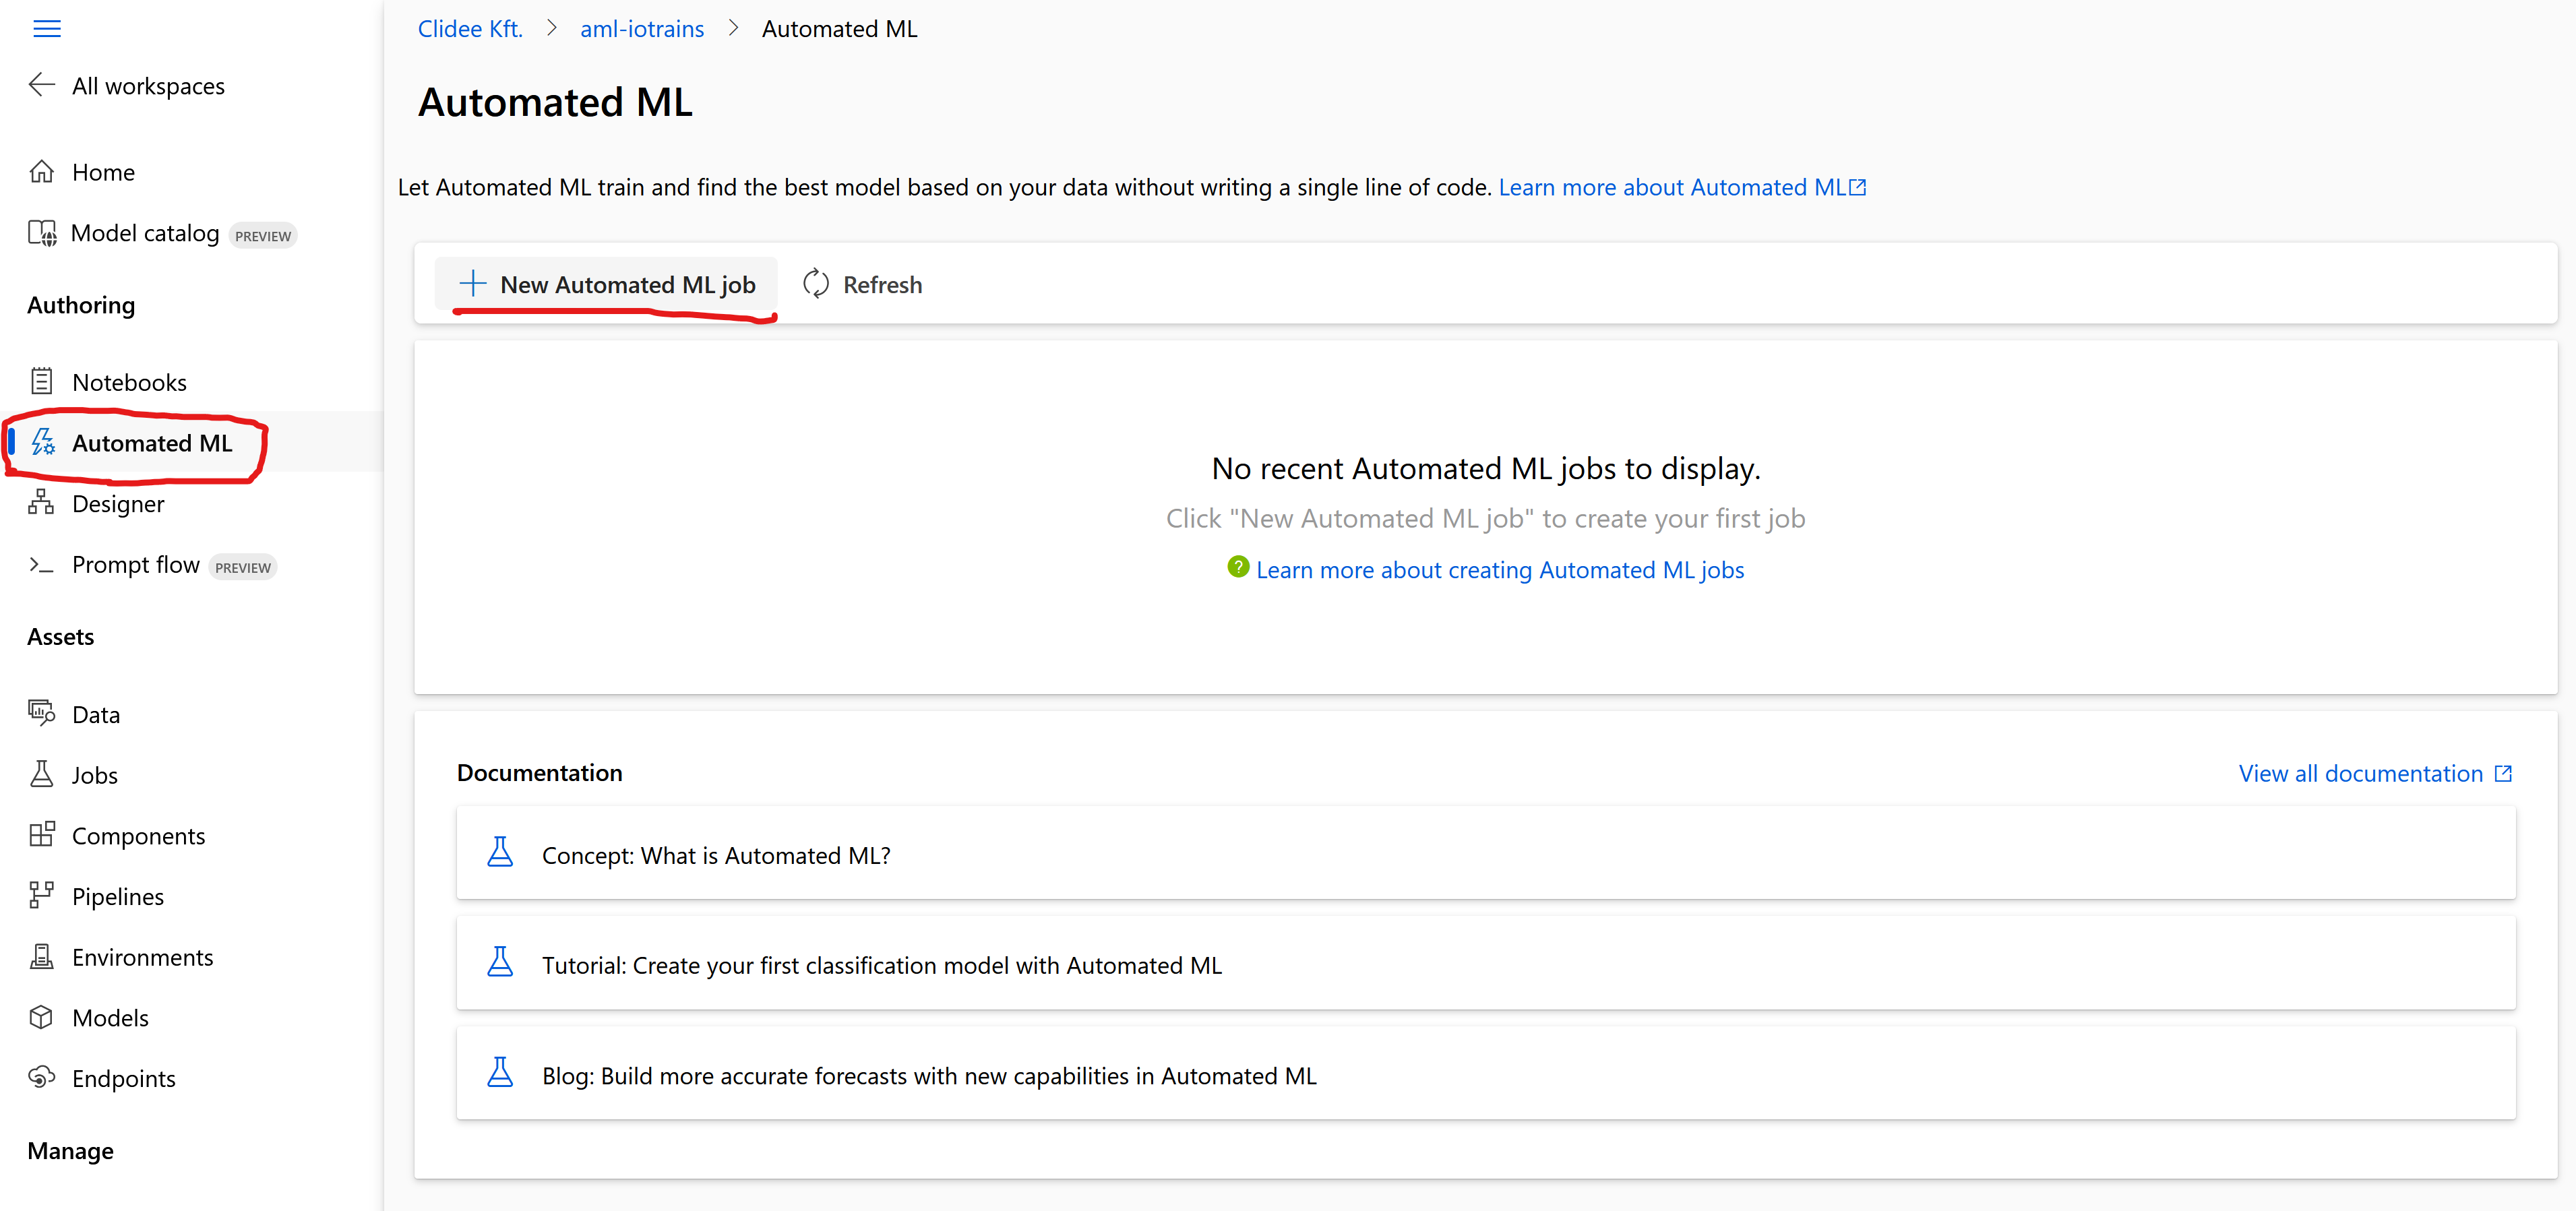
- Go to the Automated ML menu and click on the “+ New Automated ML job”
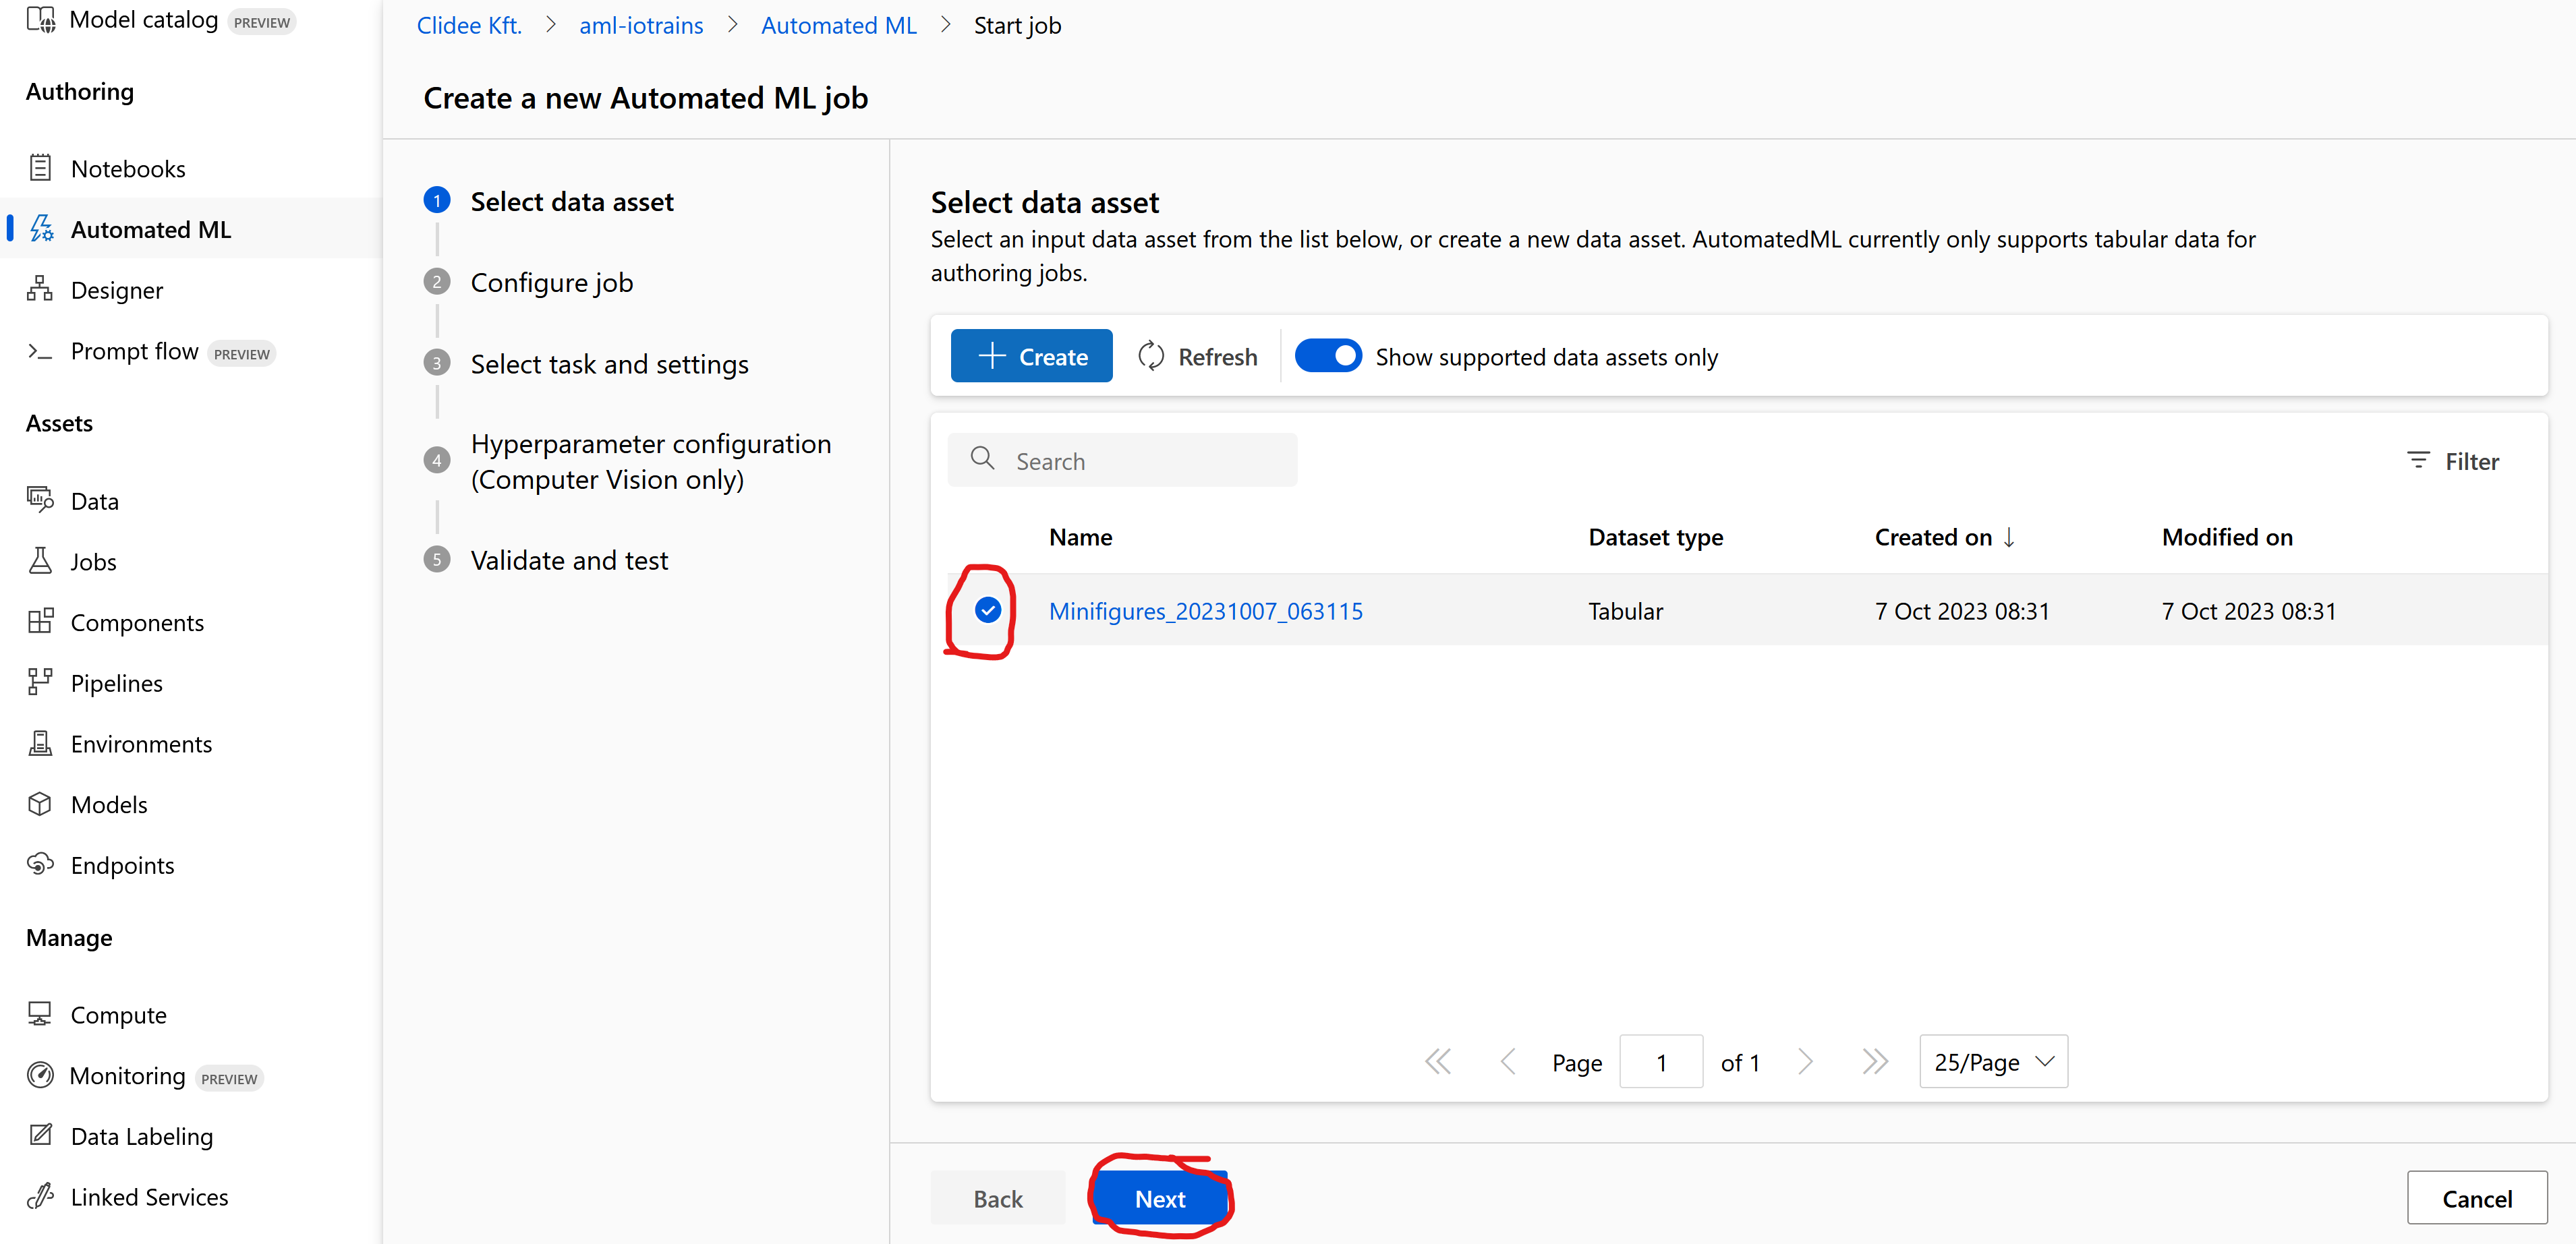
- At the dataset you will see the one from the previous export. Once the export finished, the name was written in a green label. This is the same.
- Select the dataset what we just exported from labeling.
- Set the Target column to “label (List)” because we want to train our model to find our label.
- Set the Select compute type to “Compute cluster”
- Select our “trainer” (or however you called) cluster at the Select Azure ML compute cluster

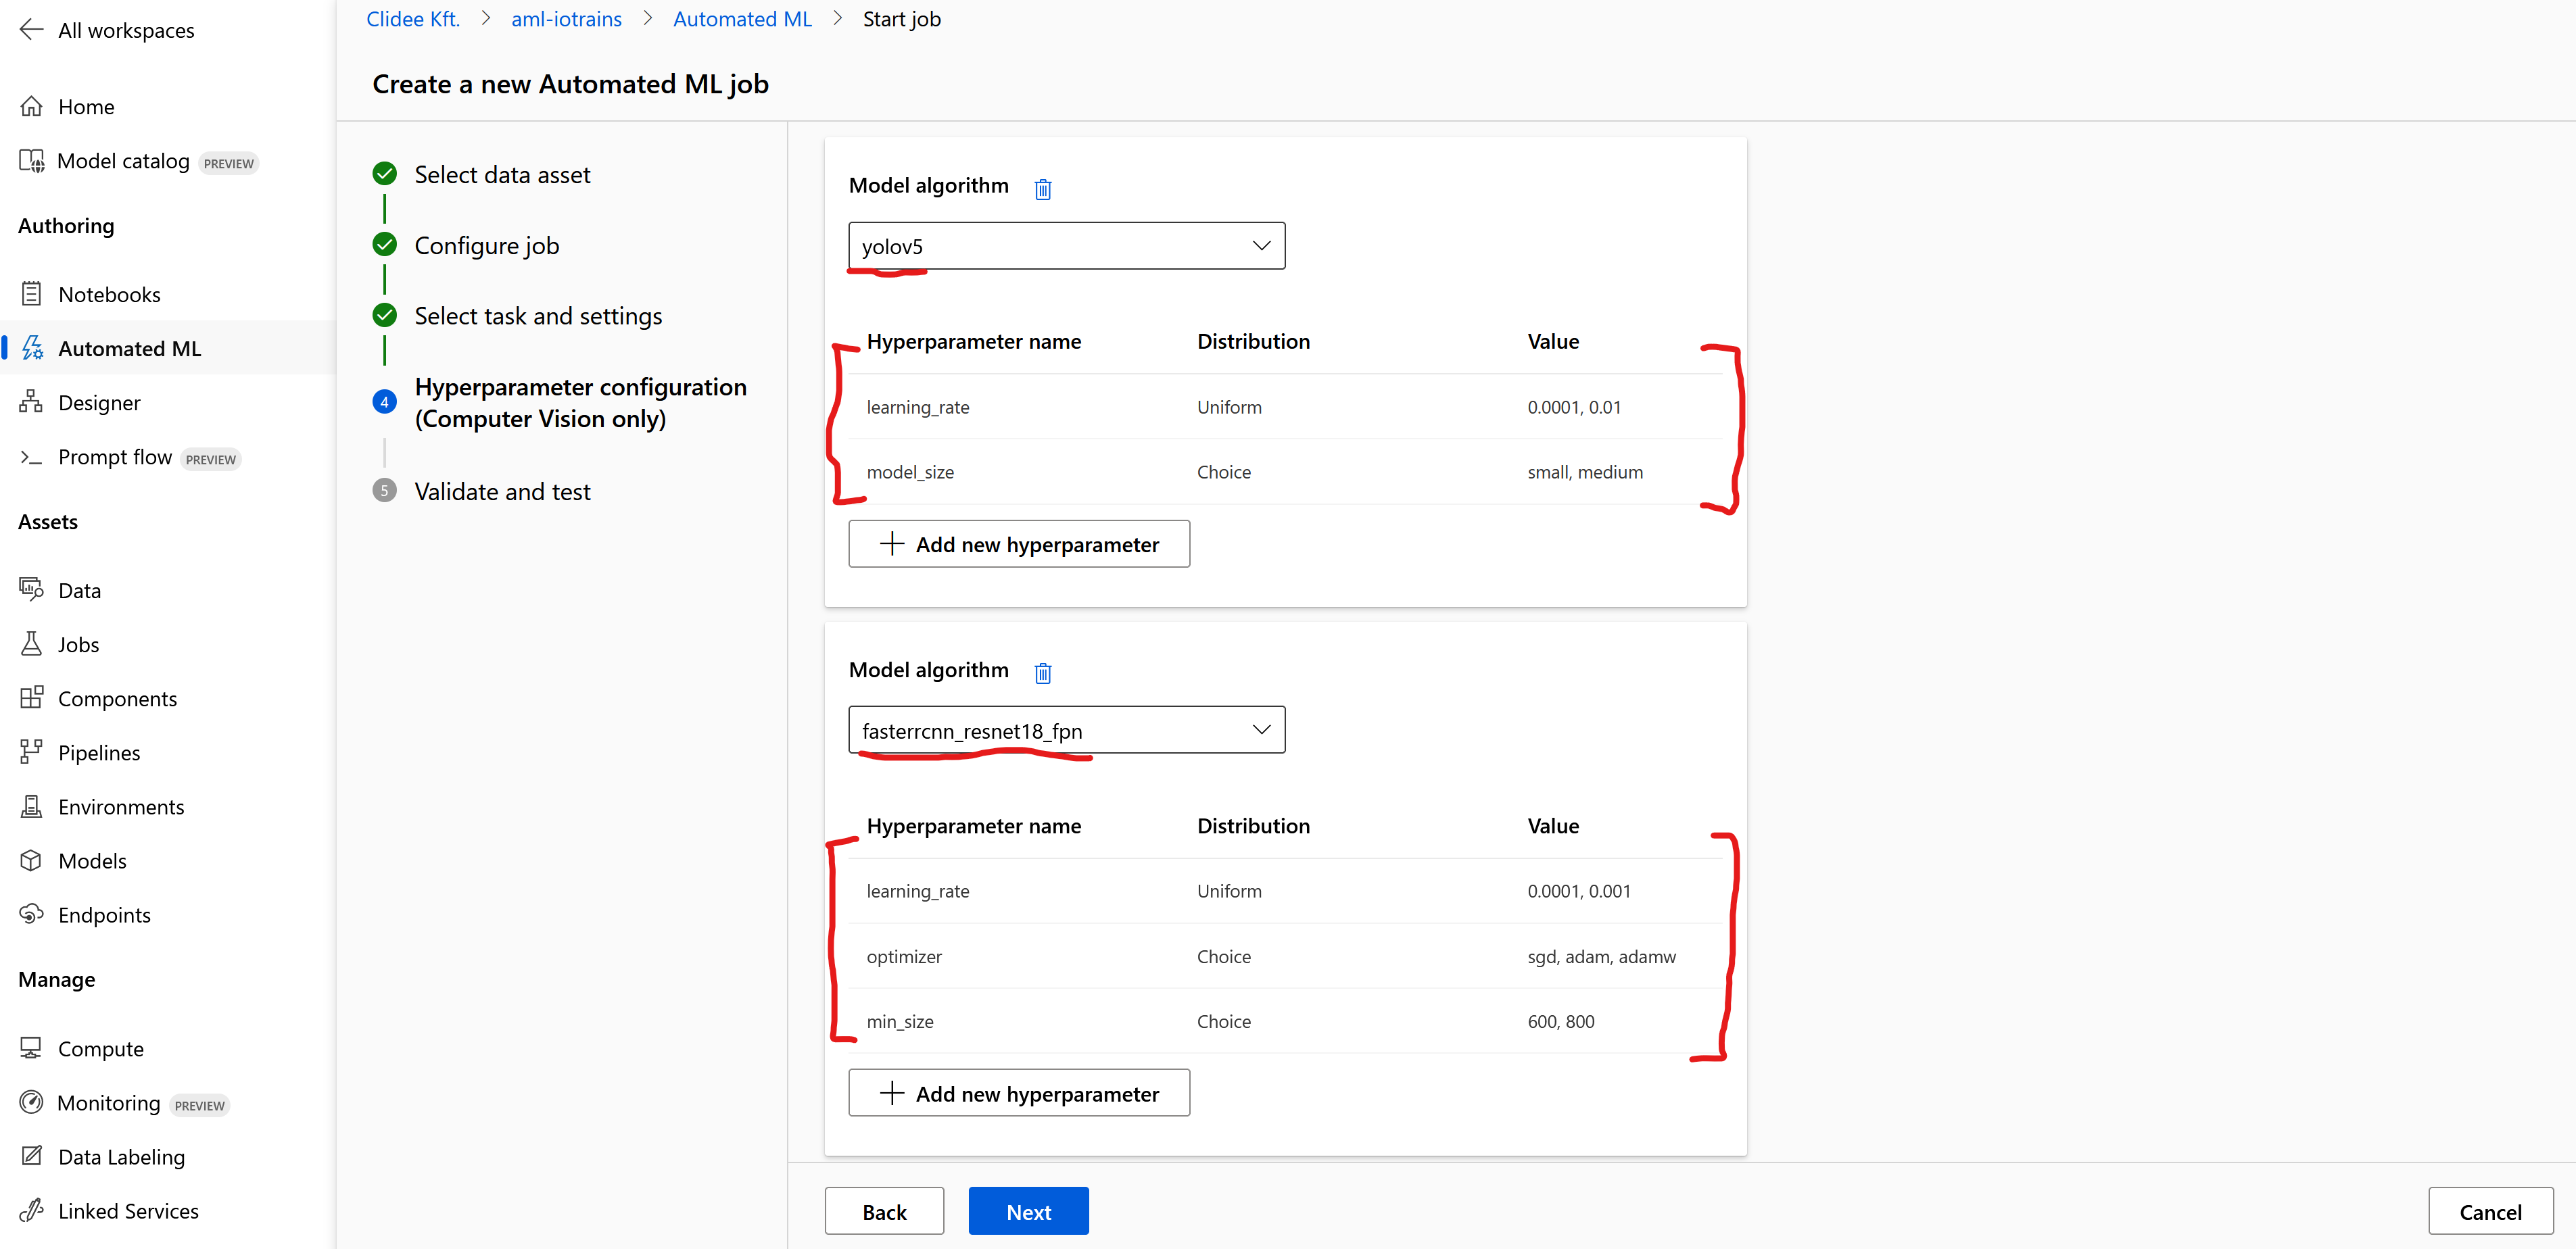
- On the next page we can select the base model and the hyperparameters.
- Select “yolov5” as Model algorithm
- Click on the “+ Add new hyperparameter” and add new following:
- Name: “learning_rate”
- Distribution: “Uniform”
- Min: “0.0001”
- Max: “0.01”
- Click on Save
- Click again on the “+Add new hyperparameter” and add the following:
- Name: “model_size”
- Distribution: “Choice”
- Value: “small, medium”
- Click on Save
- Click on the “+ Add new model algorithm” which adds a new box
- Select “fasterrcnn_resnet18_fpn” which is a small R-CNN model
- Click on the “+ Add new hyperparameter” and add new following:
- Name: “learning_rate”
- Distribution: “Uniform”
- Min: “0.0001”
- Max: “0.001” (it is different from Yolo’s)
- Click on Save
- Click again on the “+Add new hyperparameter” and add the following:
- Name: “optimizer“
- Distribution: “Choice”
- Value: “sgd, adam, adamw“
- Click on Save
- Click again on the “+Add new hyperparameter” and add the following:
- Name: “min_size“
- Distribution: “Choice”
- Value: “600, 800“
- Click on Save
- Click on the “+ Add new model algorithm” and add “fasterrcnn_resnet34_fpn”
- Click on the “+ Add new model algorithm” and add “fasterrcnn_resnet50_fpn”
- Set the hyperparameters for both similar like at fasterrcnn_resnet18_fpn
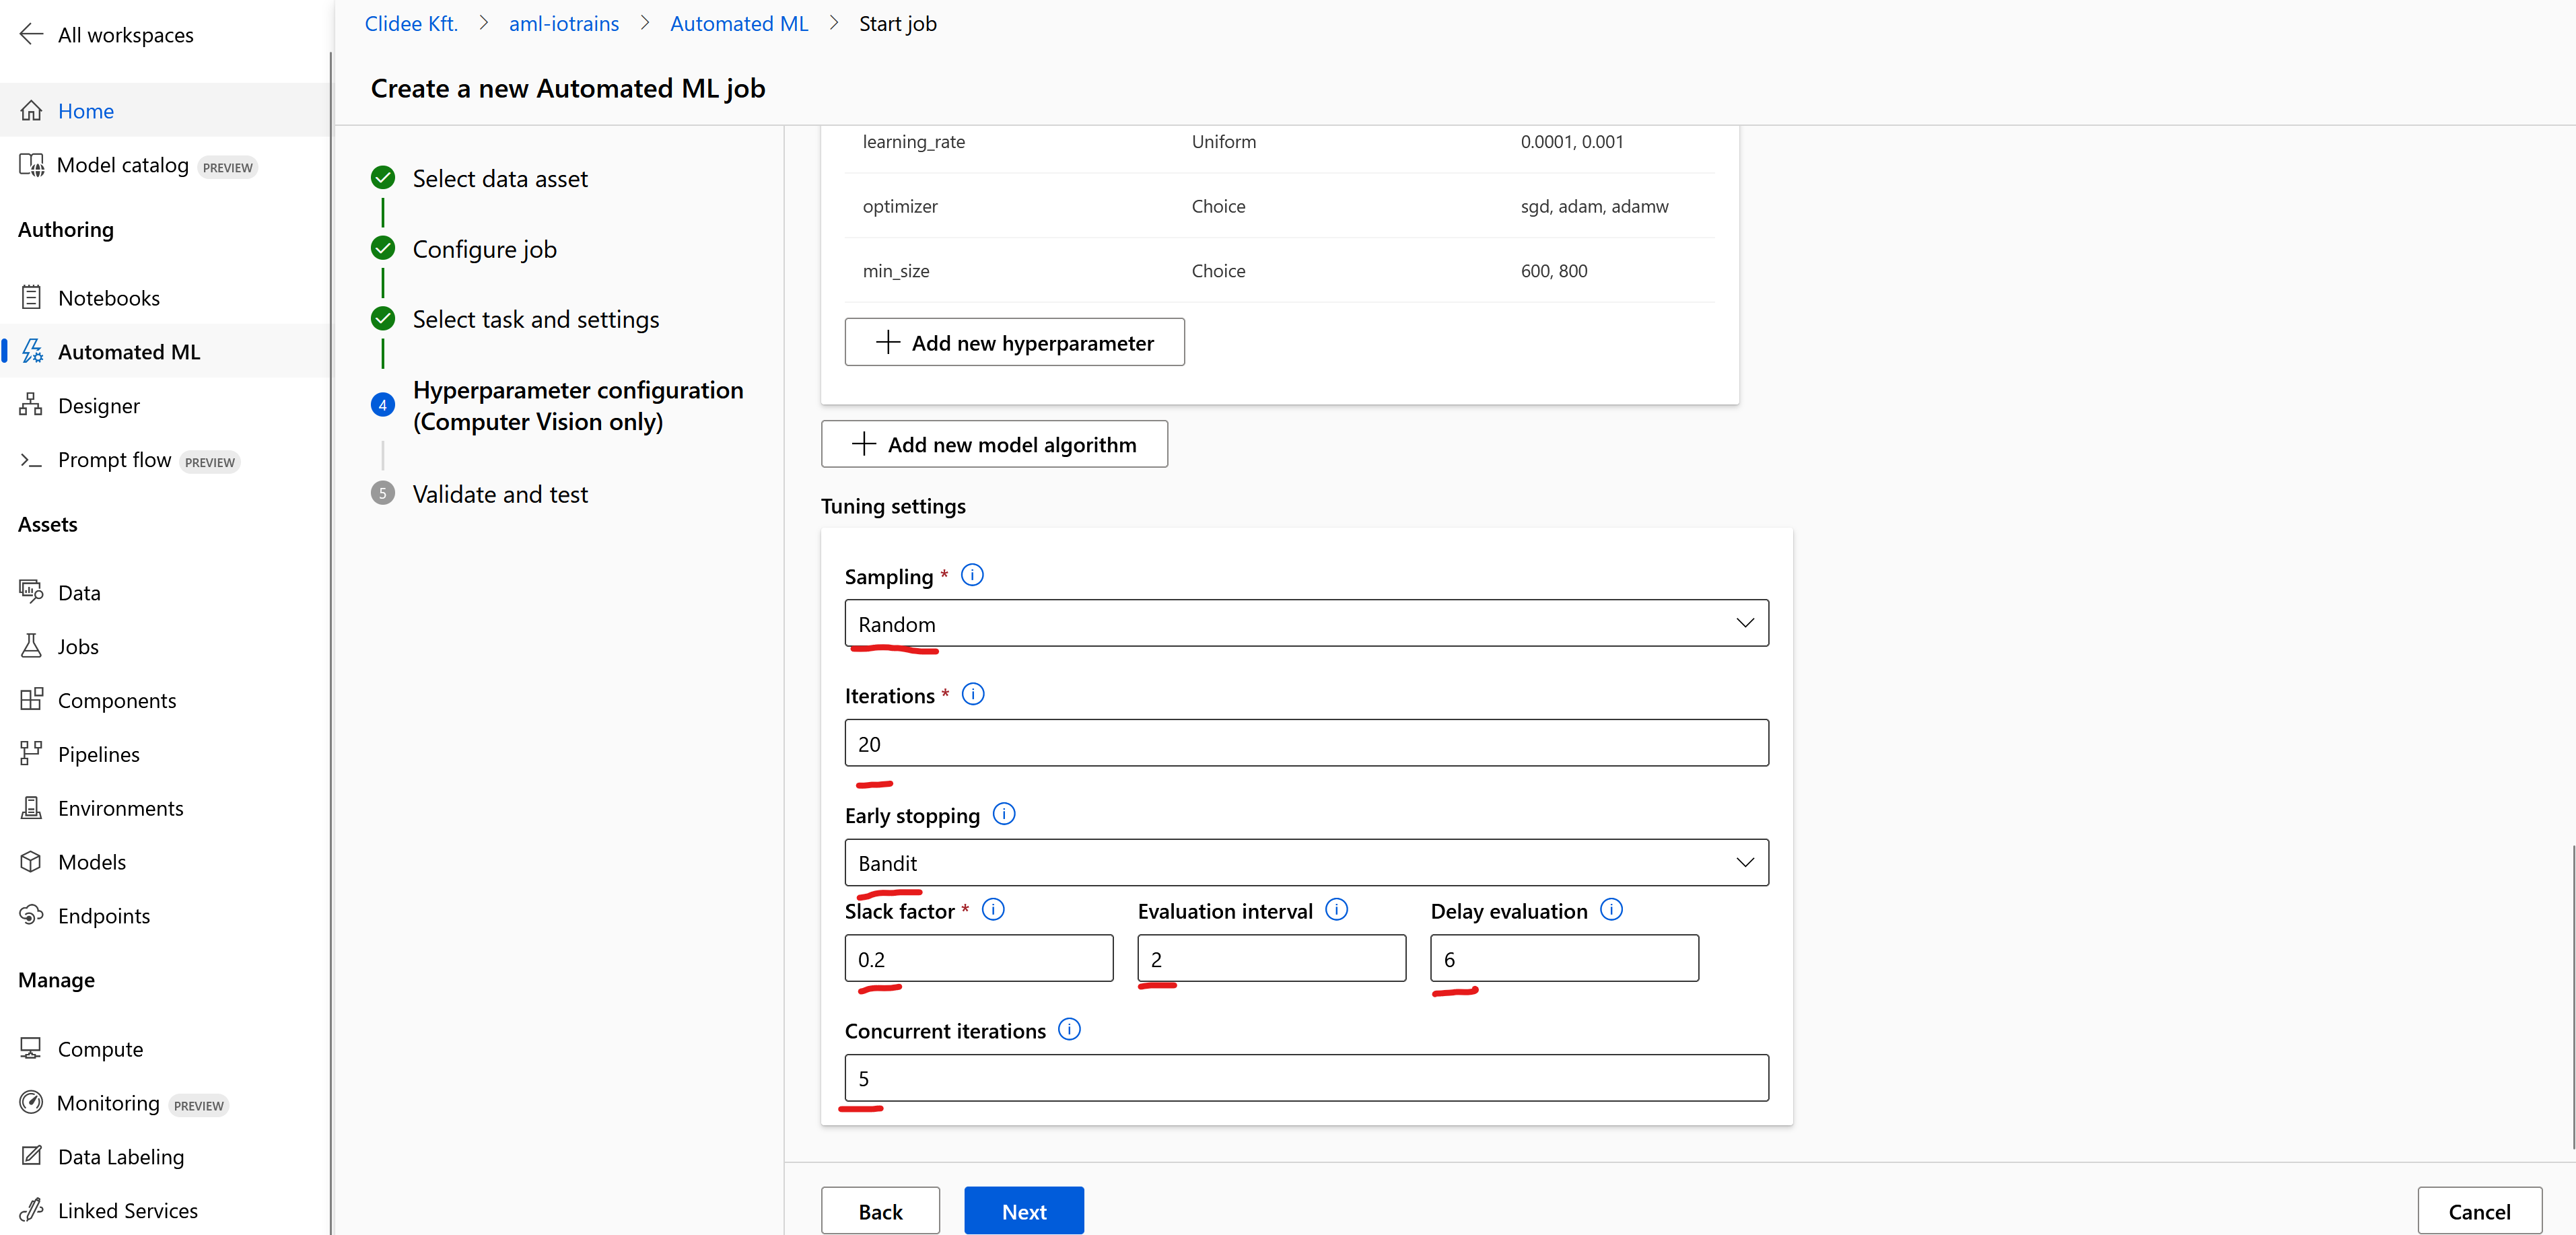
- Scroll down to set the “Tuning settings”
- Set the Sampling to “Random”
- Set the Iterations to “10” or “20”. This sets how many trials shall the AutoML randomly generate and test.
- Set teh Early stopping to “Bandit”. This algorithm will specify how to evaluate the model’s performance in early stage and stop if the training is on wrong track.
- Set the Slack factor to “0.2”
- Set the Evaluation interval to “2”
- Set the Delay evaluation to “6”
- Leave the Concurent iterations empty or set it to the size of your Compute Cluster like “5”
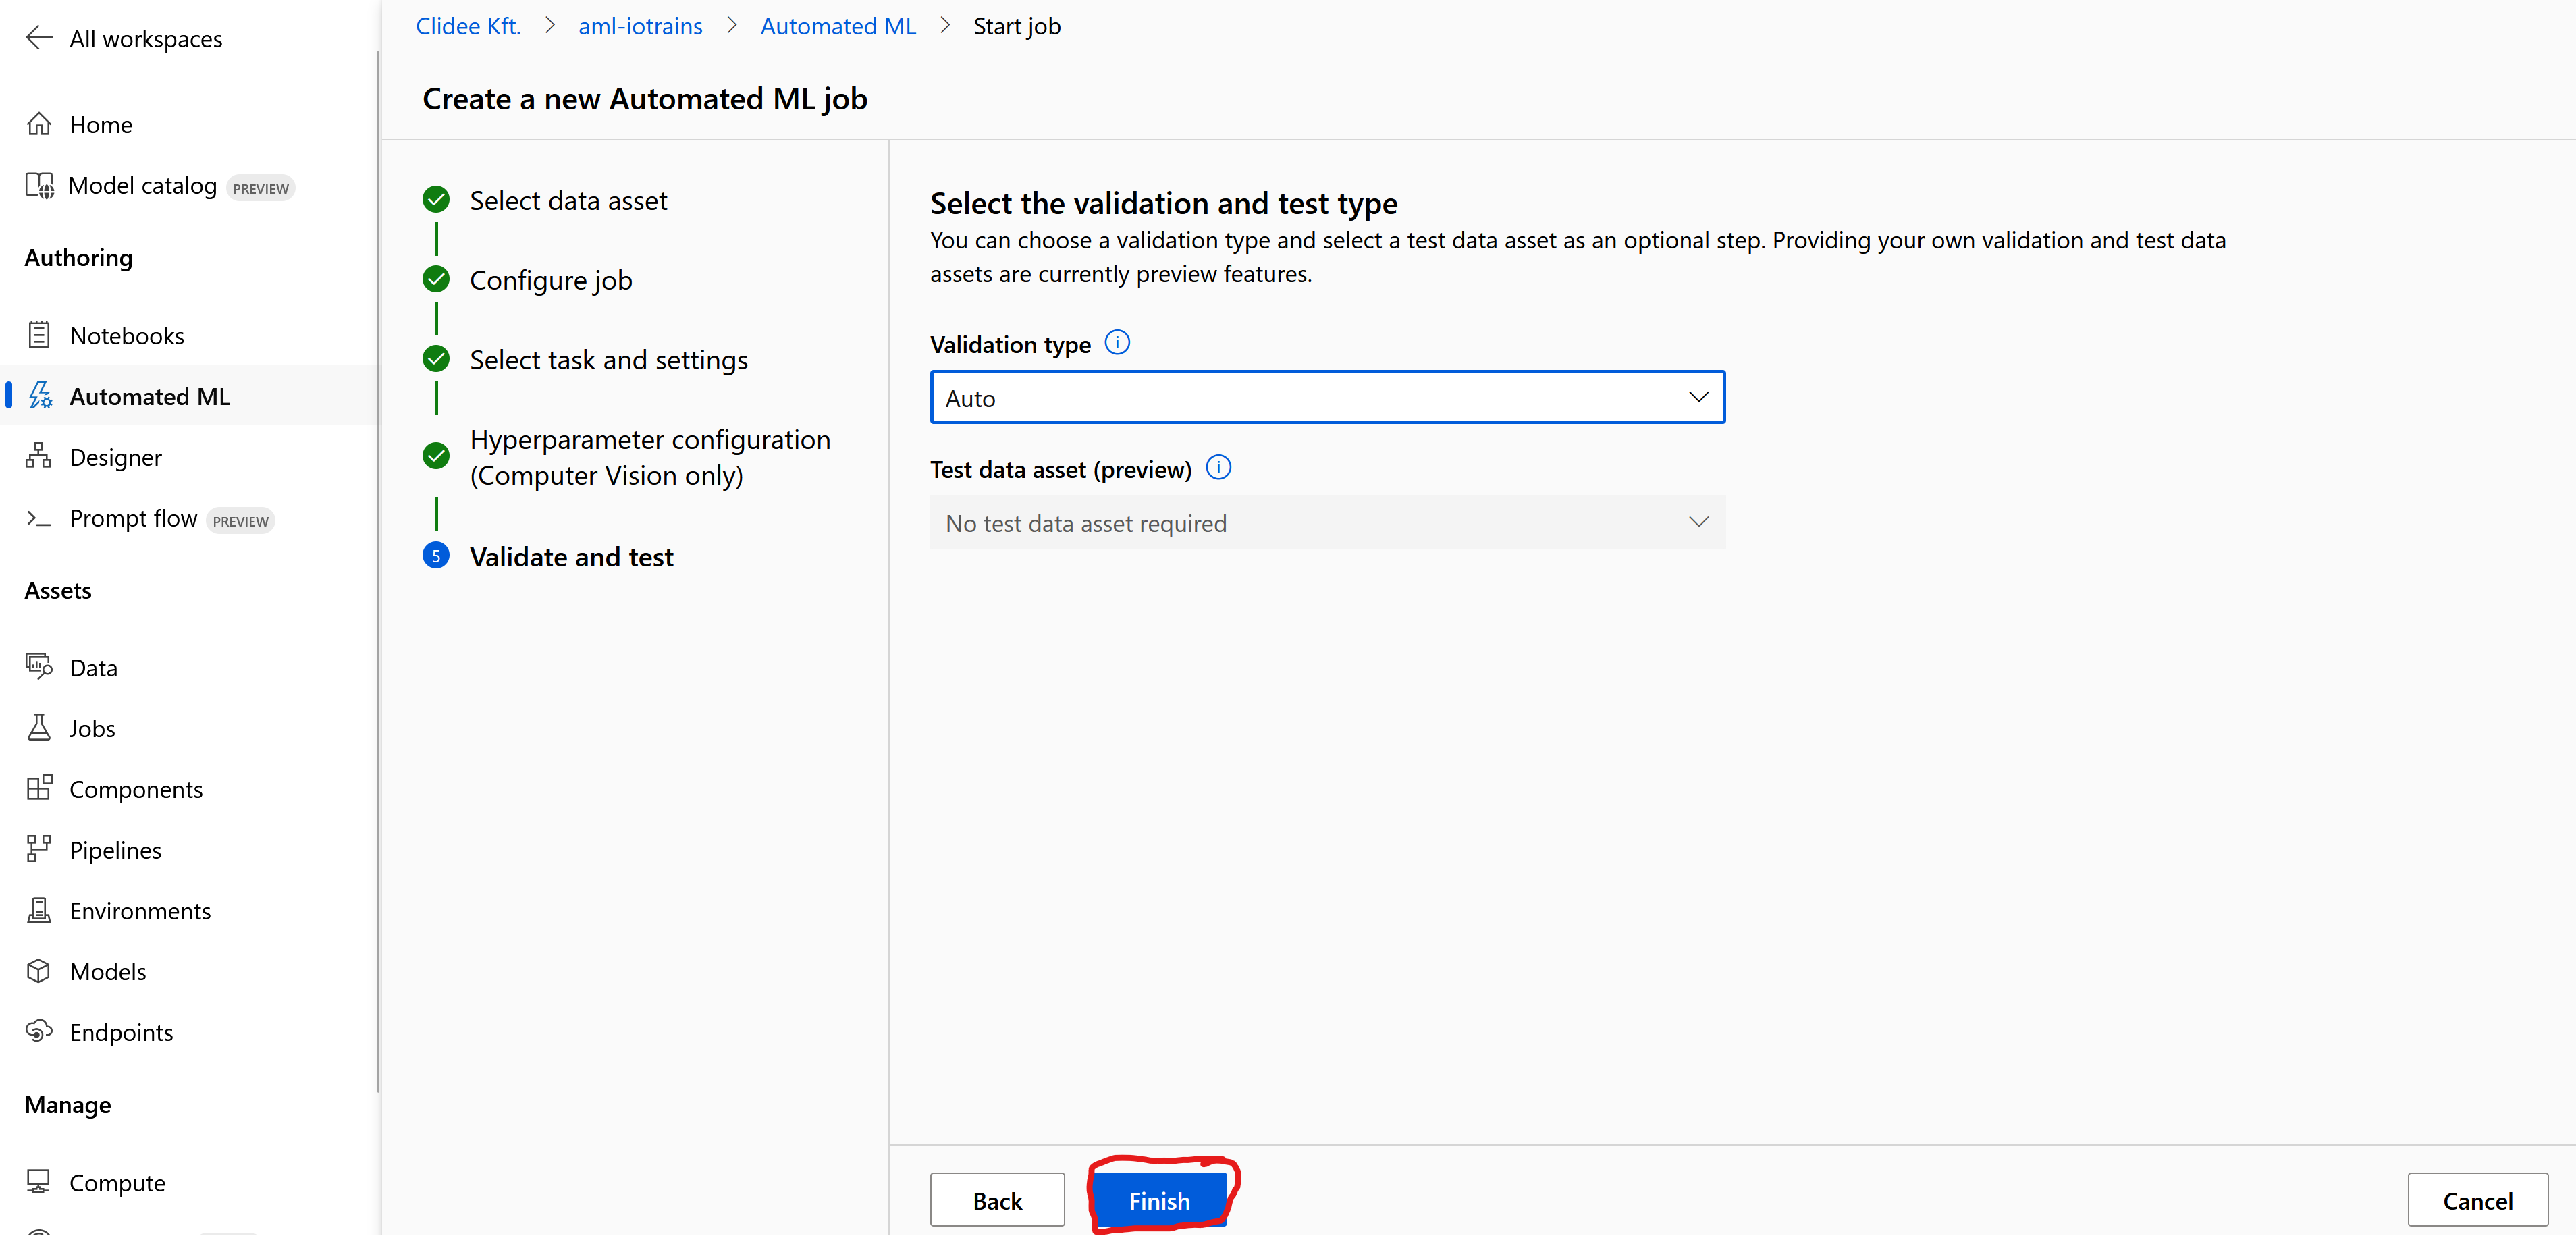
- Leave the Validation type as “Auto” and click on Finish
Now it is learning heavily and it will take some time. Depending on the size of your Compute Cluster (and the available nodes what we get as low prio) and the selected amount of Iterations. Based on my settings it was ~2.5 hours.
Once the training is ready then I suggest to look around in the outputs and especially check the Child jobs where you can see all the Trials and their Metrics as well. Those models which didn’t fail but provided some reasonable performance are listed under the Models tab.
Deploy the model
- Navigate to the Auto ML job and select the Models tab where all the reasonable models are listed.
The models are sorted based on their Mean average which is the average value based on their validation.
If you see 2 models with similar performance then it is rational to select the lighter model which requires less compute capacity to inference. Nevertheless the models can behave differently hence testing is necessary all the time. E.g.: a model can recognize a Lego figure well but it can also recognize the trees wrongly too. Or a model can recognize the figures from a given distance but it doesn’t work when the figure is close or far from the camera. So testing is necessary with several of the models too.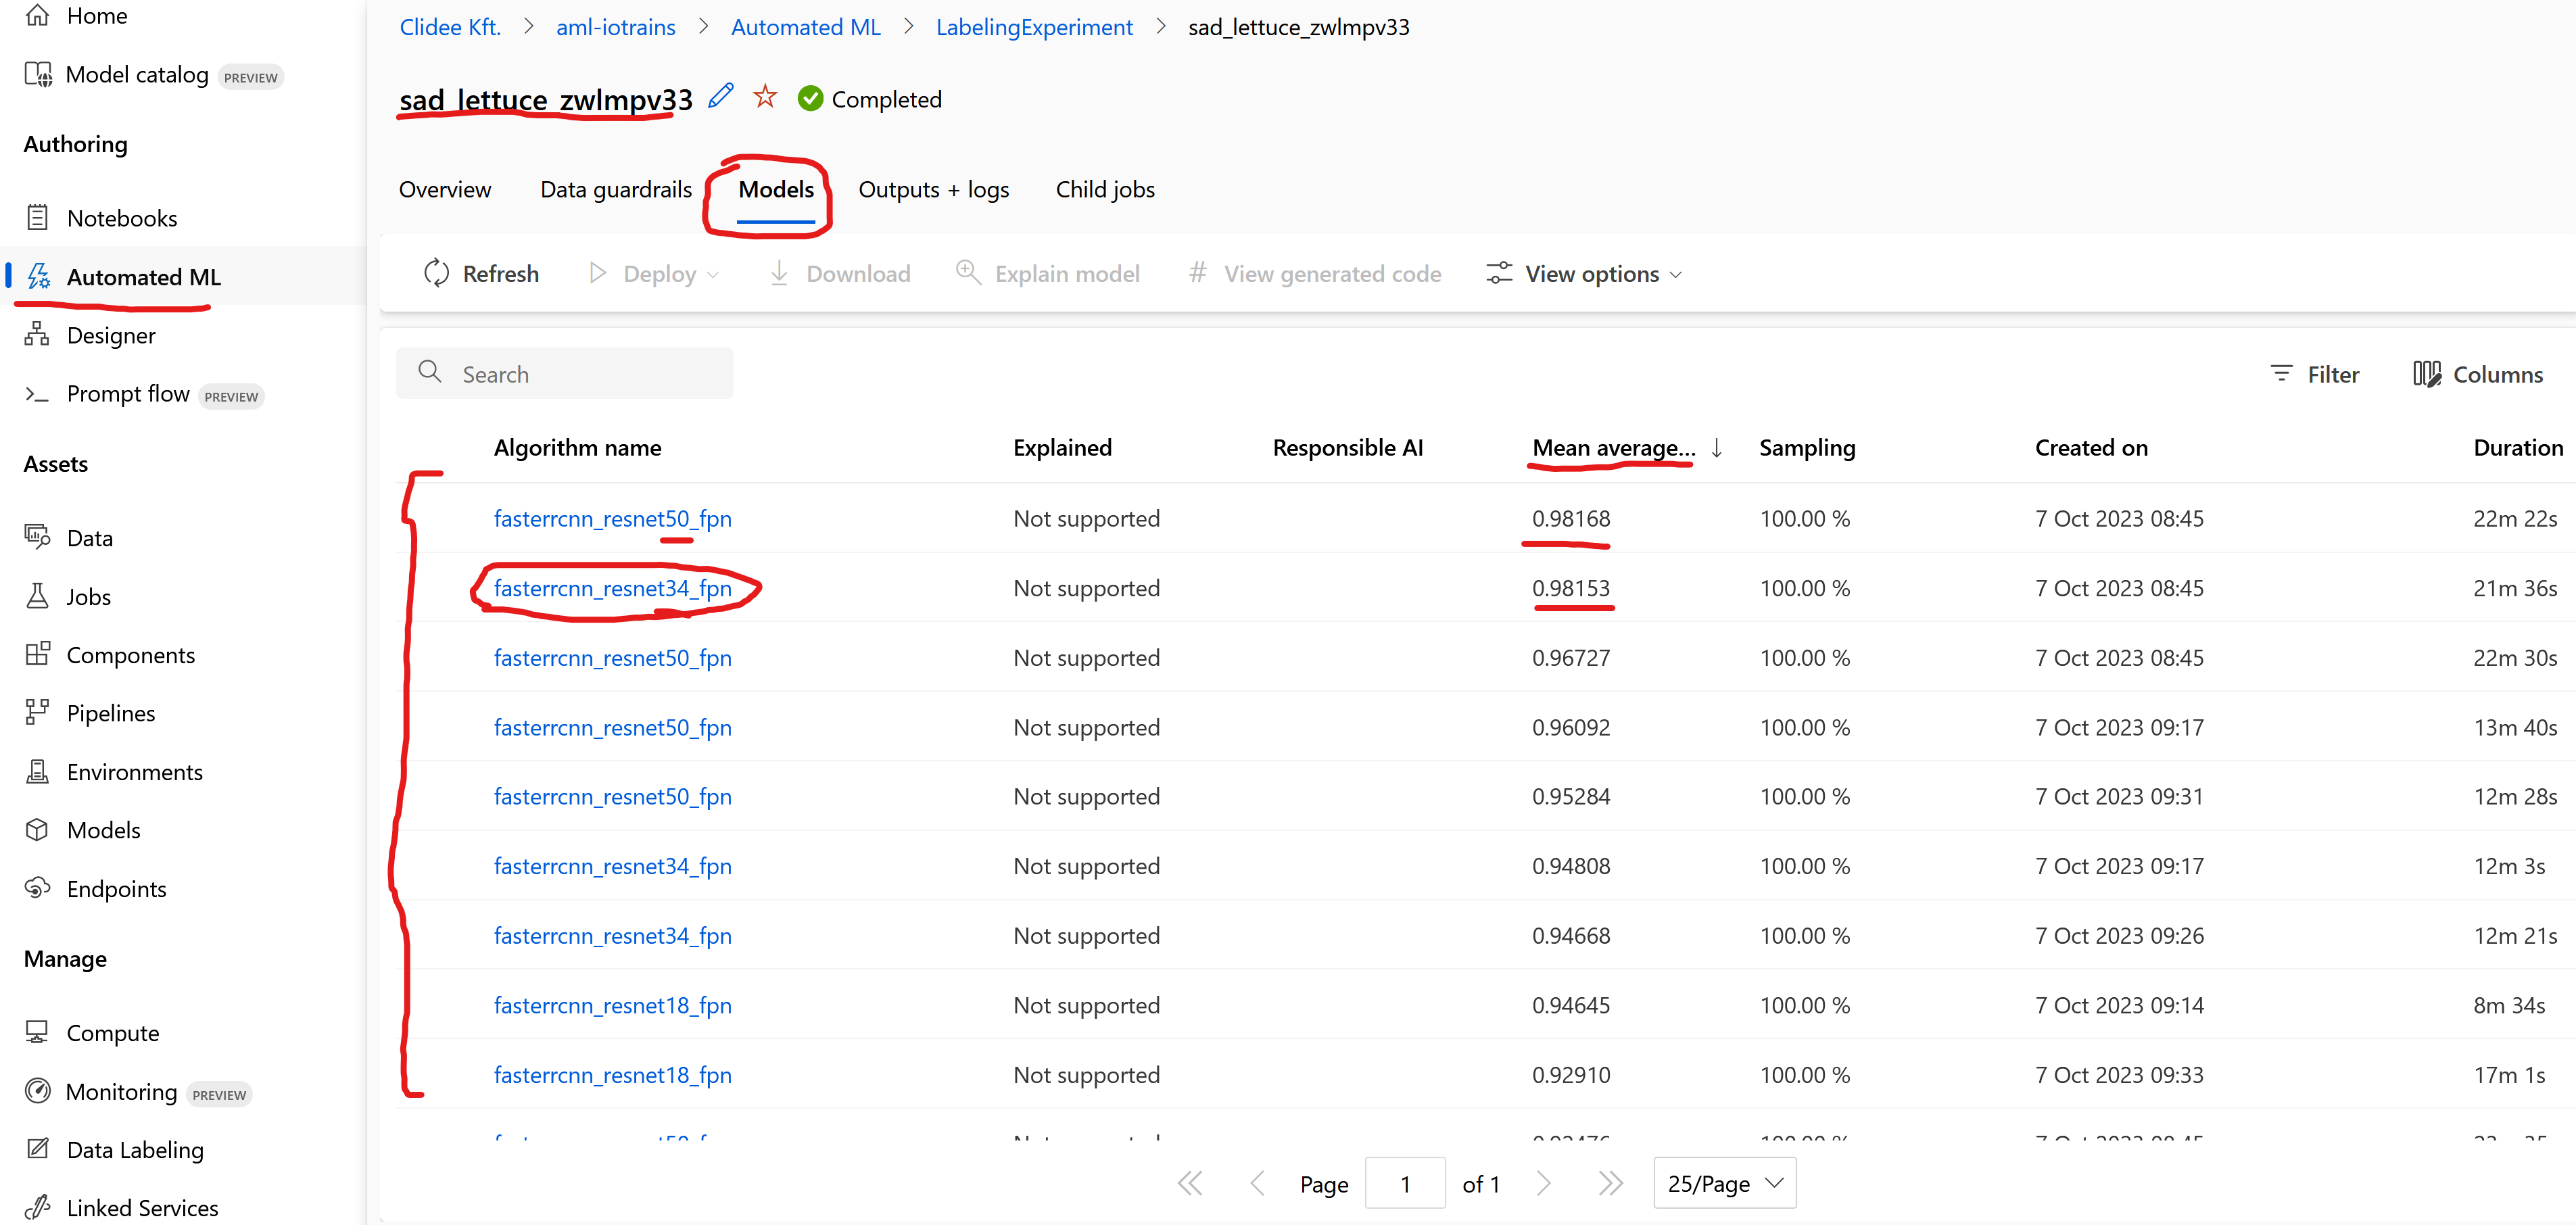
- Select one of the Model what you like. (Your list will be different than mine.)
- Click on Deploy and select “Real-time endpoint”
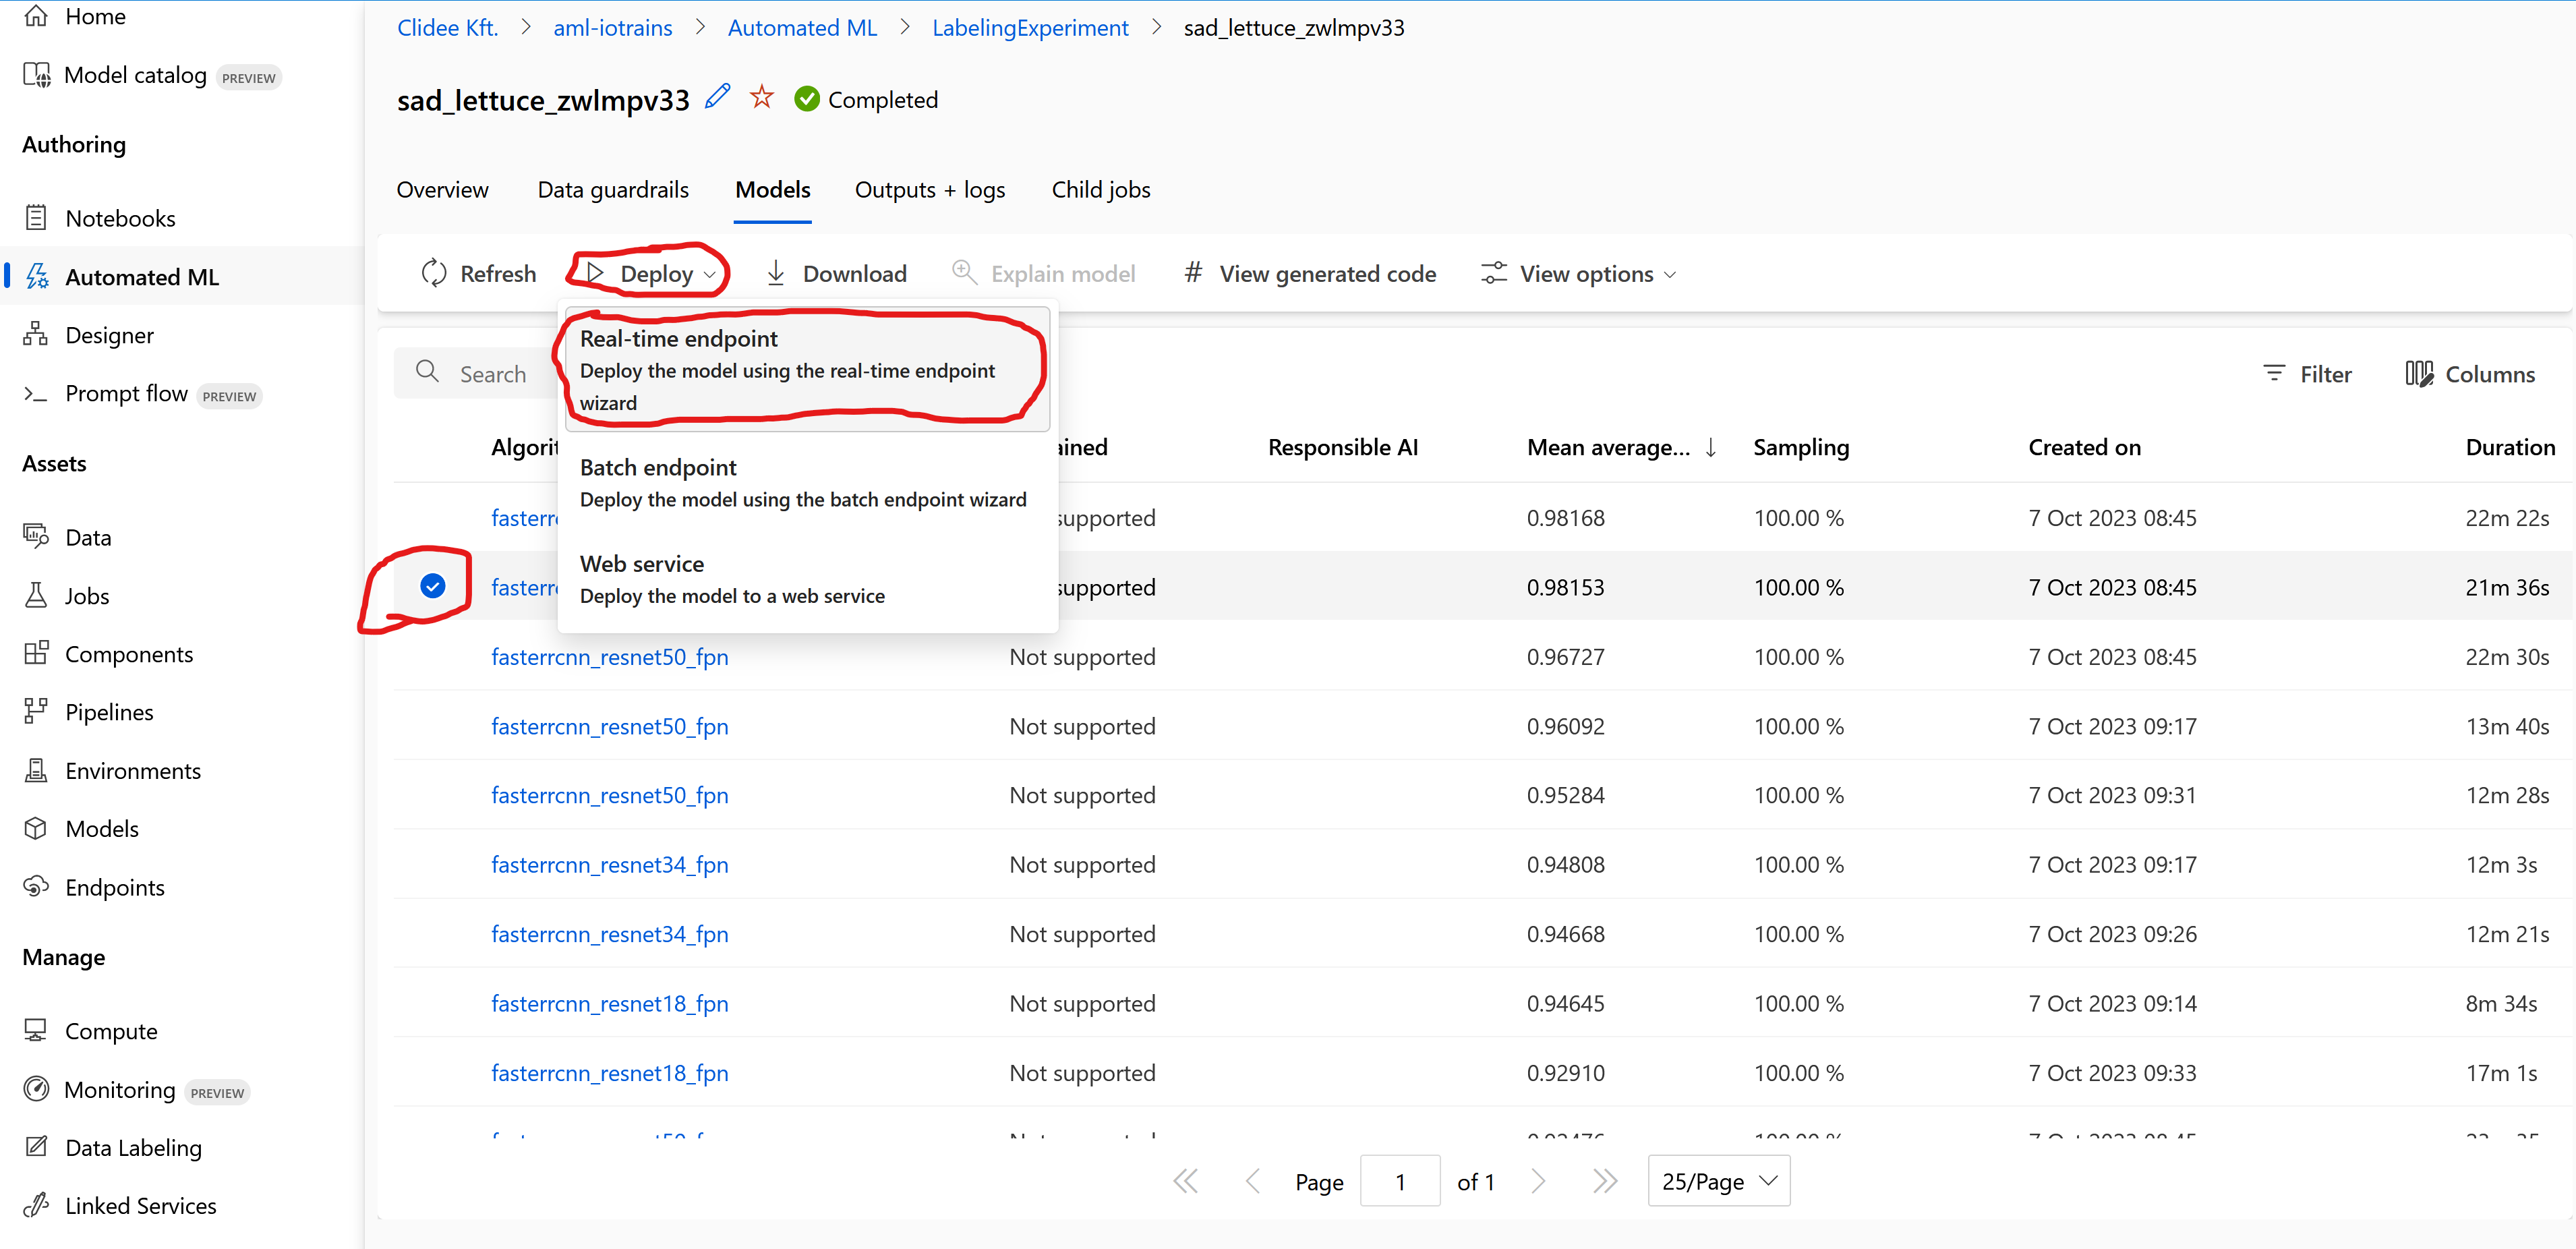
- On this page you can quickly deploy the model on an Azure managed VM.
- If you followed the previous guide and you attached your Kubernetes cluster then click on the “More options” link
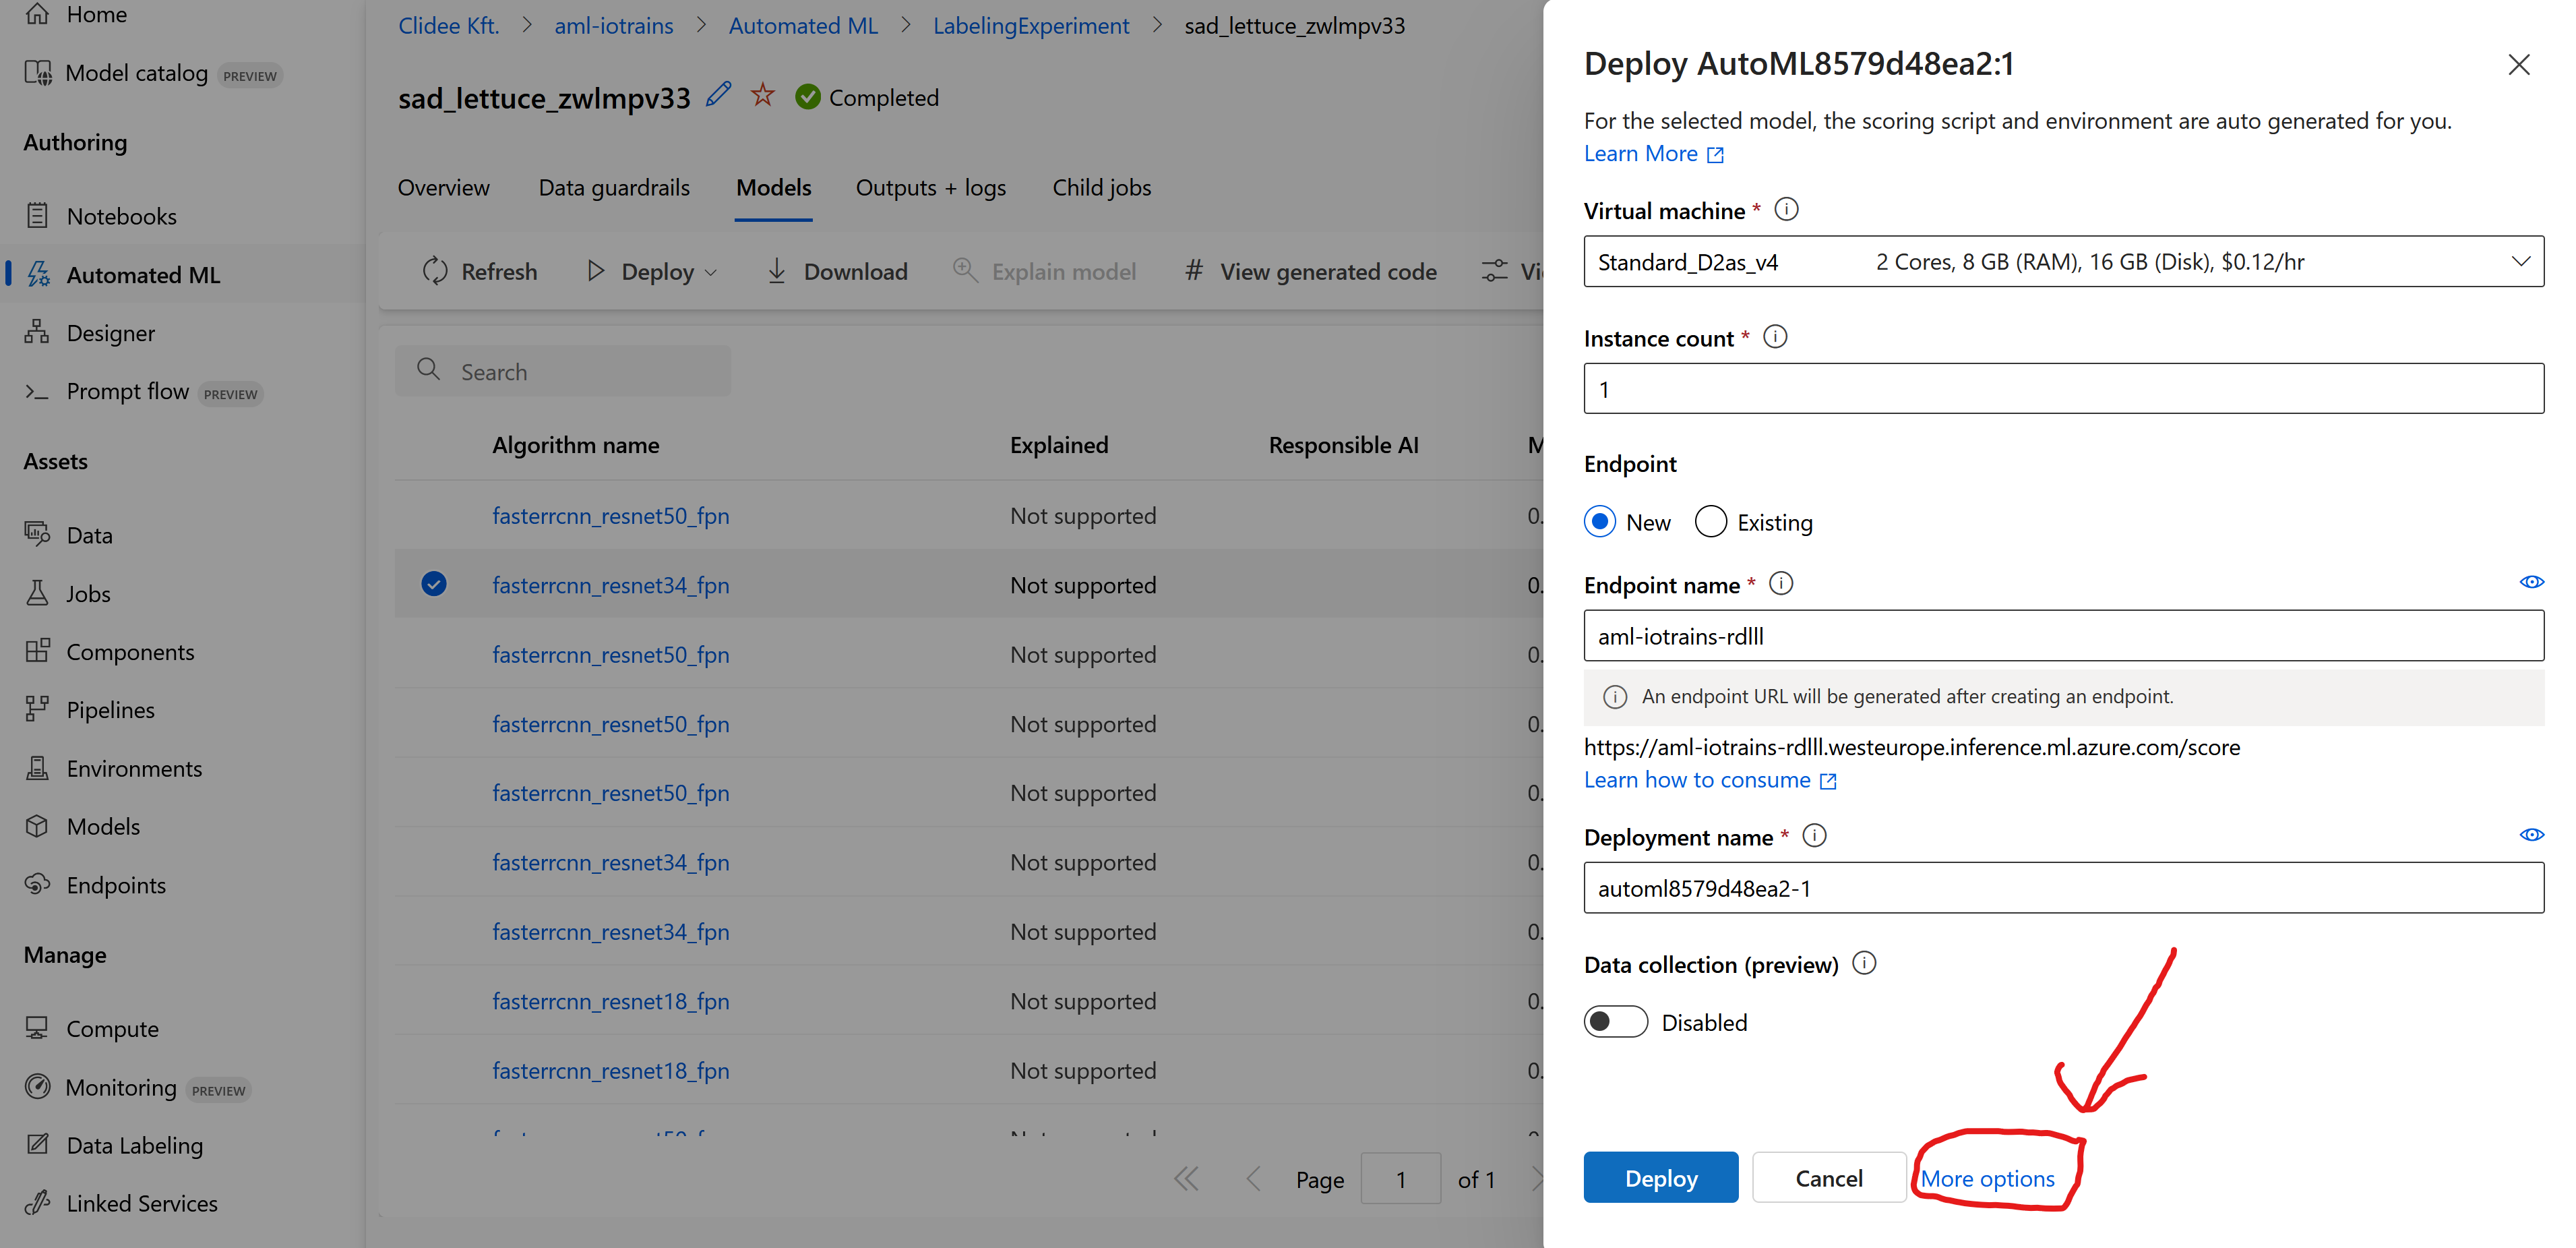
- Set the Compute type as “Kubernetes”
- Select your connected Kubernetes cluster
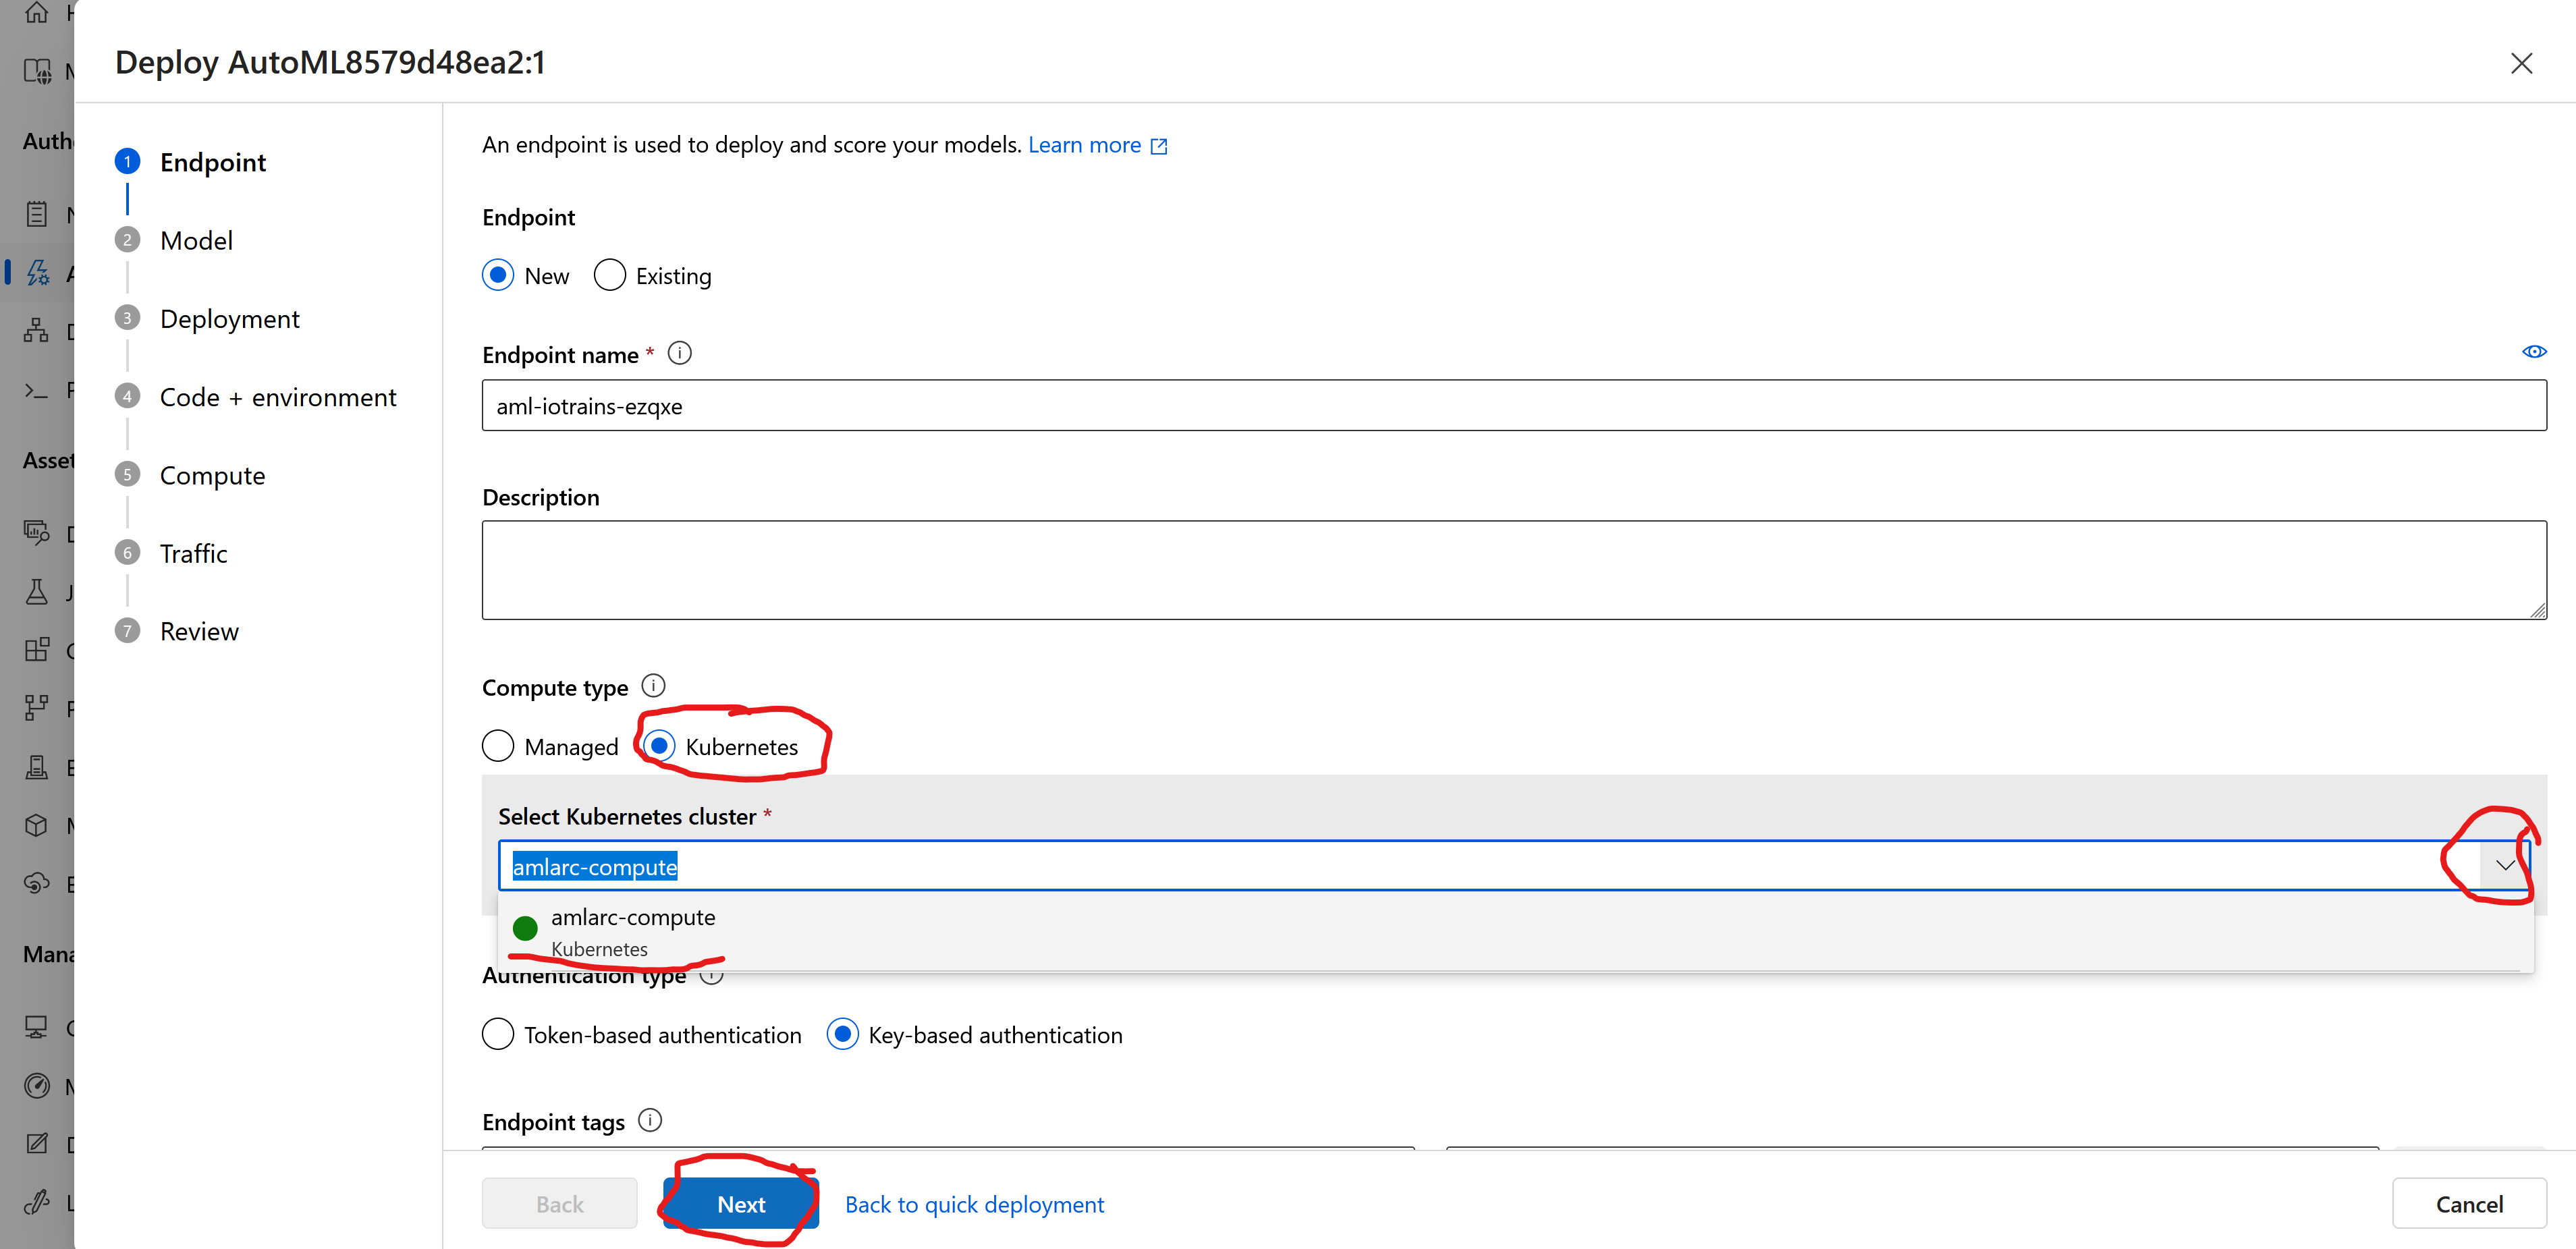
- On Model and Deployment pages click on Next as everything is good as default
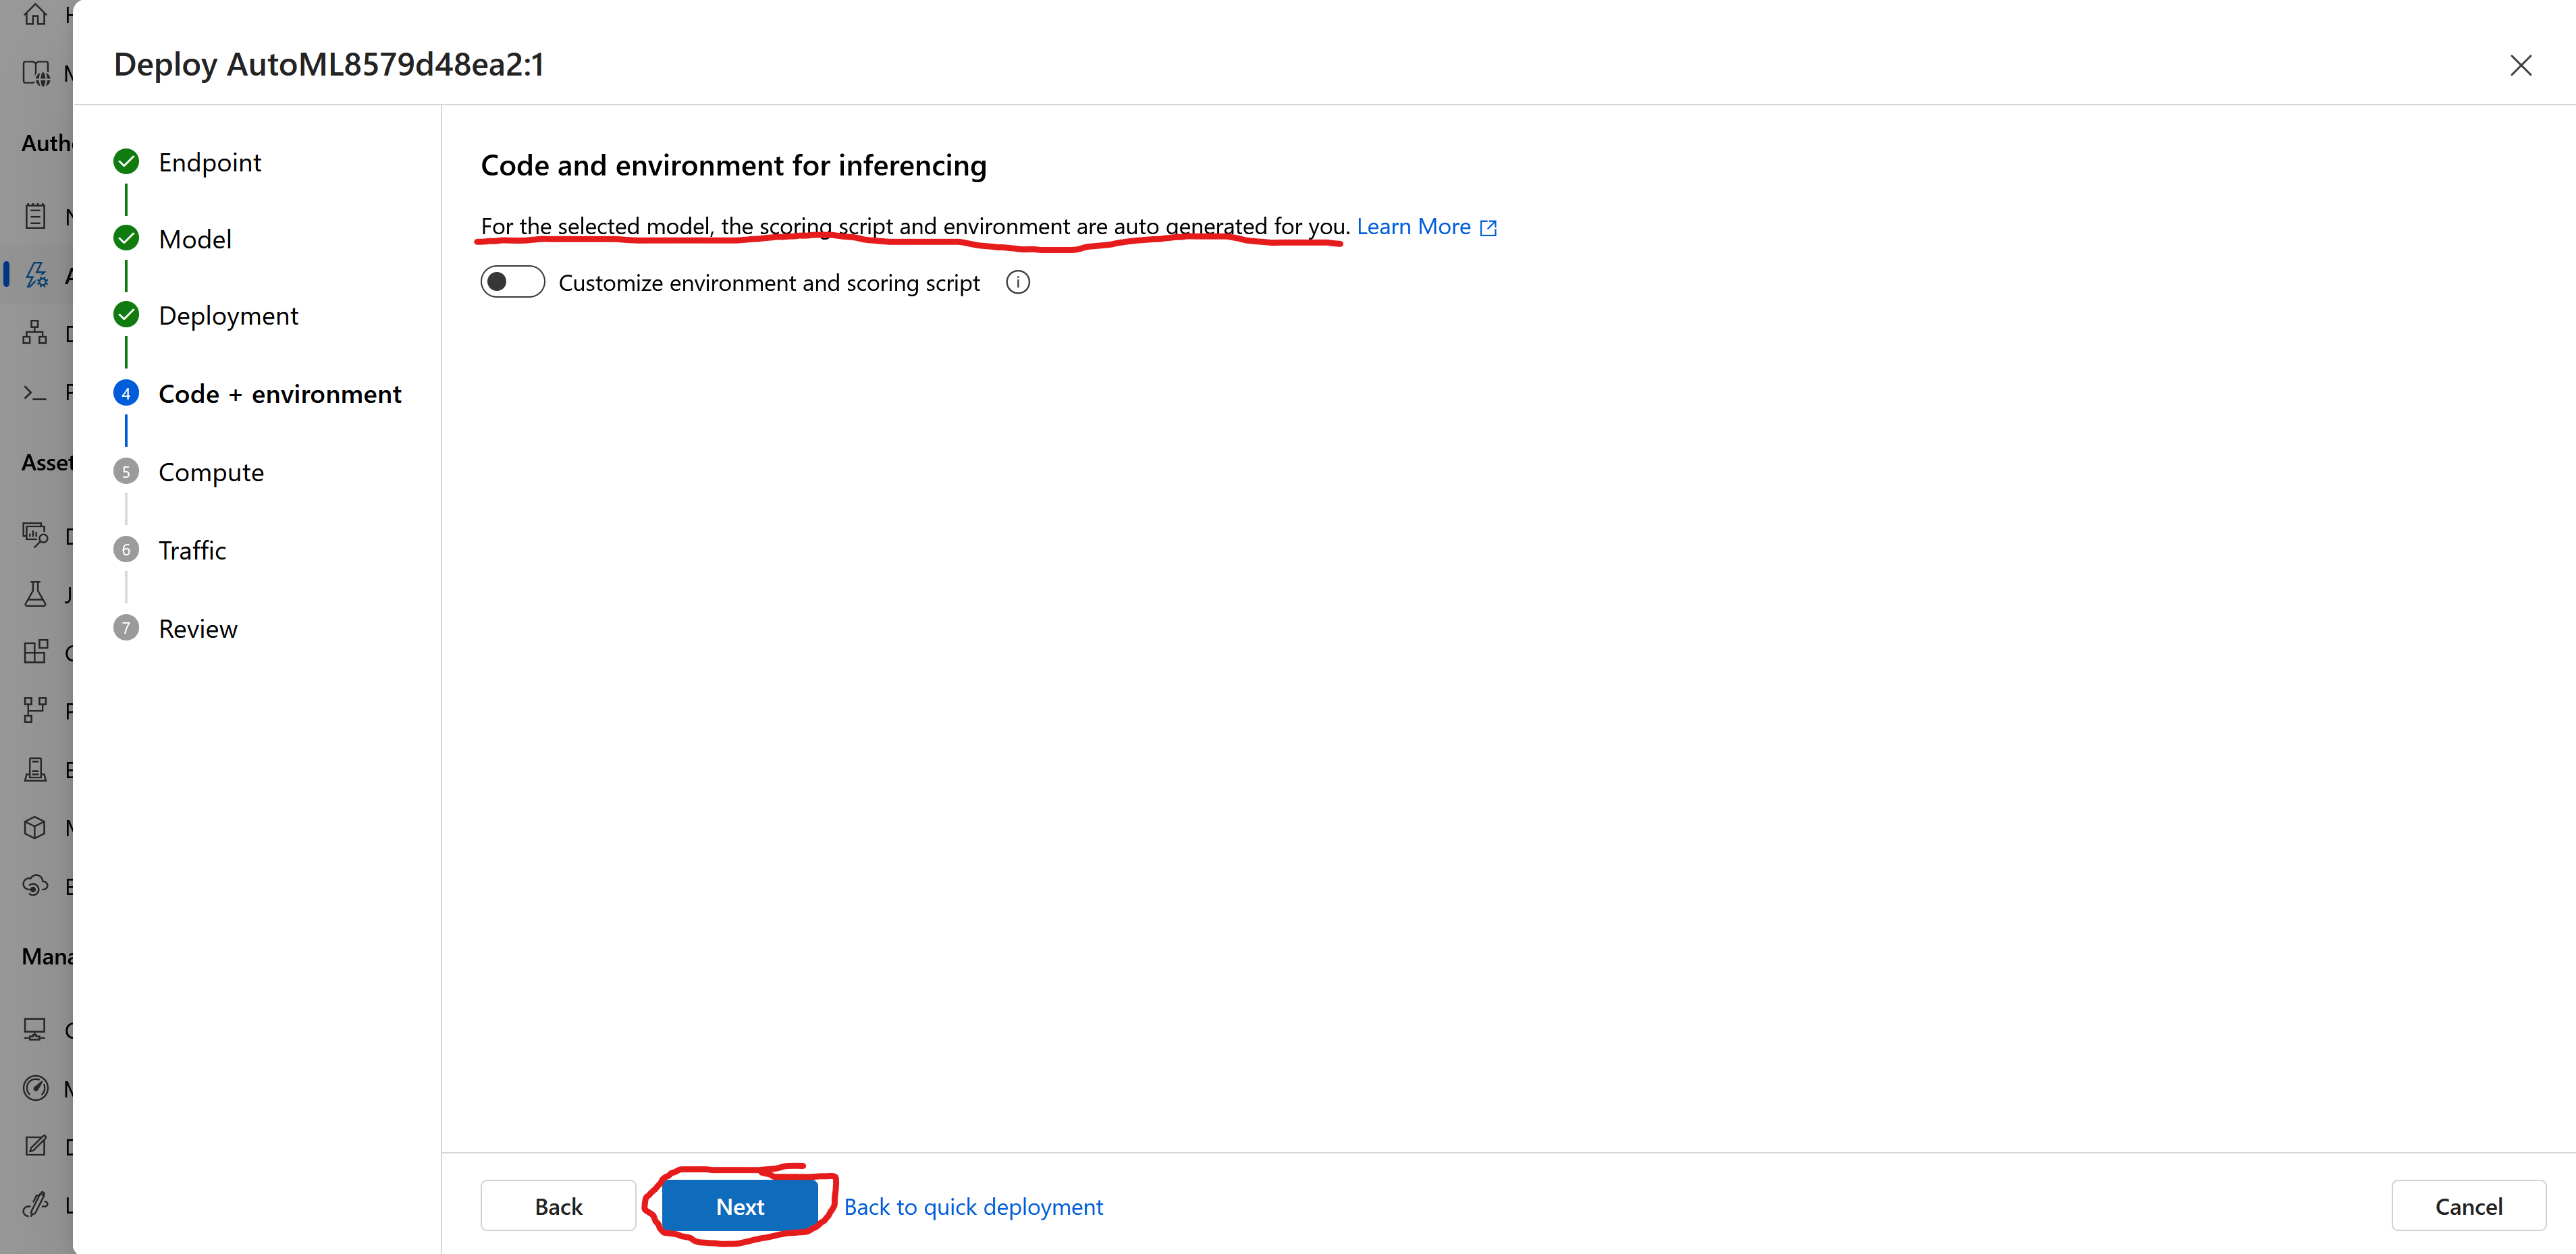
- On the Code + environment page we have opportunity to fine-tune the scoring script and define the container setup (tools installation) which will be used to deploy the model. Luckily AutoML will generate them for us so leave it default and click on Next
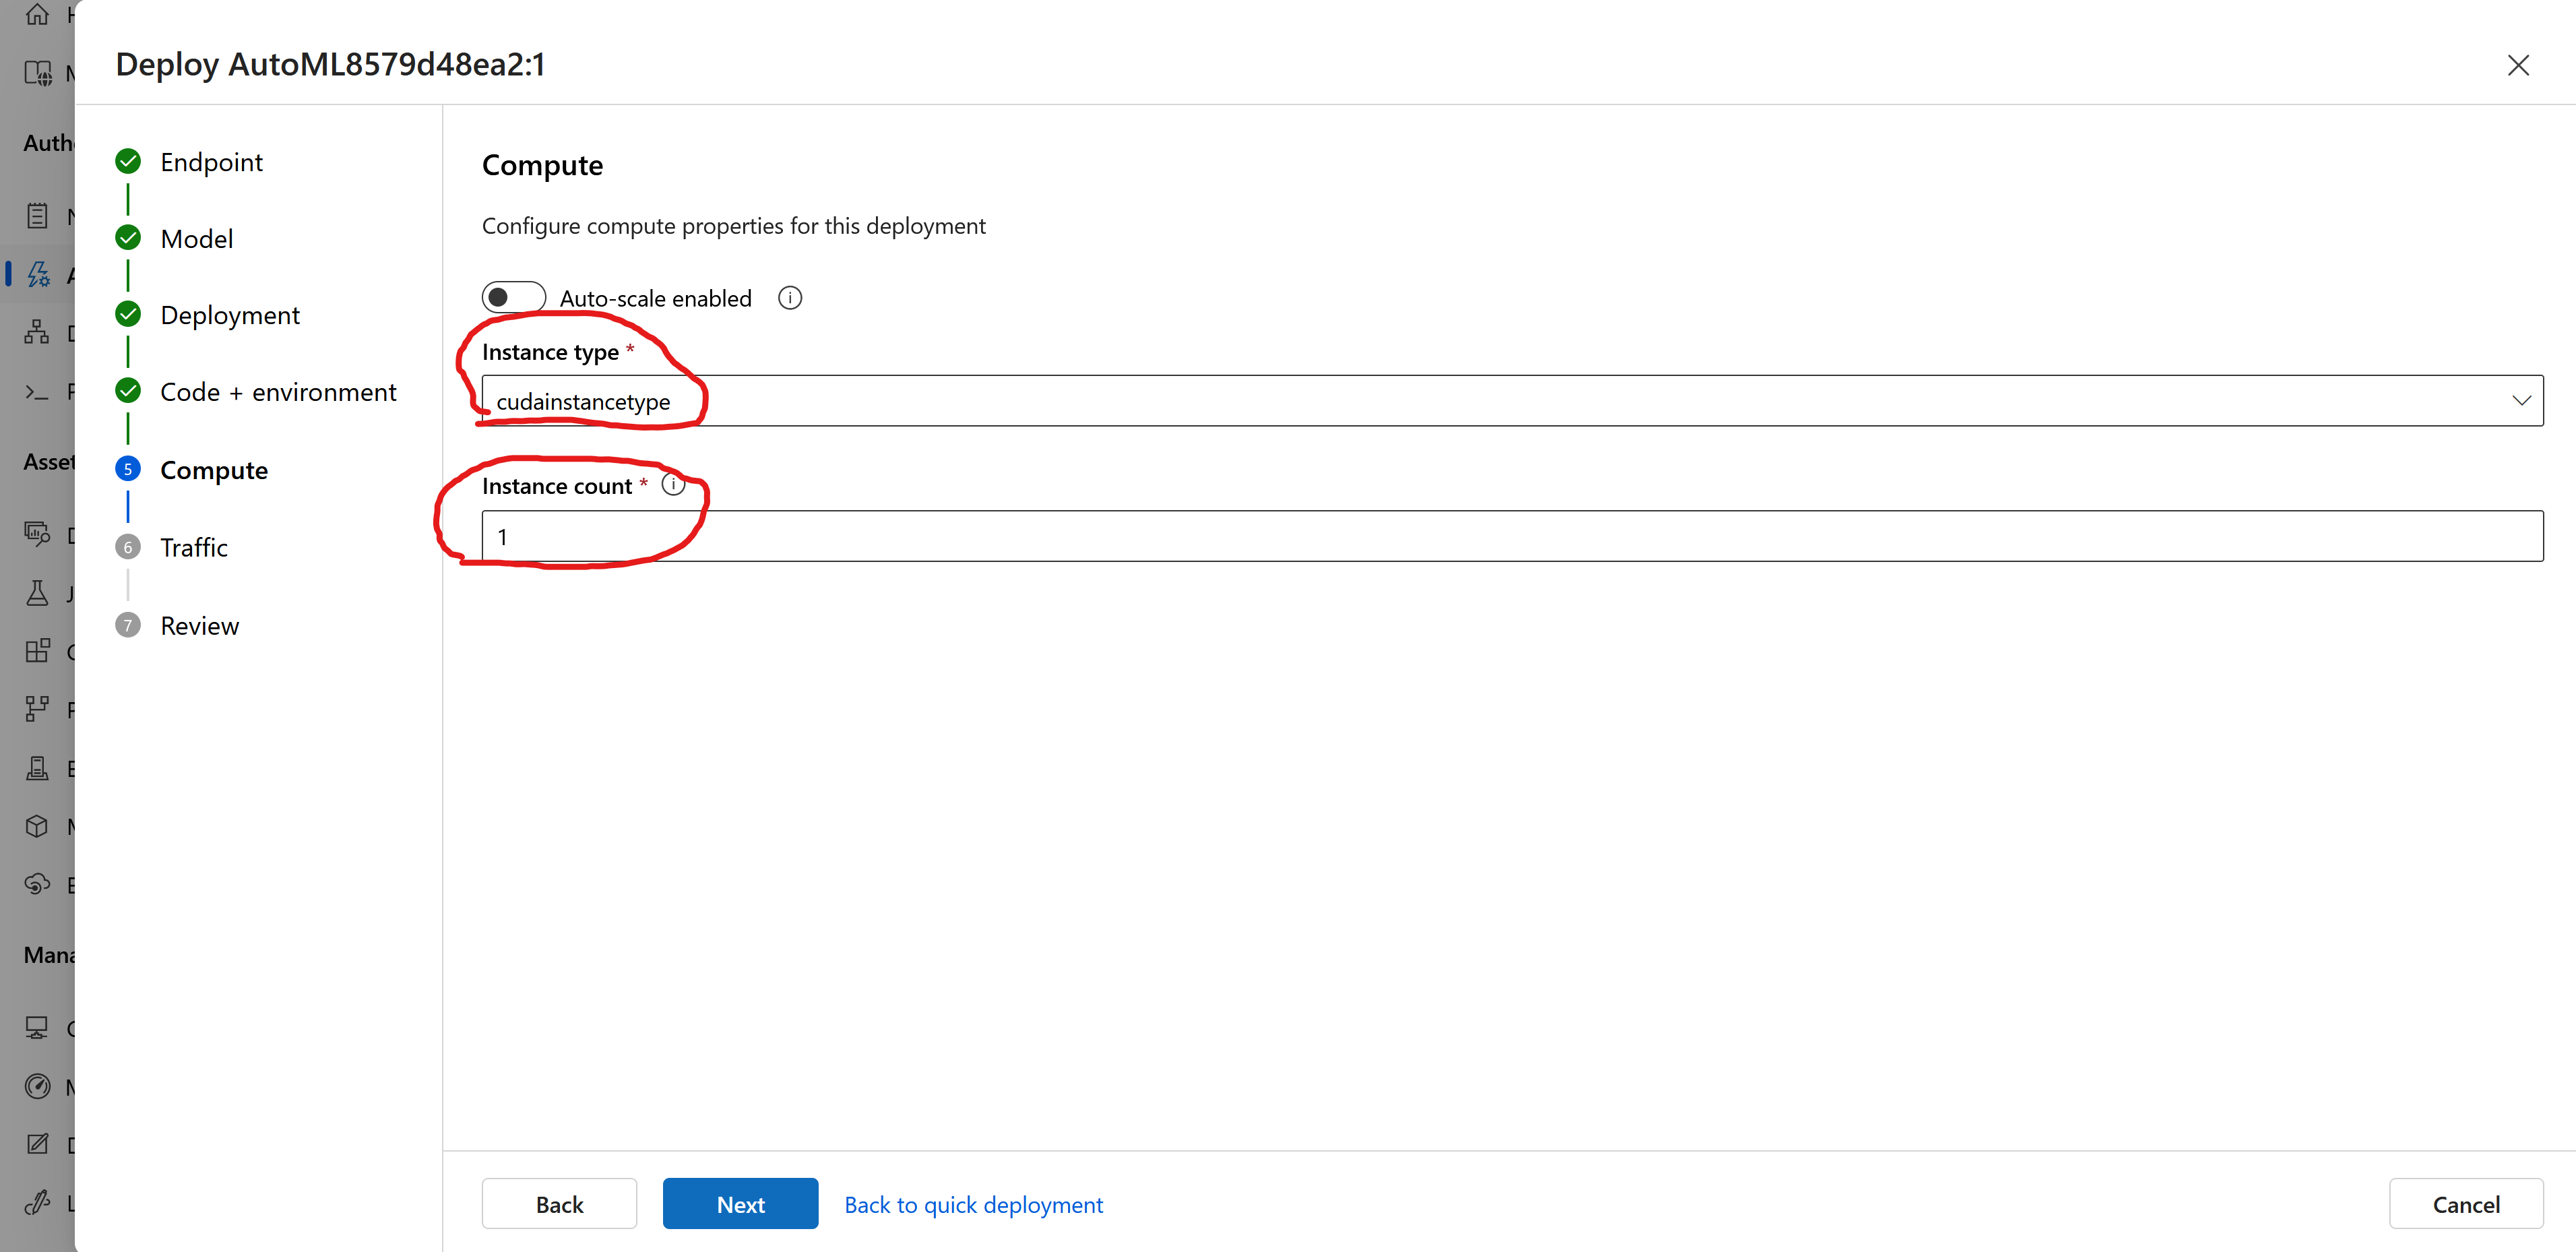
- On the Compute page set the Instance type as “cudainstancetype”
- Set the Instance count to “1” (unless you have multiple nodes or multiple GPUs)
- On the Traffic page leave on default and click on Next
- On the Review page have a final look and click on Create
The Endpoint creation is ongoing and it will be done in few minutes. Note that, the container image might be a big one hence pulling it will take some time depending on your internet connection.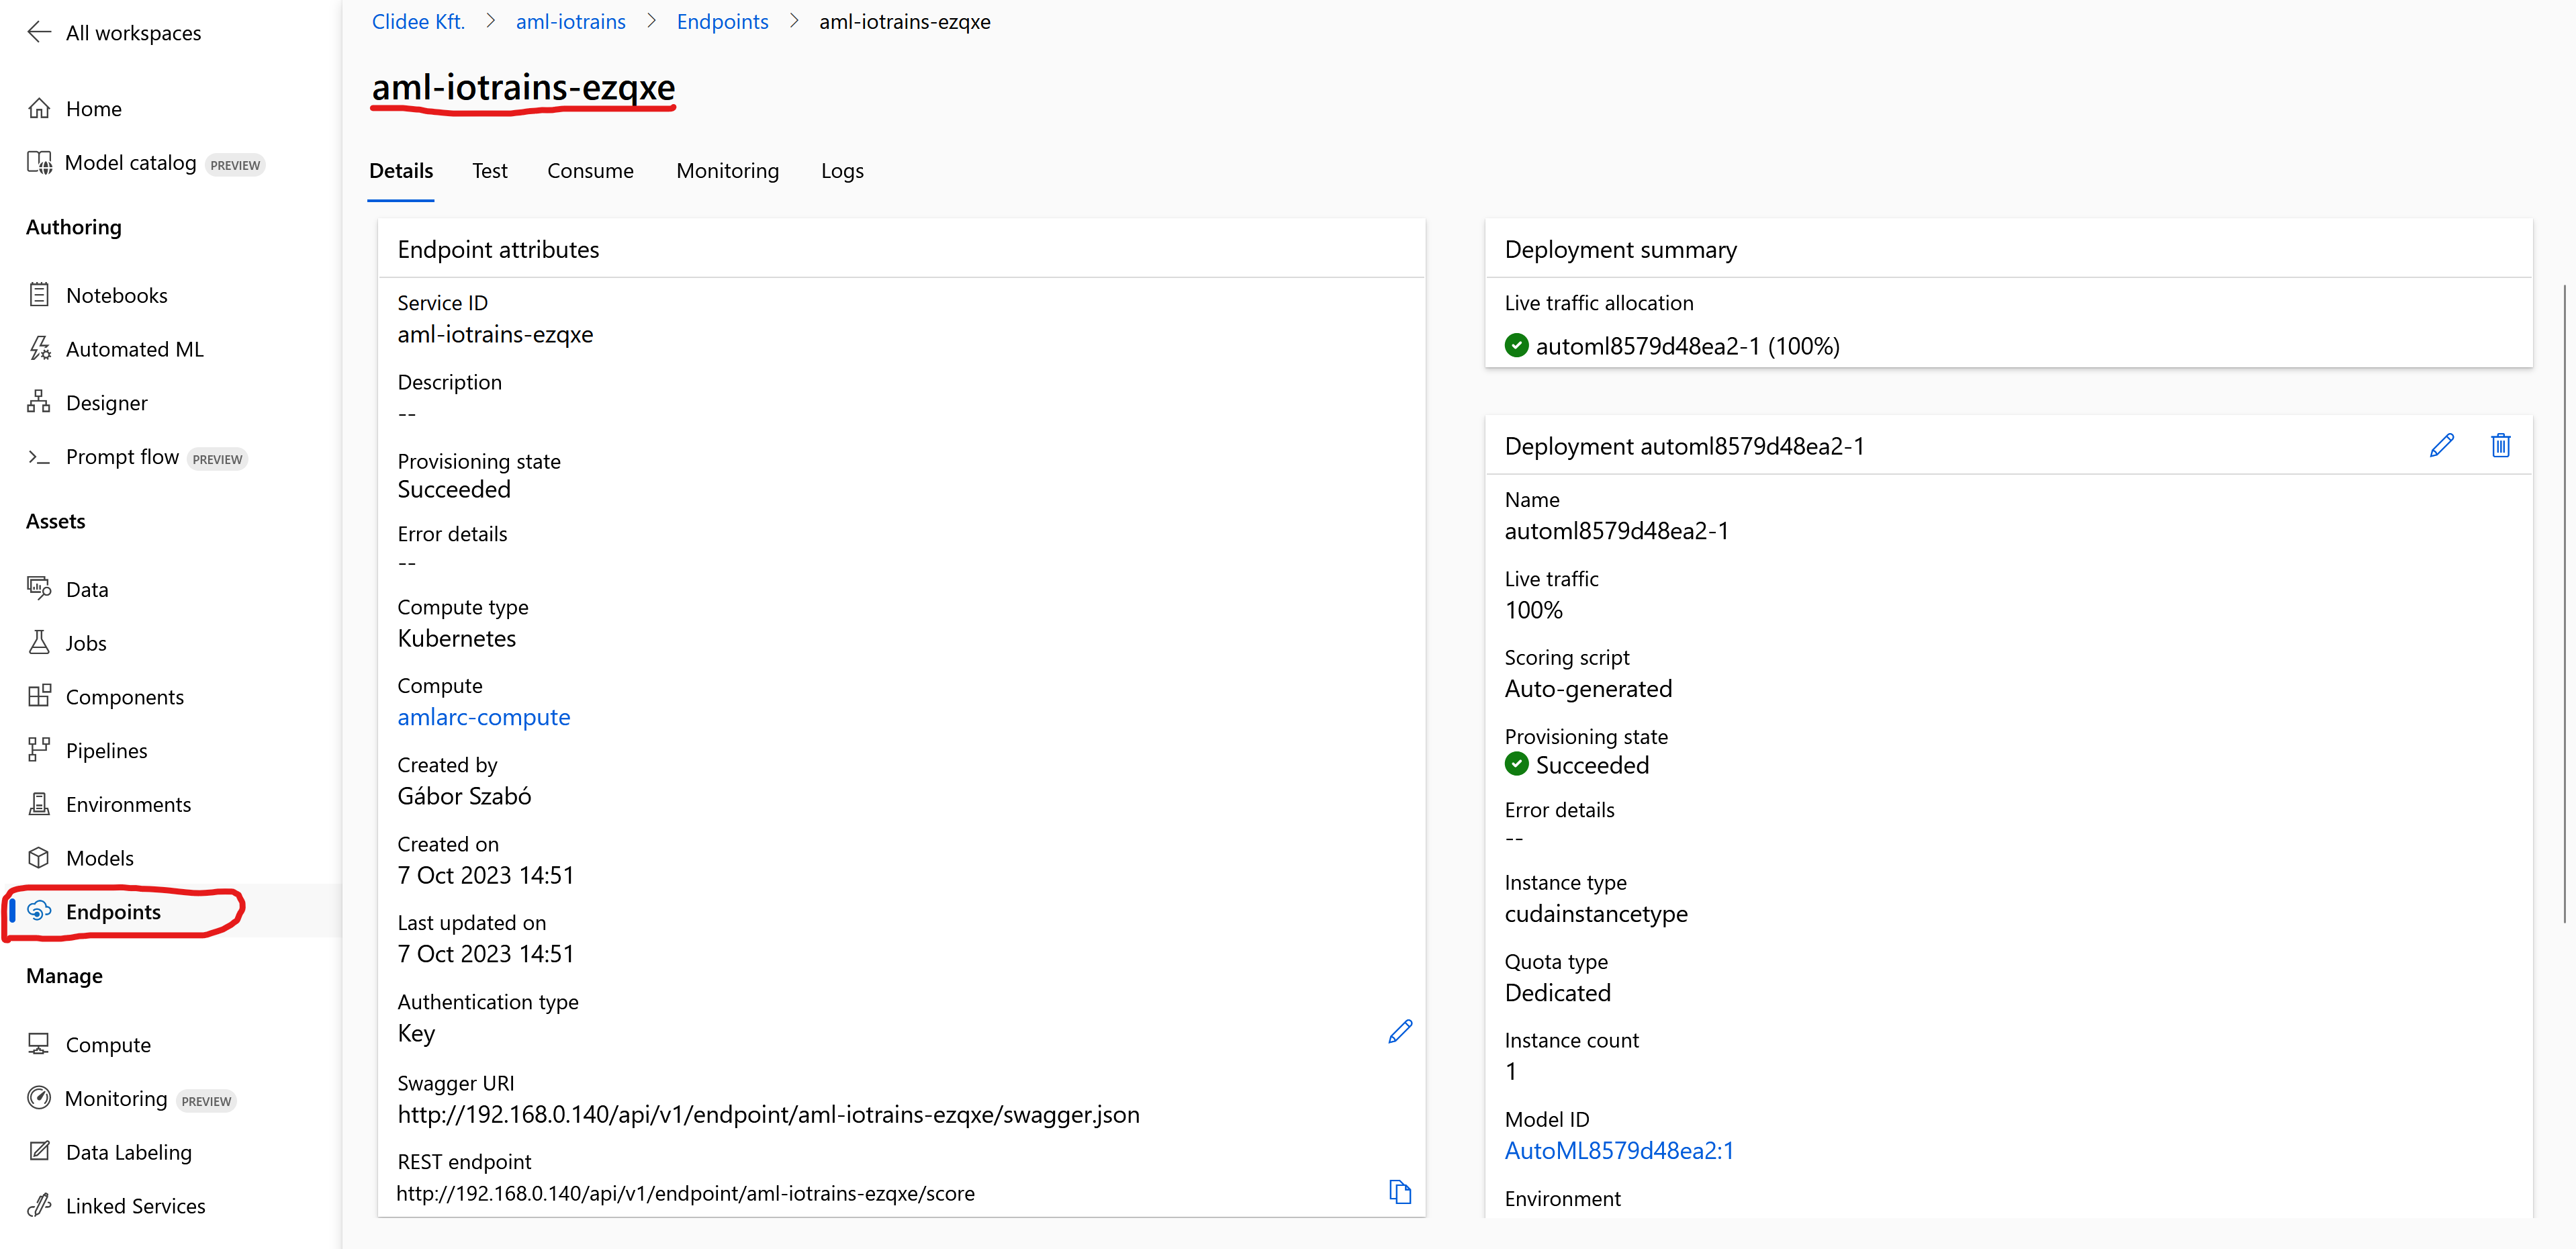
- Once the endpoint is successfully deployed then you can find the scoring REST endpoint and the Keys on the Consume tab.
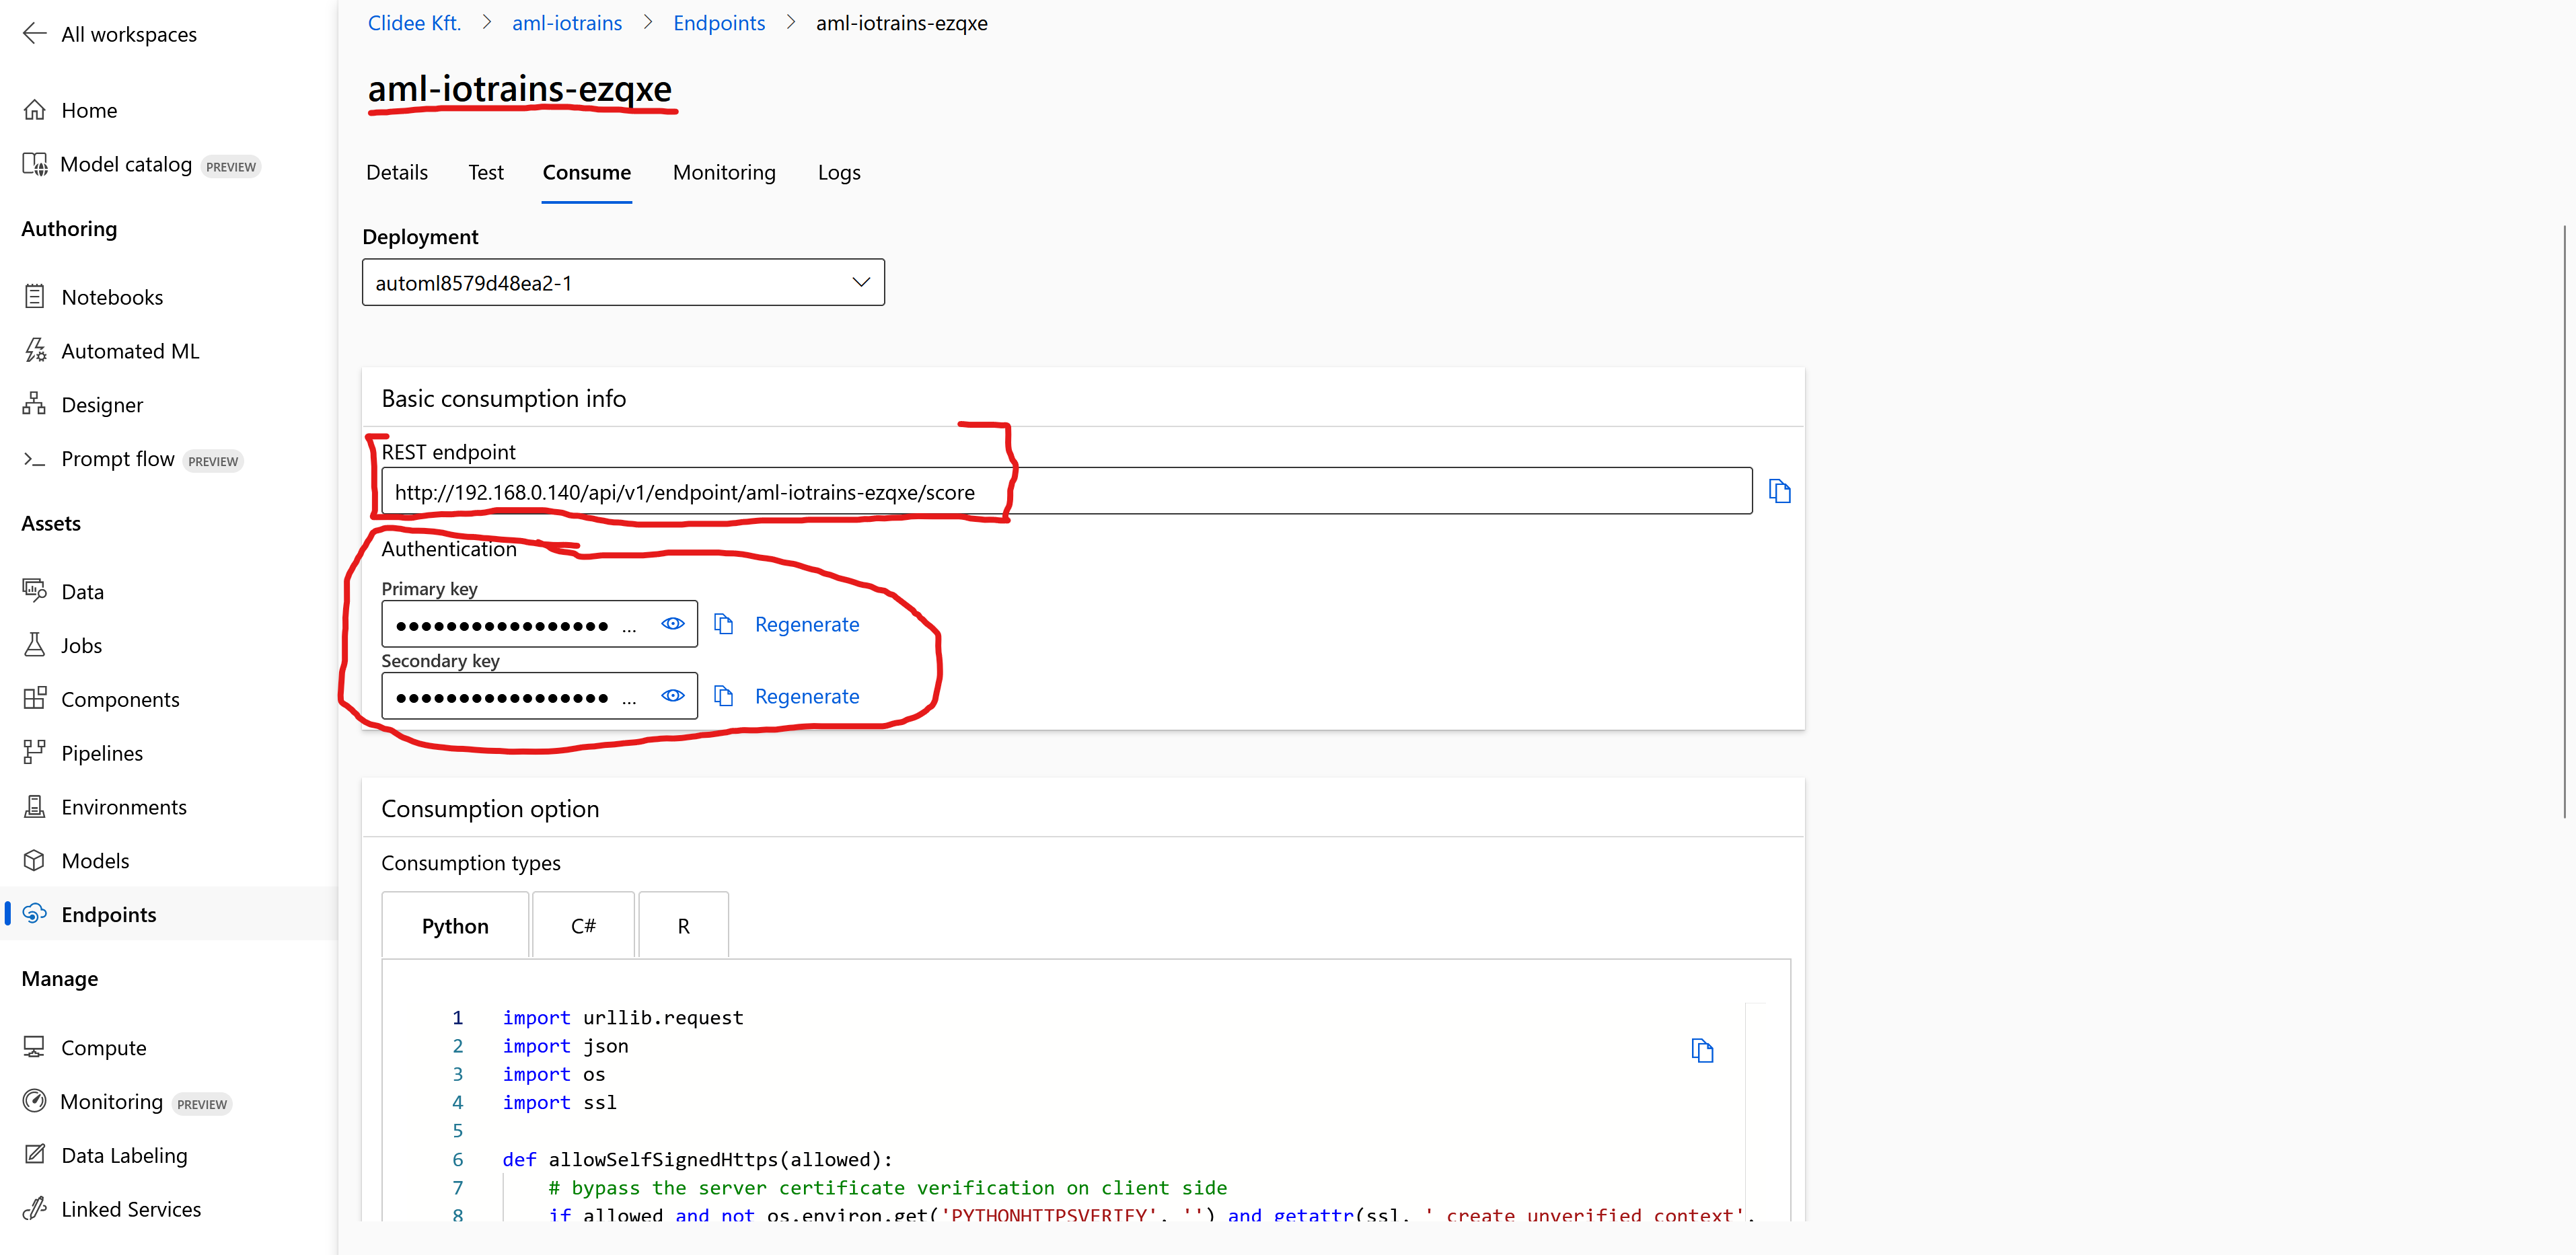
Congratulations, you have a working AI model what you deployed. You can find some code examples on the Consume page and you can use them to send some pictures via the RestAPI and you will get the coordinates in the response where the model found minifigures.
Proceed to the next blog post and I give you some ready made scripts which will automatically send the pictures.