Pre-requisites
This is a hands-on article and you will need the followings:
- Azure subscription (with ~€10 budget)
- An on-premise PC, VM, Server to install Kubernetes
- Install Kubernetes. See Kubernetes deployment
Introduction
Nowadays there is a strong trend to move the workload to the cloud but there are still some workloads which cannot move because:
- the data is too sensitive
- the processing time is critical and cannot rely on the network
- the on-premise datacenter is still up and running and the migration would be too costly
- …name your excuse 🙂
Several years ago the Microsoft guys started to containerize their own services to run Azure more efficient. One of the biggest benefit of the containerization is the portability and here came the big idea: if the customers cannot bring their workload to the cloud then let’s bring the cloud services to them. As those services are already containerized then those can run on the customer’s Kubernetes cluster as well.
Azure Arc can connect a locally (on-premise) running Kubernetes cluster to the Azure ecosystem and deploy Azure services on top of it. The management of the services remain in Azure but the local K8s’ compute capacity will be used. This is a hybrid solution to use Azure cloud technologies at on-premise. The idea is brilliant because the engineers don’t need to learn new technologies but they can use the same Azure tech for the public cloud and the on-premise deployments. There is no need to maintain these services because those are centrally maintained by Azure.
Azure Arc has different levels and aspects. At the baseline: local VMs, private VMware clouds and Databases can be controlled by the Arc. On the upper level, the more advanced solution is called Azure Arc-enabled services. This is the scope of this blogpost.
If you would like to have a deep dive in Azure Arc then I suggest to visit their “Jumpstart” site: https://azurearcjumpstart.io/
Azure Arc-enabled services
The “Arc-enabled services” are those Azure services what we can run locally in our datacenter (or at home 🙂 ). At the time of writing this article these are the followings:
- AppServices (preview)
- EventGrid
- Azure Data Services
- Azure PostgreSQL (preview)
- SQL Managed Instance
- Azure Machine Learning for Kubernetes
- Open Service Mesh
- Azure API Management gateway
- Azure Container Apps (preview)
Besides the above Azure services several Kubernetes cluster management solutions are also available:
- Azure Monitor for containers
- Azure Policy for Kubernetes
- Microsoft Defender for Kubernetes
- GitOps-based management
- Azure Role-Based Access Control (RBAC)
For Enterprise companies the blueprinted solutions are key to have always compliant environment to the company security rules. Of course it is not easy if we have an on-premise datacenter and one or more public cloud solutions. This can be covered with these K8s extensions. Bringing the K8s cluster (wherever it is deployed) under the Azure umbrella helps to keep and centralize the control. Just think about all Kubernetes cluster will:
- send the security audit logs to the same place
- use the same policy sets which shall be maintained only at 1 central place
- use same authentication and authorization process for all users
Infrastructure admins cannot dream more 🙂
Nevertheless Azure Arc enabled services solution just manages the applications on top of the cluster. It does:
- NOT manages the host OS (it doesn’t have access to it).
- NOT upgrades the Kubernetes version.
- NOT manages the host level authentication.
For these use-cases there are other solutions from Azure which are not discussed now.
Our setup
In this article, we will attach our Kubernetes cluster to Azure so we can manage some aspects from the Azure portal. Then we will have a closer look on the “extensions” and deploy “Azure Montior” and “Azure AppServices”. Finally we deploy and example WebApp just to test our setup.
Preparations
If you didn’t deploy your own Kubernetes cluster then do it first because we will need it. Follow this guide: Kubernetes deployment
Once you are ready with your cluster ensure that it can reach the internet and the firewall allows to reach the documented endpoints.
To attach our cluster to Azure we need a machine which can reach the cluster via kubectl and can run the AzureCLI. This can be our kube-master node or it can be a “manager PC”.
Using a “manager PC”
I use my notebook which is completely independent from my cluster and I would like to use my machine for management purposes (like any other admin would do 🙂 ). These shall be done on that notebook:
- Install AzureCLI
- Install kubectl. Follow the official guide or install via the AzureCLI with this command: “az aks install-cli”
- Copy the kubeconfig file from the kube-master.
If you followed my previous guide then you will find it here: “/home/kube/.kube/config”
Copy this file to your manager notebook into this folder: “$HOME\.kube” on Windows or on Linux “/home/$USER/.kube/config” - Open the file on the manager notebook and update the server address to the IP address. (Or you can add the “192.168.0.128 kube-master” to your own hosts file but that is very invasive
Before
apiVersion: v1
clusters:
- cluster:
    certificate-authority-data: <VeryLongBase64>
    server: https://kube-master:6443
  name: kubernetes
contexts:
- context:
    cluster: kubernetes
    user: kubernetes-admin
  name: kubernetes-admin@kubernetes
current-context: kubernetes-admin@kubernetes
kind: Config
preferences: {}
users:
- name: kubernetes-admin
  user:
    client-certificate-data: <AnotherVeryLongBase64>
    client-key-data: <RidiculouslyLongBase64>
After
apiVersion: v1
clusters:
- cluster:
    certificate-authority-data: <VeryLongBase64>
    server: https://192.168.0.128:6443    //UPDATE THIS LINE
  name: kubernetes
contexts:
- context:
    cluster: kubernetes
    user: kubernetes-admin
  name: kubernetes-admin@kubernetes
current-context: kubernetes-admin@kubernetes
kind: Config
preferences: {}
users:
- name: kubernetes-admin
  user:
    client-certificate-data: <AnotherVeryLongBase64>
    client-key-data: <RidiculouslyLongBase64>
If you did it well then test if you can reach your Kubernetes cluster from your own notebook.
~$ kubectl get nodes
NAME          STATUS   ROLES           AGE   VERSION
kube-master   Ready    control-plane   26h   v1.28.1
Note that, I mentioned a worker node in the other blog post but here I just have one (beefy) node.
Setup the Azure CLI
Note that the following commands are prepared to run in Linux Bash. Nevertheless those also work in Windows PowerShell with some modification.
This part mainly follows the official Azure installation guide.
First we need to login to Azure
az login…or if you use a headless machine then use this command:
az login --use-device-codeIf you use multiple subscriptions then you can select the one what you would like to use with this command:
az account set --subscription <your-subscription-id>We need to install several Azure CLI extensions what we will use later.
az extension add --upgrade --yes --name connectedk8s
az extension add --upgrade --yes --name k8s-extension
az extension add --upgrade --yes --name customlocation
az extension add --upgrade --yes --name appservice-kube
az extension add --upgrade --yes --name k8s-configuration
az extension add --upgrade --yes --name arcdata
az extension add --upgrade --yes --name ml
Prepare the subscription
The Azure subscriptions have their own features/capabilities (known as providers) which can be turned on or off. By default Azure activates the most basic providers for us but it keeps the special ones deactivated. We need to register the “Kubernetes”, “KubernetesConfiguration”, “ExtendedLocation”, “Web”, and “AzureArcData” providers to our lab setup.
providers=(Kubernetes KubernetesConfiguration ExtendedLocation Web AzureArcData)
for p in ${providers[@]}; do
  echo "Activating provider: Microsoft.$p";
  az provider register --namespace Microsoft.${p}
done
The above command just starts the activation but the registration itself takes couple of minutes. We can check the current status with the following command:
az provider show -n Microsoft.Kubernetes -o tableThe RegistrationState shall be “Registered” like this:
~$ az provider show -n Microsoft.Kubernetes -o table
Namespace             RegistrationPolicy    RegistrationState
--------------------  --------------------  -------------------
Microsoft.Kubernetes  RegistrationRequired  Registered
…or you can use this small loop which checks all the providers continuously in every 5 seconds.
for p in ${providers[@]}; do
  echo ""
  echo "Testing provider: Microsoft.$p";
  echo "Test if Microsoft.$p provider is Registered."
  test=$(az provider show -n Microsoft.$p -o table | tail -n1 2>&1)
  while ( echo $test | grep -q "Registering" ); do \
    echo "Provider is server is still registering..."; \
    sleep 5; \
    test=$(az provider show -n Microsoft.$p -o table | tail -n1 2>&1); \
  done
  echo "Microsoft.Kuber$pnetes provider is Registered."
done
Deployment
Now the environment is prepared and we can start creating the resources in Azure.
Variables
Again we will use variables to make the deployment easier as one parameter shall be used several times and you might not like my names 🙂 . Here I just list all the variables and later I will explain their purposes. Paste them into the terminal.
ResourceGroup="Arc-IoTrains"
Location="westeurope"
LogAnalyticsName="iotrains-logs"
ClusterName="iotrains-k8s"
AppExtName="appservice-ext"
AppExtNamespace="iotrains-apps"
AppEnvironmentName="iotrains-appservices"
AppCustomLocationName="iotrains-app-site"
StorageClass="default"
ACRName="iotrainsacr"
Create a Resource Group
The Resource Group will store our Azure resources.
az group create --name $ResourceGroup --location $LocationCreate a Container Registry
We need to store our container images somewhere so we need an Azure Container Registry (ACR) for this purpose.
It’s deployment is very simple with the following command but please change the “ACRName” variable first because the name shall be unique.
az acr create \
    --resource-group $ResourceGroup \
    --name $ACRName \
    --admin-enabled true \
    --sku Basic
Note that, normally we can authenticate to the ACR with a Managed Identity or a Service Principle. Activating the “admin credentials” is not the best security practice but as this is not a production grade system hence this will be okay. With the “admin-enable” function, Azure will generate an admin user and password what we can use on our private cluster to authenticate to pull images.
Create a Log Analytics Workspace
The Log Analytics Workspace (LAW) will store the logs coming from the different components like our Kubernetes cluster, the running containers, the AppServices and the Machine Learning Workspace. It is a central place for any kind of logs.
az monitor log-analytics workspace create \
  --resource-group $ResourceGroup \
  --workspace-name $LogAnalyticsName \
  --location $Location
Once the LAW is ready we need to query some of it parameters and IDs. These will be used later to connect the other Services to the LAW.
Description of variables
- LogAnalyticsWorkspaceId is the UUID of the LAW.
- LogAnalyticsWorkspaceResourceId is the Azure resource ID of the LAW. It will be used by the Monitoring extension of the K8s cluster.
- LogAnalyticsWorkspaceIdEnc is the Base64 encoded Workspace UUID. It will be used by the AppService extension.
- LogAnalyticsKey is the connection key.
- LogAnalyticsKeyEnc is the Base64 encoded connection key. It will be used by the AppService extension.
LogAnalyticsWorkspaceId=$(az monitor log-analytics workspace show \
    --resource-group $ResourceGroup \
    --workspace-name $LogAnalyticsName \
    --query customerId \
    --output tsv)
LogAnalyticsWorkspaceResourceId=$(az monitor log-analytics workspace show \
    --resource-group $ResourceGroup \
    --workspace-name $LogAnalyticsName \
    --query id \
    --output tsv)
LogAnalyticsWorkspaceIdEnc=$(printf %s $LogAnalyticsWorkspaceId | base64 -w0)
LogAnalyticsKey=$(az monitor log-analytics workspace get-shared-keys \
    --resource-group $ResourceGroup \
    --workspace-name $LogAnalyticsName \
    --query primarySharedKey \
    --output tsv)
LogAnalyticsKeyEnc=$(printf %s $LogAnalyticsKey | base64 -w0)
Attach the K8s cluster to Azure
Now it is the time to connect our cluster to Azure. The following command will take couple of minutes
az connectedk8s connect \
  --name $ClusterName \
  --resource-group $ResourceGroup
This command will deploy several containerized agent on our K8s cluster. You can follow the deployment with the following command:
watch kubectl get pods -n azure-arcFinally you shall see a similar output:
~$ kubectl get pods -n azure-arc
NAME READY STATUS RESTARTS AGE
cluster-metadata-operator-66b4f876d-xxdr7 2/2 Running 0 12m
clusterconnect-agent-746b98b59c-qp8pk 3/3 Running 0 12m
clusteridentityoperator-7f5d9db6b6-s2l42 2/2 Running 0 12m
config-agent-fb7449bb5-7b7xq 2/2 Running 0 12m
controller-manager-5ccdc5b974-glkj7 2/2 Running 0 12m
extension-events-collector-76bf8c46b5-bnj7f 2/2 Running 0 12m
extension-manager-675c5cc67d-skj65 3/3 Running 0 12m
flux-logs-agent-5998575cfc-2rnd6 1/1 Running 0 12m
kube-aad-proxy-5c47f65f-94z9l 2/2 Running 0 12m
metrics-agent-5f84fc46f5-8h6mj 2/2 Running 0 12m
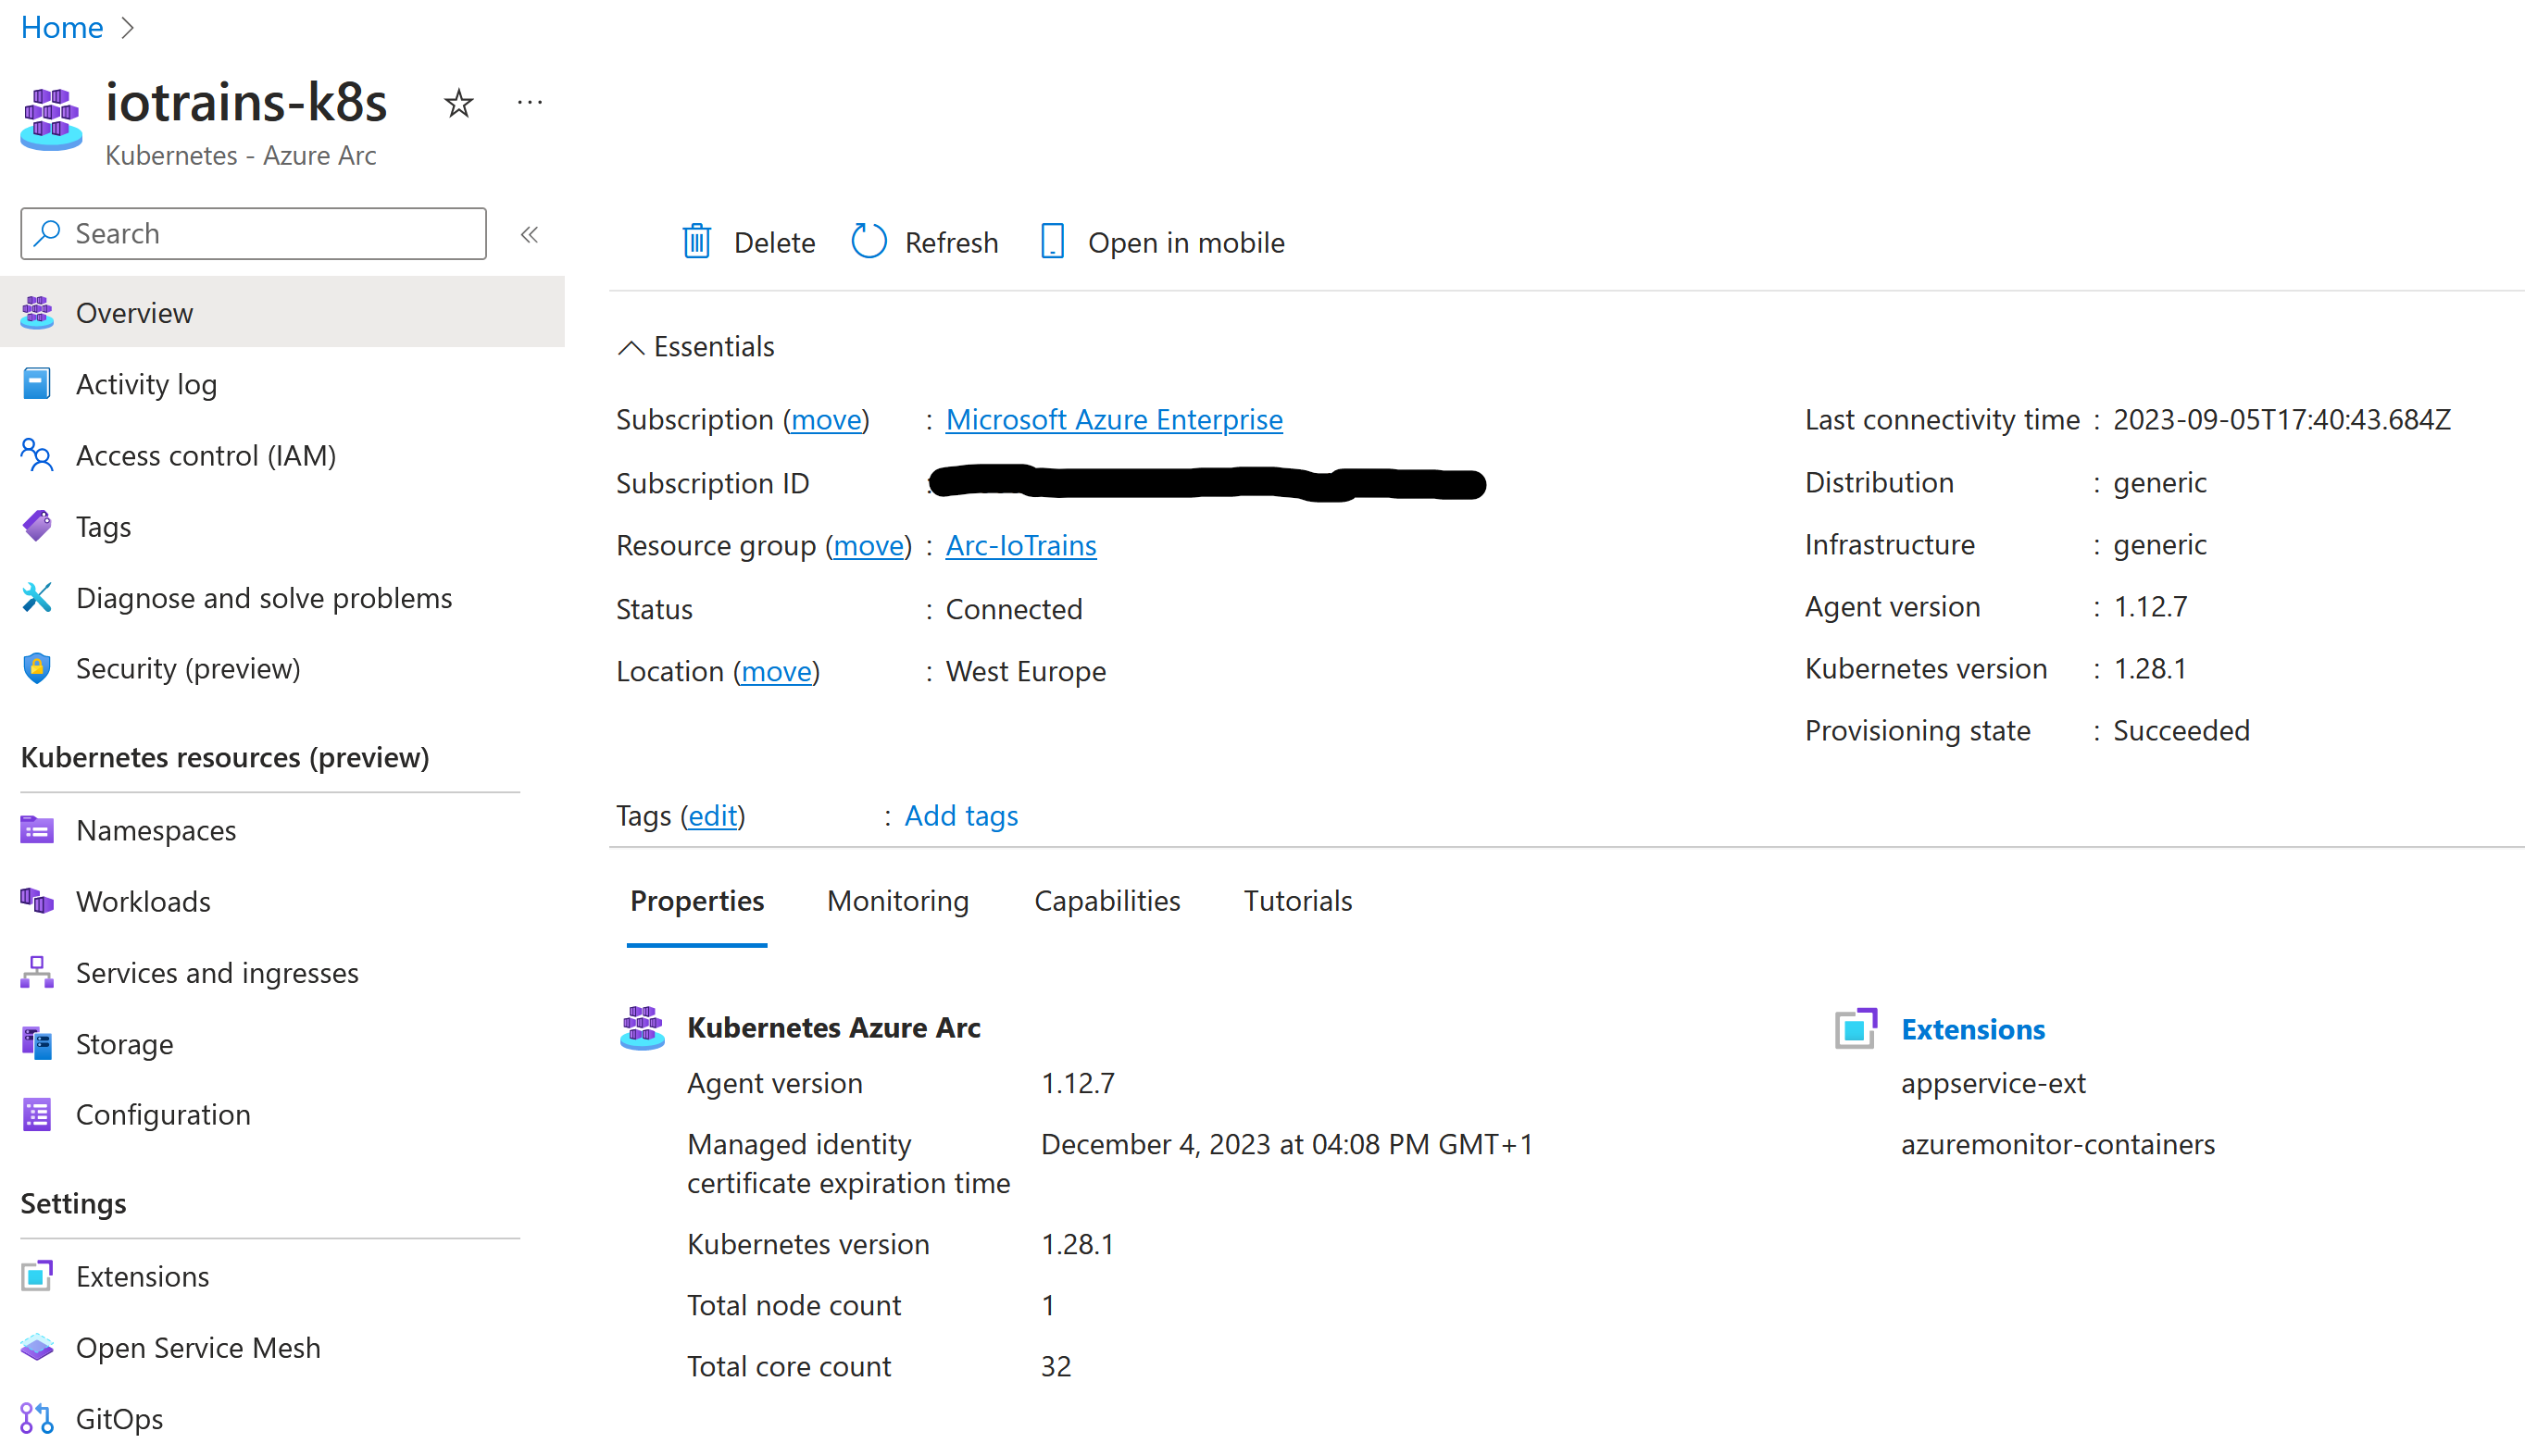
resource-sync-agent-64d6f7ff-klv2q 2/2 Running 0 12mNow our cluster is connected to Azure. You can check also on the portal where a new resource will appear in your resource group. You can also see some details about your cluster on that page like its version, node count, capacity figures.
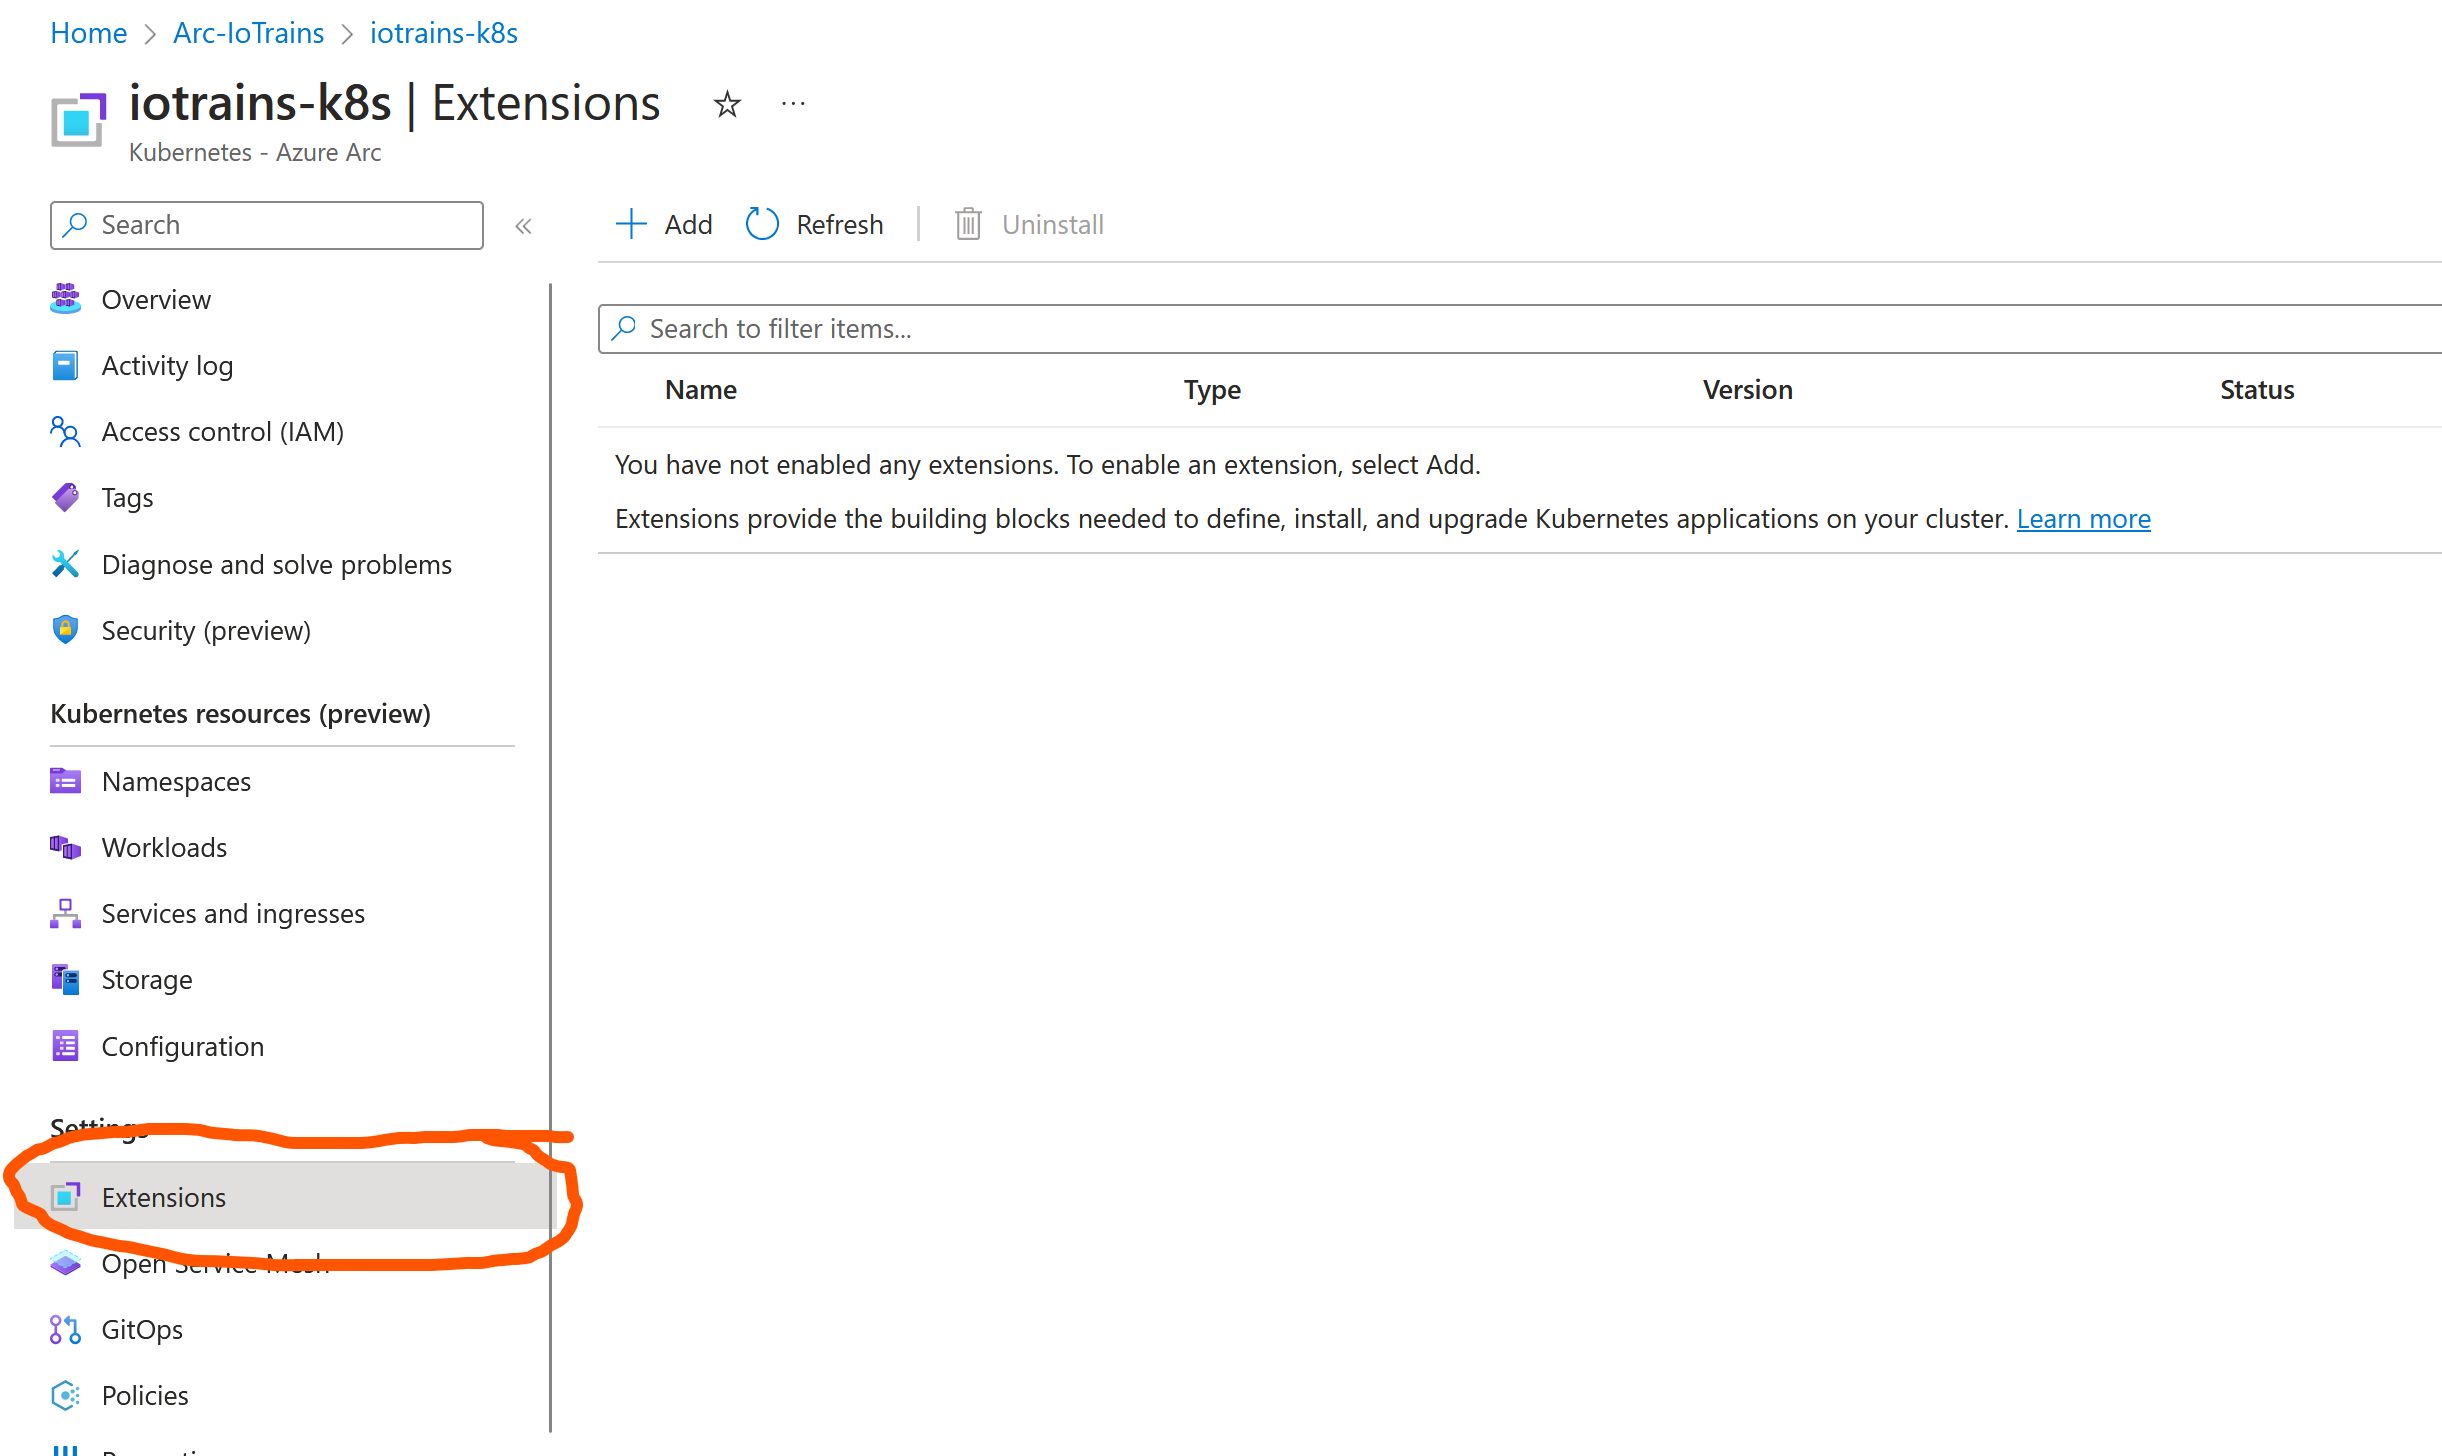
Extensions
Here starts the magic. Now we are able to manage our cluster even from the Azure portal but this is just a raw Kubernetes cluster. To use the Azure resources we need their extension. Each service has its own extension which will make our cluster capable to deploy the Azure Service. For example the “Azure Arc data controller” extension deploys few (bootstrap) container which will let us later use the cluster as target to deploy our services. If you don’t understand yet, then don’t worry. I will show you later.
Notice the “Extension” menu on the portal. Here we already can deploy the extensions to our cluster with few clicks. Some extensions have some deeper configuration options like the “Azure Arc data controller”. Other extensions are just a single click like the Azure Policy extension.
Azure Monitor extension
The first thing what we would like to activate is the central monitoring. With this extension all container logs will be stored in the previously created Log Analytics Workspace. This means there is continuous outgoing traffic from our cluster towards Azure hence we need continuous network connectivity.
You can deploy the extension from the portal but for programmability point of view it is better to use the CLI.
Note that, this command doesn’t use kubectl anymore. This means once you connected the cluster then you can do a fully remote management and you don’t need direct access to the cluster. In an enterprise environment this helps a lot because the K8s cluster creation and the Azure Arc attachment can be done by the sysadmins but the extension installation can be done by the developers/users.
az k8s-extension create \
  --name azuremonitor-containers \
  --cluster-name $ClusterName \
  --resource-group $ResourceGroup \
  --cluster-type connectedClusters \
  --extension-type Microsoft.AzureMonitor.Containers \
  --configuration-settings logAnalyticsWorkspaceResourceID="${LogAnalyticsWorkspaceResourceId}" \
  --configuration-settings omsagent.resources.daemonset.limits.cpu="150m" \
  --configuration-settings omsagent.resources.daemonset.limits.memory="600Mi" \
  --configuration-settings omsagent.resources.daemonset.requests.memory="300Mi" \
  --configuration-settings omsagent.resources.deployment.limits.cpu="1" \
  --configuration-settings omsagent.resources.deployment.limits.memory="750Mi"
Configuration details
You can notice the “configuration-settings” parameters. Actually this create command invokes a helm deployment in the background and with these parameters we can fine-tune the default deployments. What I did here is to reduced the resource requirements and limits of the agent to save memory on low capacity clusters. Good for lab but don’t touch these in production. MS guys don’t like if you mess with these parameters … believe me, I just know 😉
If you are interested in all the values then execute this command (after you installed helm):
helm get values -n azuremonitor-containers azuremonitor-containers --allAzure Application Services extension
The next extension will make our K8s cluster capable to host Azure AppServices. Once the extension is deployed then we will be able to deploy AppServices (WebApps) from the Azure portal. Of course the WebApp will run on our cluster and as it doesn’t have public IP address hence the WebApp will get an internal IP address as well so it will be reachable from our own network only.
This will take a while so take a coffee/tee. Give it at least 1 hour and leave it even if the command returns with an error. Sometimes the first deployment fails because it times out but don’t worry. The whole deployment has a 15 minutes timeout and it automatically retries the deployment from scratch in the background. You can follow the deployment progress on the portal on your iotrains-k8s cluster’s page at the extensions.
az k8s-extension create \
    --resource-group $ResourceGroup \
    --name $AppExtName \
    --cluster-type connectedClusters \
    --cluster-name $ClusterName \
    --extension-type 'Microsoft.Web.Appservice' \
    --release-train stable \
    --auto-upgrade-minor-version true \
    --scope cluster \
    --release-namespace $AppExtNamespace \
    --configuration-settings "Microsoft.CustomLocation.ServiceAccount=default" \
    --configuration-settings "appsNamespace=${AppExtNamespace}" \
    --configuration-settings "clusterName=${AppEnvironmentName}" \
    --configuration-settings "keda.enabled=false" \
    --configuration-settings "buildService.storageClassName=${StorageClass}" \
    --configuration-settings "buildService.storageAccessMode=ReadWriteOnce" \
    --configuration-settings "customConfigMap=${AppExtNamespace}/kube-environment-config" \
    --configuration-settings "logProcessor.appLogs.destination=log-analytics" \
    --config-protected-settings "logProcessor.appLogs.logAnalyticsConfig.customerId=${LogAnalyticsWorkspaceIdEnc}" \
    --config-protected-settings "logProcessor.appLogs.logAnalyticsConfig.sharedKey=${LogAnalyticsKeyEnc}"
While you are waiting you can also monitor the container creations
watch kubectl get pods -n iotrains-appsIn Azure, when you create a new resource then you need to select where you would like to deploy. This is typically and Azure region like East-US-1 or West-Europe … but we want to deploy on our own cluster. So now we need to create a “Custom location” which points to our cluster (to be more precise to the previously installed extension). This means that the extension takes over the “region” responsibility to deploy the resource. Let’s do it and see it.
First we need the Azure Resource ID of the extension and then the cluster’s.
ExtensionId=$(az k8s-extension show \
    --cluster-type connectedClusters \
    --cluster-name $ClusterName \
    --resource-group $ResourceGroup \
    --name $AppExtName \
    --query id \
    --output tsv)

ConnectedClusterId=$(az connectedk8s show --resource-group $ResourceGroup --name $ClusterName --query id --output tsv)
Create the Custom location.
az customlocation create \
    --resource-group $ResourceGroup \
    --name $AppCustomLocationName \
    --host-resource-id $ConnectedClusterId \
    --namespace $AppExtNamespace \
    --cluster-extension-ids $ExtensionId
Once it is deployed we need its Resource ID.
CustomLocationId=$(az customlocation show \
    --resource-group $ResourceGroup \
    --name $AppCustomLocationName \
    --query id \
    --output tsv)
Now the environment is (almost) ready. The Custom location is tied to the AppService extension. Now we need an AppService Environment on top of the Custom location to start to use it.
az appservice kube create \
    --resource-group $ResourceGroup \
    --name $AppEnvironmentName \
    --custom-location $CustomLocationId
And we are done. Now we can deploy a test WebApp. Let’s try it out.
Deploy a test WebApp
Now our cluster is ready to host some application so try it out because it is fun.
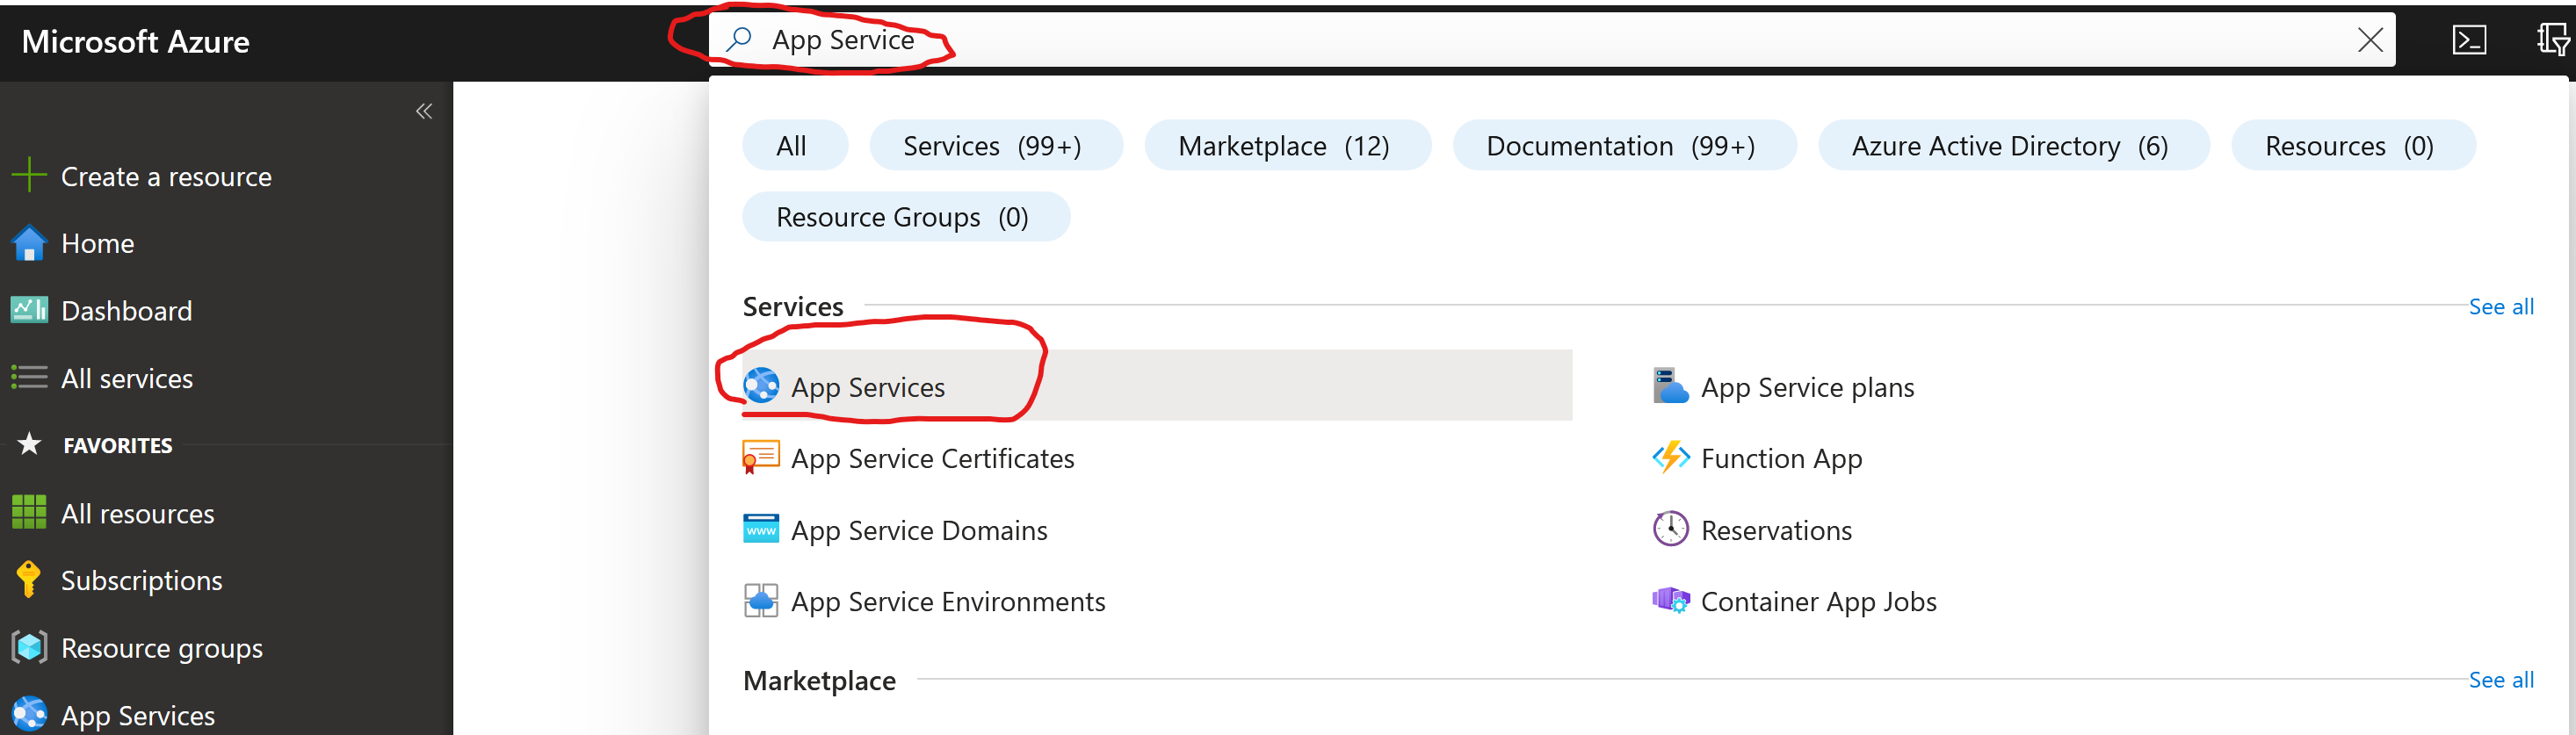
Open the Azure Portal and search for “App Service” at the top search bar. Then click on the service. Then click “Create” and “Create Web App”.
Do the following configuration
- Resource Group: “Arc-IoTrains”
- Name: “test” –> Don’t worry if it says it is not available
- Publish: “Docker Container”
- Operation System: “Linux”
- Region: …haha, here comes the magic why we work so far 😀 Open the drop-down list and scroll to the top. There it is “iotrains-app-site”.
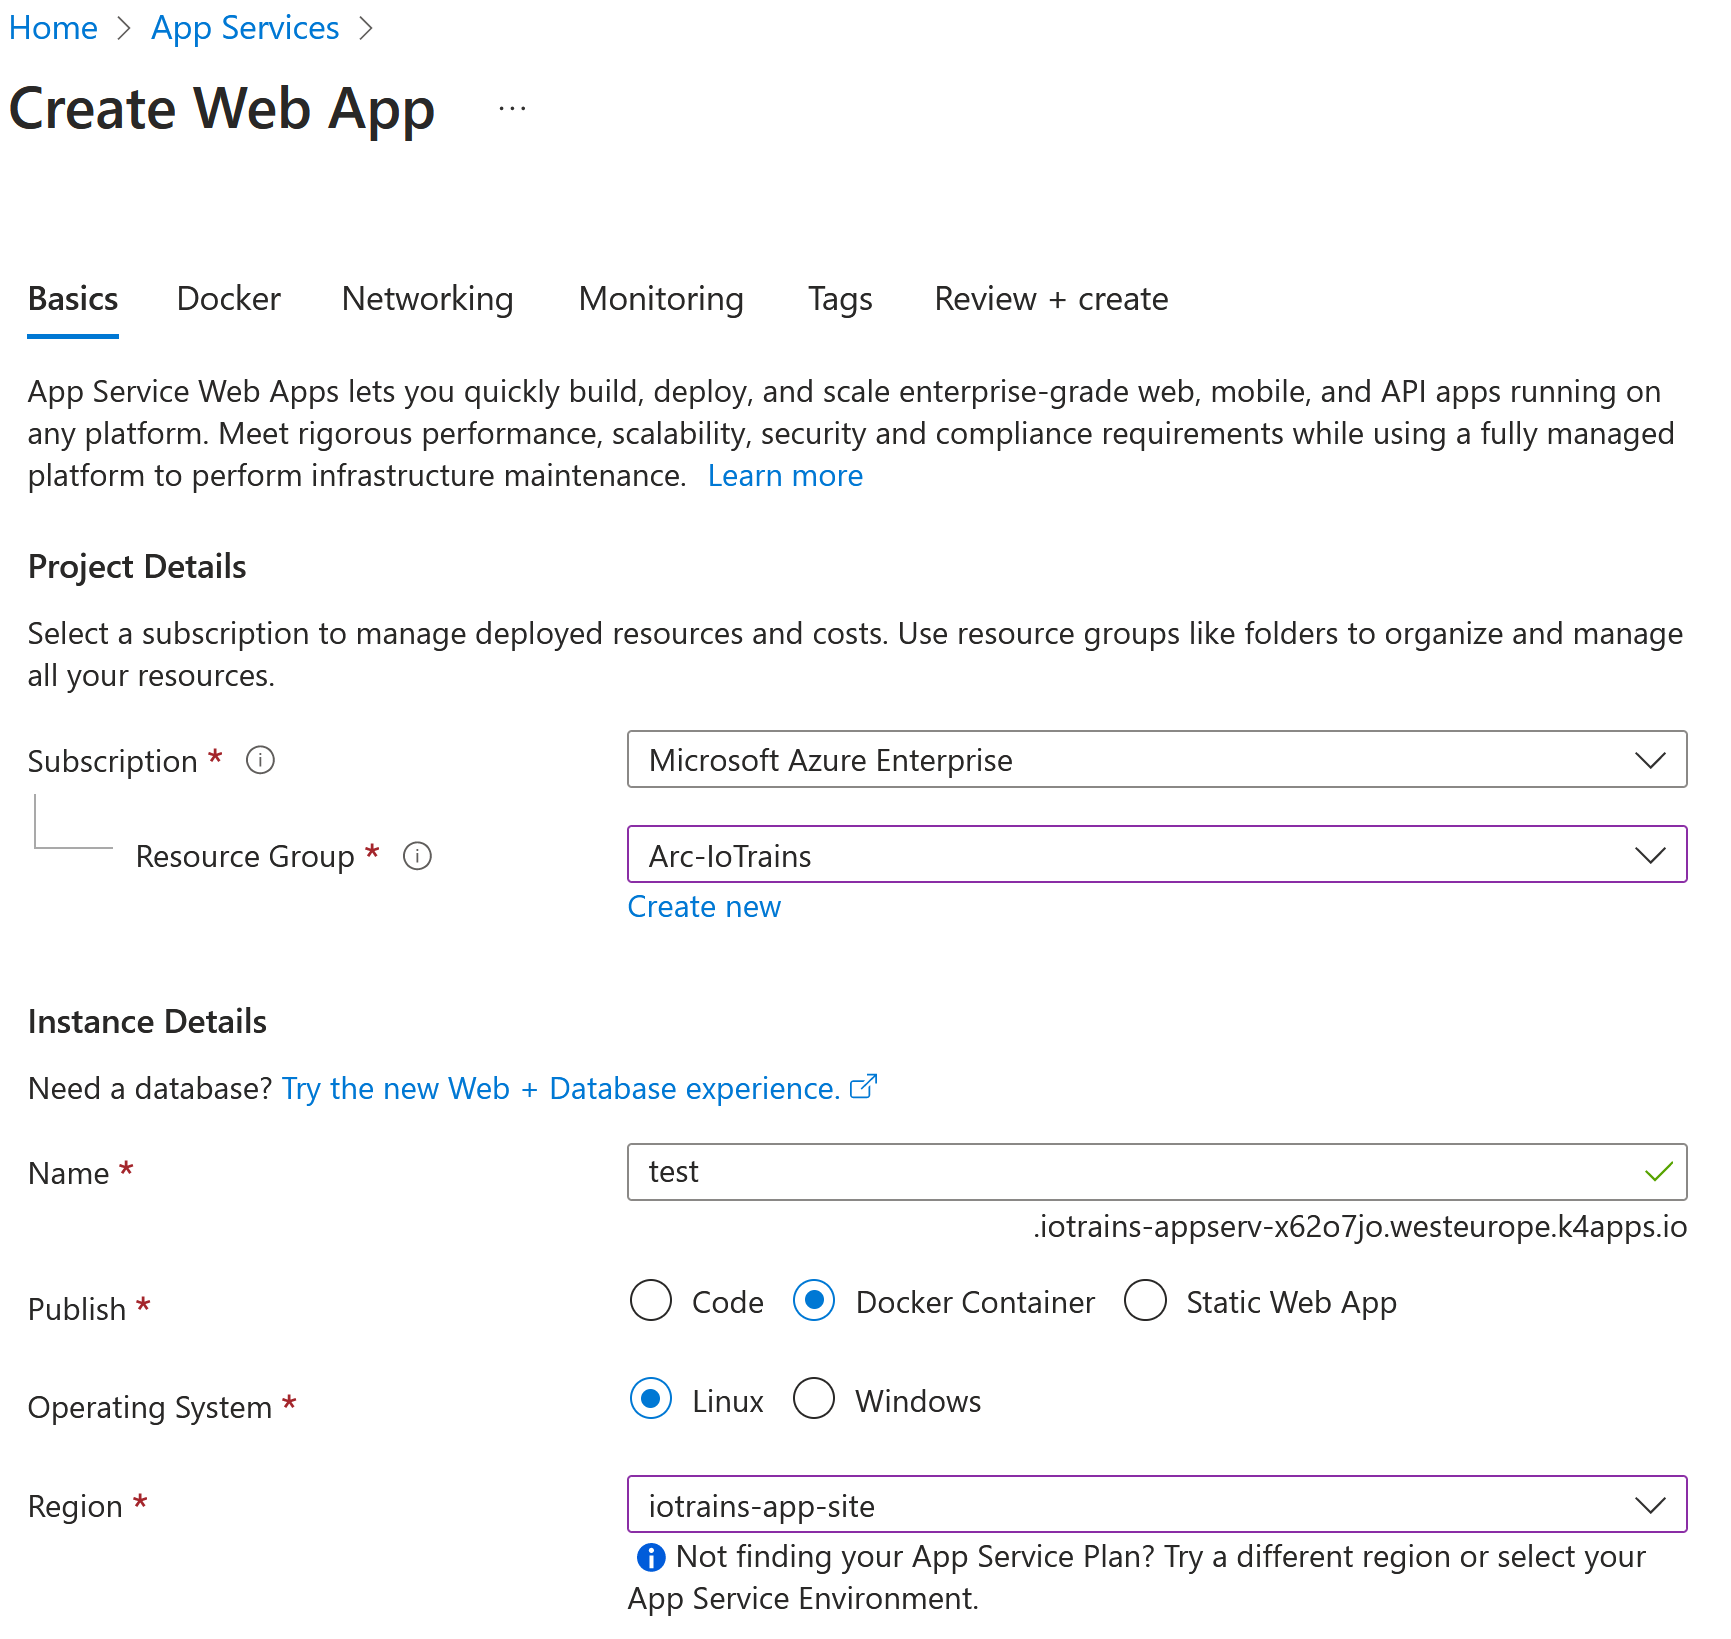
Click on “Review & Create” then again on the “Create”. It shouldn’t take more then few seconds. Then go back to your cluster and check your containers.
kubectl get pods -n iotrains-appsThere it is. It is running. Hurray 😀
~$ kubectl get pods -n iotrains-apps
NAME READY STATUS RESTARTS AGE
appservice-ext-k8se-activator-5c6dc5499c-762vp 1/1 Running 0 18m
appservice-ext-k8se-activator-5c6dc5499c-frxhz 1/1 Running 0 18m
appservice-ext-k8se-app-controller-f5997c999-4txxw 1/1 Running 0 18m
appservice-ext-k8se-app-controller-f5997c999-89qvz 1/1 Running 0 18m
appservice-ext-k8se-build-service-7cc8745cbf-55qsx 2/2 Running 0 28m
appservice-ext-k8se-envoy-5d8bd7645d-248dc 1/1 Running 0 28m
appservice-ext-k8se-envoy-5d8bd7645d-pxfg9 1/1 Running 0 27m
appservice-ext-k8se-envoy-5d8bd7645d-sspx9 1/1 Running 0 27m
appservice-ext-k8se-envoy-controller-6447fc74f9-nkl9k 1/1 Running 0 18m
appservice-ext-k8se-envoy-controller-6447fc74f9-p64bg 1/1 Running 0 18m
appservice-ext-k8se-http-scaler-57d584588f-n8mgd 1/1 Running 0 28m
appservice-ext-k8se-img-cacher-h8776 1/1 Running 0 29m
appservice-ext-k8se-log-processor-5x5wk 1/1 Running 1 (18m ago) 29m
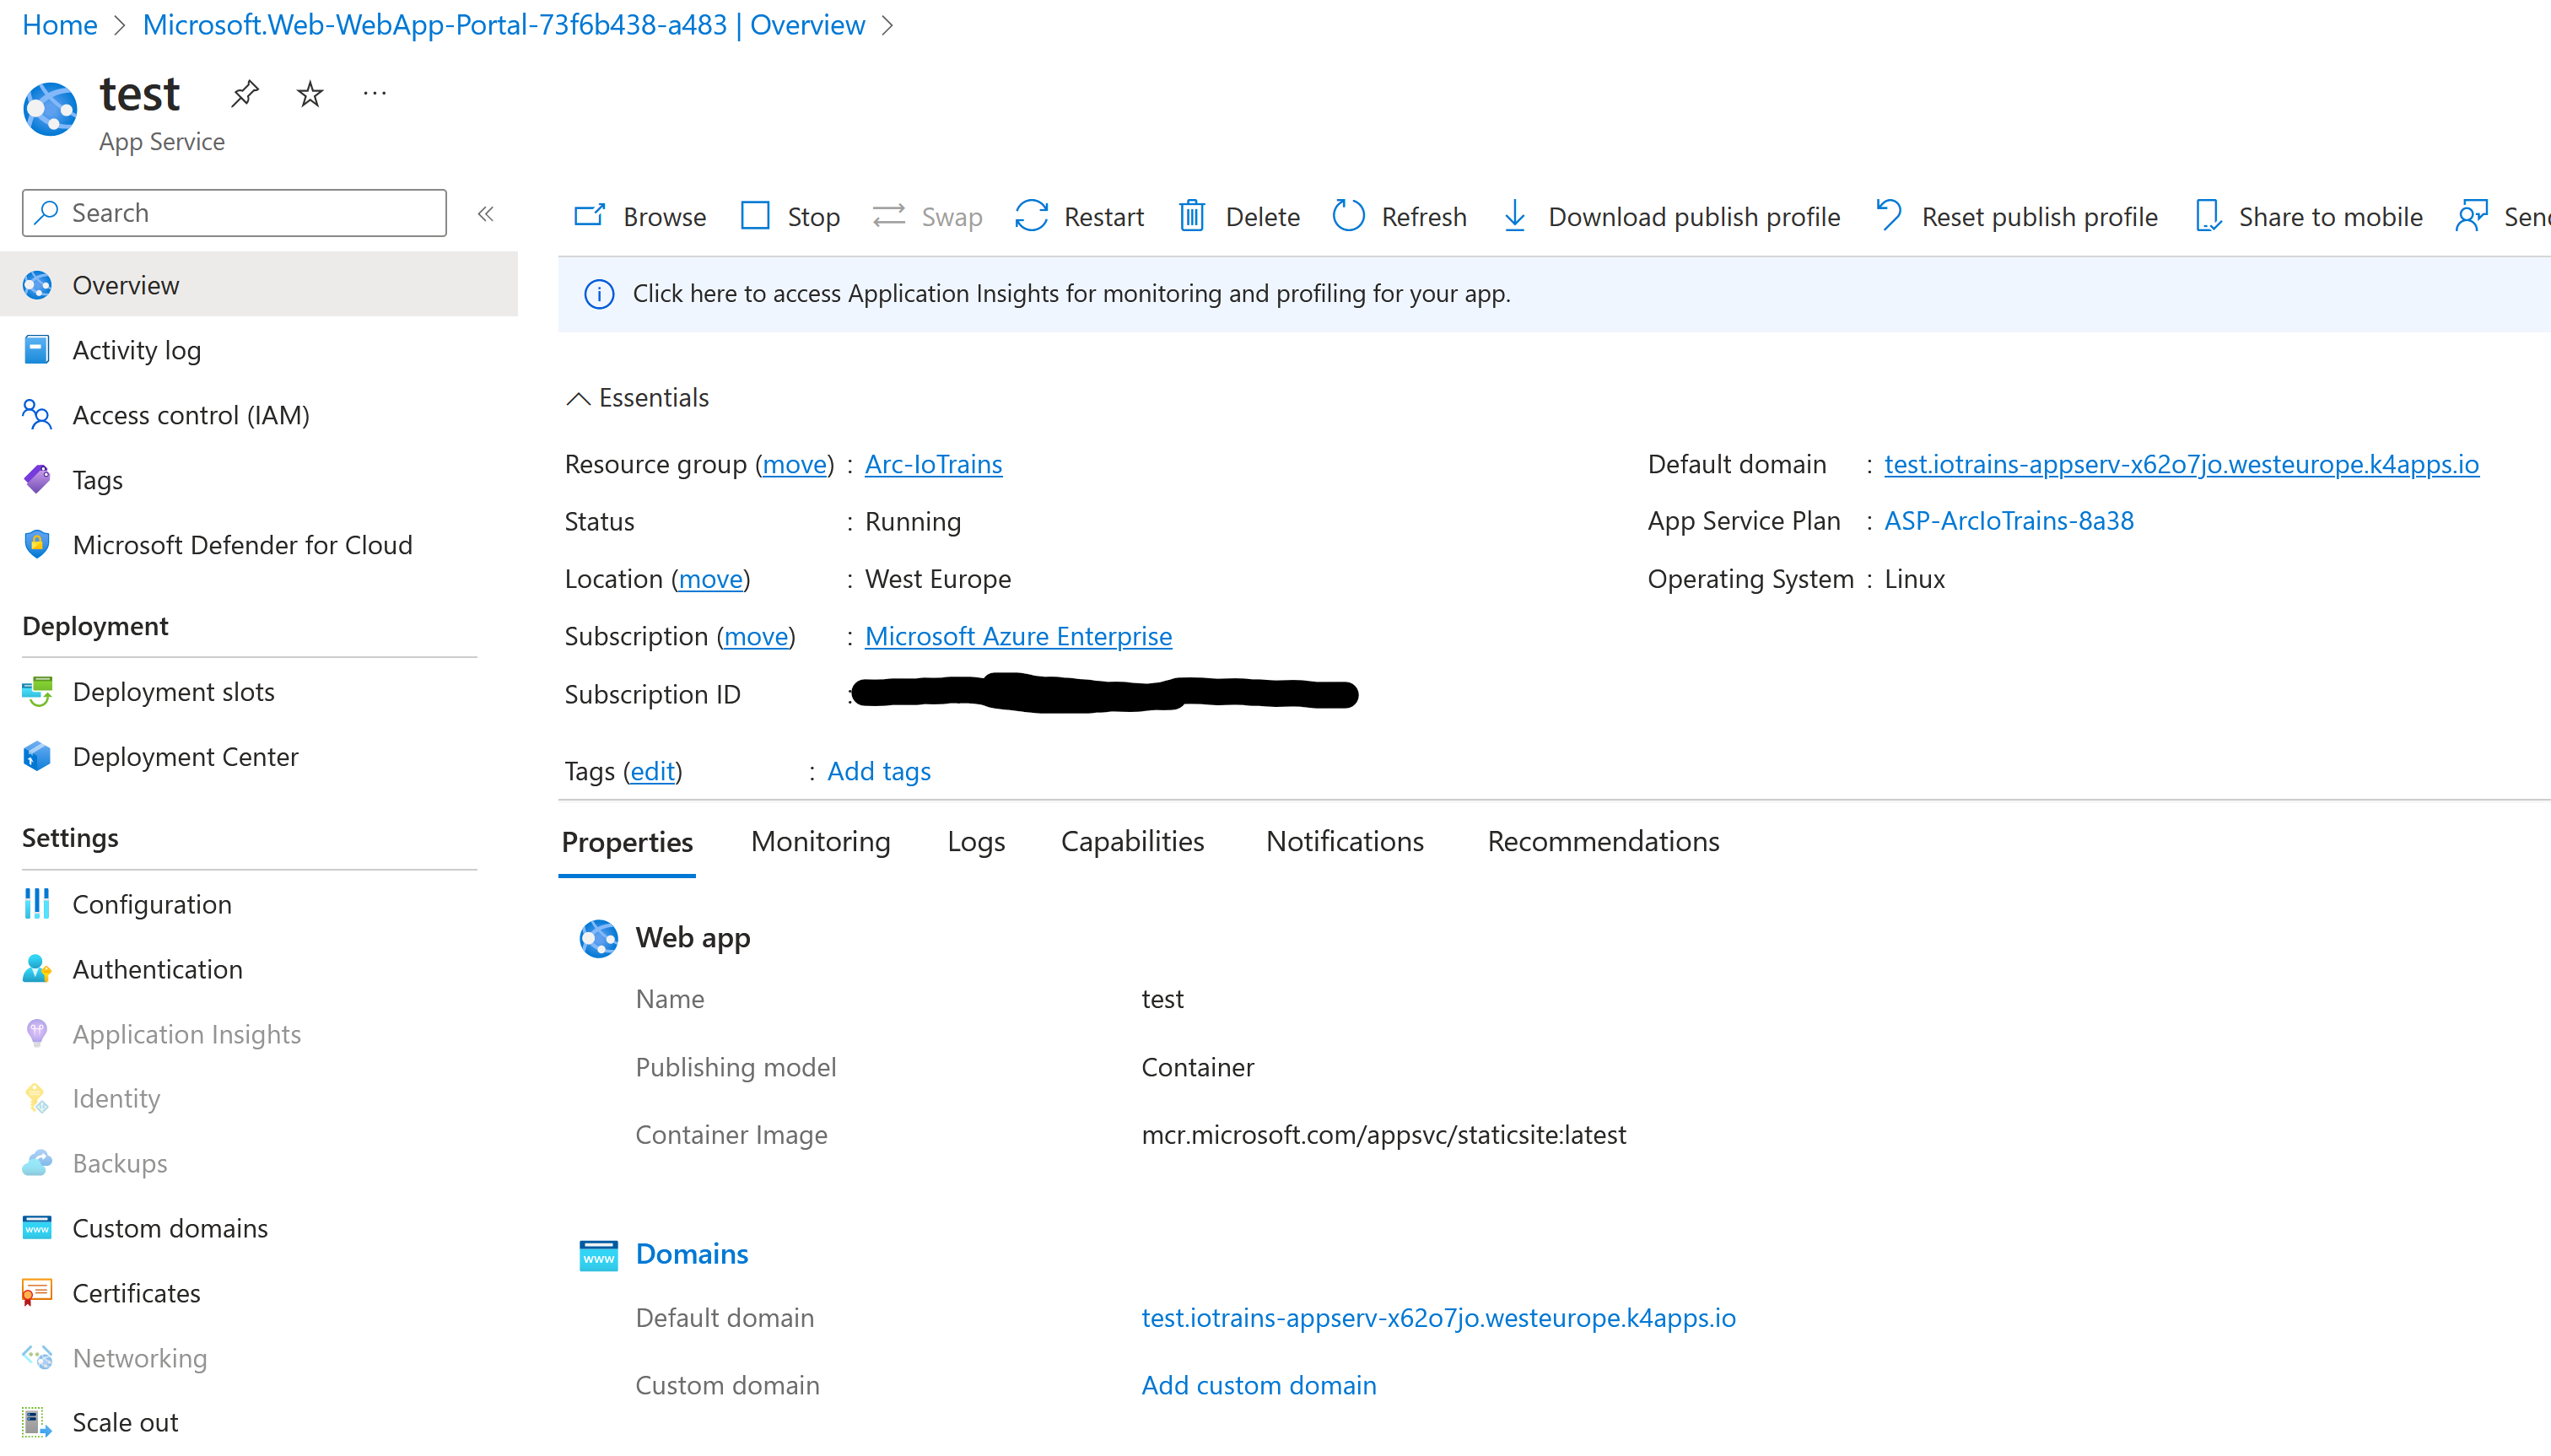
test-7f79cdff4c-fkxbn 1/1 Running 0 25sGo back to the portal and if you didn’t click away from the previous deployment then click on the “Go to resource” button. You shall see a working App Service which is very-very similar if it would run in the Azure datacenter but this is special because it runs on your cluster. 😉
As we didn’t change the Docker image during the creation it was deployed with Microsoft’s QuickStart image. You can also see it on the overview page. Notice the URL on the left side (Default domain) and click on it. If everything works well then the QuickStart page opens.
However it looks it is running publicly … it isn’t. If you make an nslookup to the URL then you will see the trick. It has a private IP address. And of course if you try to reach this link outside of your network then it won’t work.
~$ nslookup test.iotrains-appserv-x62o7jo.westeurope.k4apps.io
Server:         127.0.0.53
Address:        127.0.0.53#53

Non-authoritative answer:
Name:   test.iotrains-appserv-x62o7jo.westeurope.k4apps.io
Address: 192.168.0.140
Exactly, this is an internal IP address. And it is not a random IP but this is the first one from the IngressRange what we used during the Kubernetes cluster deployment.
You can also check the Kubernetes Services IP with the following command:
kubectl get services -AYou can see that only the appservice-ext-k8se-envoy has an external IP address. (Because that is the only service which is exposed so far.)
~$ kubectl get services -A
NAMESPACE          NAME                                            TYPE           CLUSTER-IP       EXTERNAL-IP     PORT(S)                      AGE
azure-arc          extension-events-collector                      ClusterIP      172.17.87.82     <none>          8082/TCP                     158m
azure-arc          extension-manager-svc                           ClusterIP      None             <none>          8081/TCP                     158m
azure-arc          flux-logs-agent                                 ClusterIP      172.17.198.227   <none>          80/TCP                       158m
azure-arc          kube-aad-proxy                                  ClusterIP      172.17.168.141   <none>          443/TCP,8080/TCP             158m
calico-apiserver   calico-api                                      ClusterIP      172.17.75.214    <none>          443/TCP                      31h
calico-system      calico-kube-controllers-metrics                 ClusterIP      None             <none>          9094/TCP                     31h
calico-system      calico-typha                                    ClusterIP      172.17.29.134    <none>          5473/TCP                     31h
default            kubernetes                                      ClusterIP      172.17.0.1       <none>          443/TCP                      31h
iotrains-apps      appservice-ext-k8se-activator                   ClusterIP      172.17.243.195   <none>          4045/TCP,4050/TCP,4046/TCP   47m
iotrains-apps      appservice-ext-k8se-build-service               ClusterIP      172.17.49.57     <none>          8181/TCP,4343/TCP            47m
iotrains-apps      appservice-ext-k8se-envoy                       LoadBalancer   172.17.154.127   192.168.0.140   80:32327/TCP,443:32606/TCP   47m
iotrains-apps      appservice-ext-k8se-envoy-controller            ClusterIP      172.17.109.224   <none>          9090/TCP                     47m
iotrains-apps      appservice-ext-k8se-envoy-internal              ClusterIP      172.17.7.17      <none>          80/TCP,443/TCP               47m
iotrains-apps      appservice-ext-k8se-http-scaler                 ClusterIP      172.17.112.199   <none>          4055/TCP,4050/TCP            47m
iotrains-apps      test                                            ClusterIP      172.17.86.223    <none>          80/TCP                       18m
kube-system        gpu-operator                                    ClusterIP      172.17.73.24     <none>          8080/TCP                     30h
kube-system        kube-dns                                        ClusterIP      172.17.0.10      <none>          53/UDP,53/TCP,9153/TCP       31h
kube-system        metrics-server                                  ClusterIP      172.17.102.64    <none>          443/TCP                      31h
kube-system        nvidia-dcgm-exporter                            ClusterIP      172.17.148.43    <none>          9400/TCP                     30h
kube-system        nvidia-operator-node-feature-discovery-master   ClusterIP      172.17.171.151   <none>          8080/TCP                     30h
metallb-system     metallb-webhook-service                         ClusterIP      172.17.24.75     <none>          443/TCP                      31h
Now go back to the portal and delete the “test” AppService. But only just that one. See you in the next blog post where we will deploy Azure ML and connect our cluster to it.