Estimated time to do: ~1 hour
Introduction
As I’m very focused on Kubernetes hence most of the concepts uses Kubernetes which are running in either in the Public Cloud or at the on-premise. On-premise deployments typically represents an Edge cloud in my concepts. Hence I created this guide how to deploy your own Kubernetes cluster and I also add some descriptions about the different components without going too deep into the details but focusing on the overarching picture.
This guide shows you how to install Kubernetes at on-premise (or in VM or in Cloud or wherever you wish :)) and its additional components. The guide follows the official Kubernetes documentation with Kubeadm and adds some specific configuration. By going through the installation you will understand how Kubernetes is build up and how the components are connected together.
Nevertheless if you just would like to play with Kubernetes then there are much easier ways to bootstrap it like deploying a managed Kubernetes service like Azure Kubernetes Services (AKS), Google Kubernetes Engine (GKE) or Amazon Elastic Kubernetes Service (EKS). If you wish to deploy Kubernetes on your computer then you can do it easily with Minikube.
TL/DR
Yeah, I know, too much speech, let’s jump into the middle 🙂
I prepared a guide which deploys a 1 Master + 1 Worker setup. If you wish you can deploy only 1 Master node (it is enough to have a working simple “cluster”) and you can add as many Worker nodes as you wish too.
The technical steps are documented on Github and you can find it on this link: https://github.com/szasza576/kube-installation
Also there are scripts what you just need to execute on the nodes and will do the dirty job on behalf of you … just don’t forget to setup the input parameters.
IMPORTANT, this guide is for learning purposes hence it is pretty far from production grade. Security hardening, high-availability or redundancy are not included hence don’t use it for anything else than learning.
Prerequisites
Compute
For the on-premise deployment you will need a bare metal PC or a VM with enough compute power. The minimum requirements are the following:
- 2 CPU / vCPU
- x86 or x64 architecture
(You can install on ARM as well but for the upcoming use-cases in the next post, we will need a classic x86/x64 CPU. Don’t worry, we will play with ARM later.) - 4 GB RAM
- 30 GB Disk
- SSH access
- (optional) Nvidia GPU for CUDA / AI workloads
Considering our future use-cases with Azure Arc and some fancy Application deployment, I recommend the following minimum config:
- 4+ CPU / vCPU
- 16+ GB RAM (some application will require more than 8 GB but if you have only 8GB then you’re still good with some tricks)
- 80 GB Disk
Network design
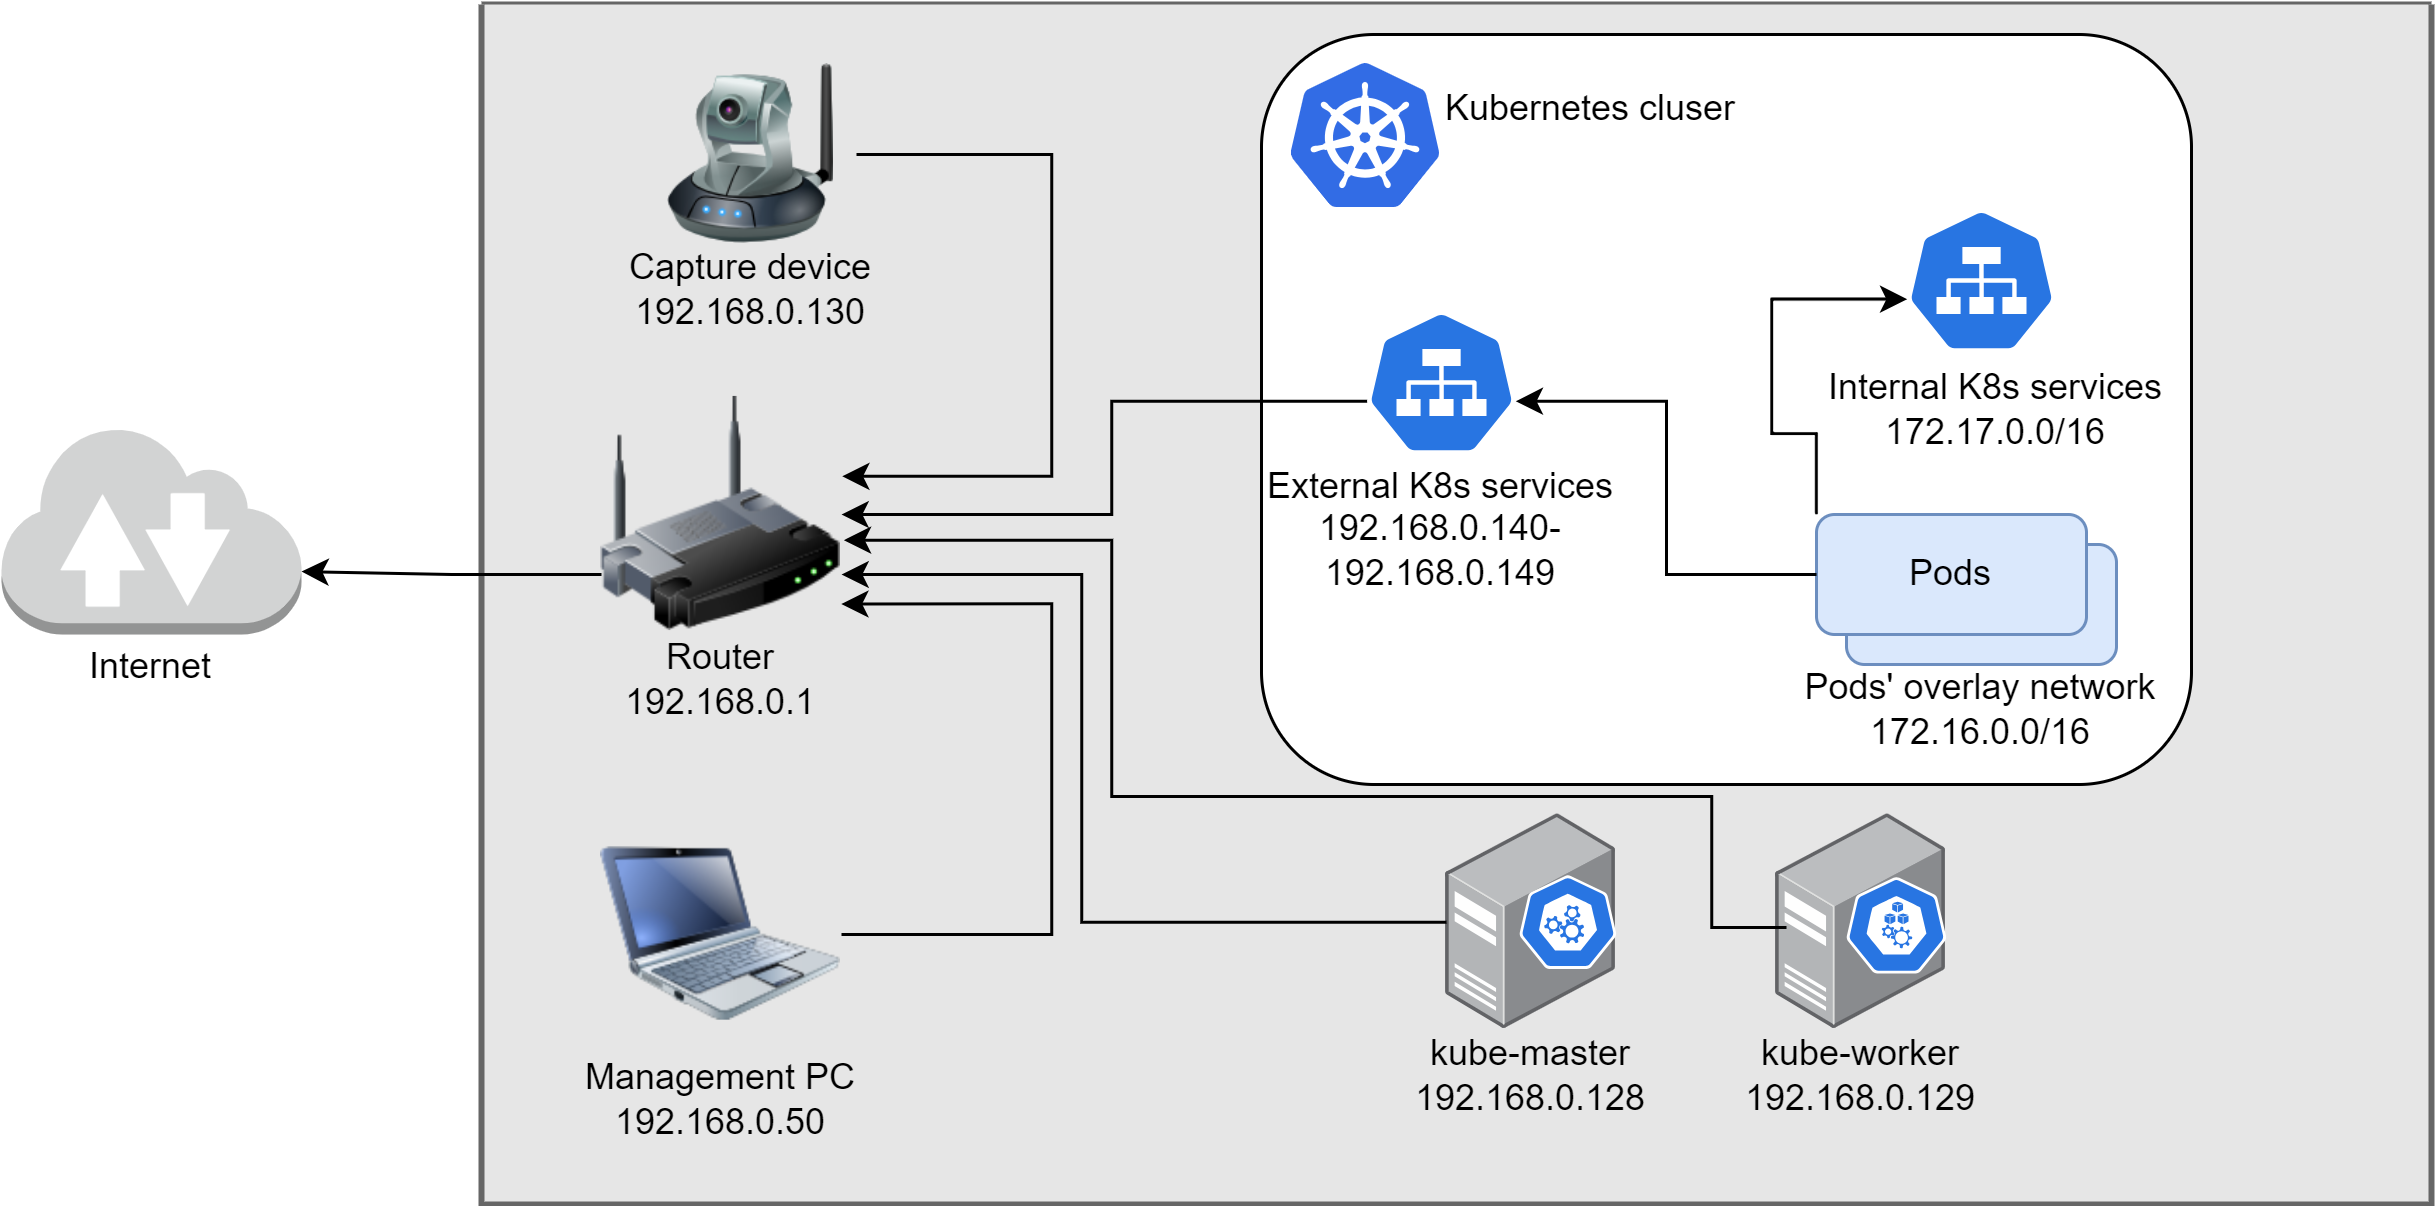
Before we would jump into the deployment then we need to design the network. We will have several components which will use IP addresses and we need to make a good plan before we would start the deployment. The following components will use IP addresses:
- The host nodes (both the Master and all Worker nodes).
- Pods will get internal IP addresses hence they won’t appear in our network directly.
- Kubernetes Services (ClusterIP) will also get private IP addresses
- Loadbalancer type K8s Services need routable IP addresses (see details below at MetalLB)
In my case this is the network setup:
- Default gateway (router): 192.168.0.1
- Master node: 192.168.0.128 –> The Master’s IP is called MasterIP in the script.
- Worker node: 192.168.0.129
- The script also needs a subnet of all of the nodes to whitelist for the NFS (Storage) share: 192.168.0.128/29 –> This is called NFSCIDR in the script.
- Loadbalancer IPs: 192.168.0.140 – 192.168.0.141 –> This range is called IngressRange in the script.
- Pod’s internal IPs: 172.16.0.0/16 –> This is called PodCIDR in the script.
- Kubernetes Services’ IP range: 172.17.0.0/16 –> This is called ServiceCIDR in the script
A quick visualization of the network setup.
Linux installation
The setup assumes that Ubuntu 22.04 (minimal server version) is installed onto the nodes and the networking is pre-configured according to the network design. The rest will be configured on the fly.
Deployment
You are prepared so it is time to do the deployment. I suggest to use a central machine (like your notebook) and do the deployment remotely via SSH. Nevertheless it is up to you what is your preference.
Please open this Github page and follow the steps: https://github.com/szasza576/kube-installation
I wrote a small description about the used components and their roles in the next chapters if you wish to learn more.
What is what?
A full course can be filled with each of the topics if we would like to deep dive hence here is just a quick summary about the components and why do we need them in our setup. If you are interested in the details then I suggest to check their linked webpages. The following descriptions focus on the big picture and the context only.
Kubernetes (in super-nutshell)
Webpage: https://kubernetes.io/docs/home/
Kubernetes (K8s) is a container orchestrator. This means it manages several compute nodes (Virtual Machines or Bare Metal servers) and schedules containers on top of them. K8s is responsible for the lifecycle management of the containers. If we would like to deploy a container then K8s finds a suitable server to run on it. Also it monitors continuously and restarts, redeploys, upgrades, scales if necessary.
Kubernetes has several central functions (like the K8s-API server, K8s-Scheduler, K8s-Controller and etcd) which are running on a central node(s) which is typically called “master node”. The worker nodes run a service which is called “kubelet”. The worker nodes register themselves into the cluster via the kubelet. The central components keep the connection to the worker nodes via the kubelet.
In our setup we also use the “master node” as a “worker node” as well. This means the core functions will run on the same node as the application containers. In a production grade setup these are typically separated but for a lab environment it is perfect.
It is important that not Kubernetes “runs” the containers but it is containerd’s responsibility. However think to Kubernetes like the boss who orders the minions to do the work.
Note, in Kubernetes the smallest deployment unit is called Pod. One Pod can contain 1 or more containers. Kubernetes manages Pods … but not containers. In the next chapters, I will use containers just for simplification.
Containerd
Webpage: https://containerd.io/

Containerd is responsible to run our containers on the given server. While Kubernetes runs as a cluster and has an overview of multiple nodes, till Containerd runs on each server independently. It has the local responsibility to run the container once it got the order from Kubernetes (via the kubelet).
Containerd will pull the container image from the Registry and will setup the kernel isolated environment to run the container.
Calico

Our containers will need some special resources like Network or Storage. As I mentioned Kubernetes is the boss and it doesn’t make its hand dirty with details. But the good news is the K8s is a pluggable system which means that we can attach our own resource provider … like Calico which is a network module. The connection interface is called CNI: Container Network Interface.
Calico is responsible for the network connectivity. Once K8s creates a container then it will trigger Calico to assign an IP address to the container. Calico is installed locally to the severs and works together with the Kubelet.
There are different ways how to configure Calico. We can use it assign routable IP addresses to our containers or we can use it to create an overlay network. In the first case the containers get a unique IP address which is available in our network and the containers can be reached directly. The overlay network means that only our nodes have routable IP addresses and our containers get an internal IP address. If the containers would like to talk to each other then the nodes will manage the communication (via routing or via tunneling –> it depends on the CNI modul). Both solutions have their own advantages and disadvantages.
In our setup we will use a standard overlay network so the containers will have internal IP address and won’t be reachable from outside of our cluster.
MetalLB
Webpage: https://metallb.universe.tf/

Once we run our containers inside our cluster then we would like to expose their services to the external world as well. In a typical on-premise environment this can be done by a Nodeport solution. If we run our cluster in one of the public cloud then we can expose the services via a Loadbalancer which will create a routable IP address to front of our containers.
MetalLB is a virtual loadbalancer which can run on bare metal servers (like our use-case). Once we will expose a container service then we can use this loadbalancer to assign an external routable IP address to our service. This solution has the advantage compared to the nodeport that we can distinguish different services by their IP addresses. For example if we have 2 webpages then we can use 2 IP addresses like 192.168.0.140:80 and 192.168.0.141:80 to expose the services. It makes the networking solution more pretty. If we would like to expose these services via the Nodeport way then we shall use the node’s IP address and a unique port number like: 192.168.0.128: 30000 and 192.168.0.128:30001 (only the port number is different).
In our setup MetalLB will manage and assign the IP address to those containers what we will expose via a Kubernetes Service.
Note that if you deploy this setup in the public cloud then MetalLB won’t work. In the cloud, the cloud provider assigns the IP addresses to the VMs and hence MetalLB cannot just take the IP address and assign to the pods.
NFS Persistent Volume
Webpage: https://github.com/kubernetes-sigs/nfs-subdir-external-provisioner
One of the cloud native principle is to NOT store anything in your container. Here the solution is to attach an external “Persistent Volume” to our container where we can safely store our data. Of course Kubernetes cannot store this data but it has an interface to use our own backed (similar to the network) which is called CSI: Container Storage Interface.
We can use our most favorite storage solution which will manage the data in the background. In a production grade on-premise environment these are typically Ceph, Cinder or vendor specific adapters like NetApp, FlexVolume, vSphere, etc. In public cloud, each provider has its own driver to handle the native storage solutions.
In our mini lab environment any of these solution would be overkill. There are several smaller solutions (of course without any redundancy) which can provide the functionality to us and in our case this will be the NFS Subdir provisioner. On the master node we setup a standard NFS share and then we deploy the provisioner to the K8s cluster. Once a container requires a storage then the Provisioner will create a new folder inside our NFS share and it attaches it to the container.
Congratulations
Big Kudos to you if you arrive to this point and everything is working. Very likely this is one of the most complex deployment what you will meet here. So don’t give up, go to the next exercise and keep on. 😉